Ever wondered how to turn an ordinary kitchen into a stunning showstopper? Kitchen pop ceiling designs are rapidly gaining popularity because they add personality, style, and a touch of luxury to one of the most important spaces in your home. Whether it’s bold colors, textured panels, or eye-catching lighting features, a creative ceiling can completely transform the vibe of your kitchen, making it more inviting and visually interesting. These designs are not just decorative—they can also reflect your personality and elevate your interior aesthetic.
In this article, you’ll find a treasure trove of inspiring ideas and practical tips to elevate your kitchen with pop ceiling designs. From modern geometric patterns to warm wooden accents and artistic installations, there’s a versatile range of options to suit every taste and style. Get ready to discover how you can add depth, dimension, and a personalized touch to your space, turning your ceiling into a stunning focal point that impresses every guest!
Adding bold color accents to your kitchen ceiling transforms a mundane space into a lively, energetic environment that instantly captures attention. This approach is perfect for homeowners eager to make a statement and infuse personality into their kitchen design.
Imagine a crisp white ceiling suddenly painted in a deep navy blue or a vibrant emerald green, creating a striking contrast with the surrounding cabinetry and walls. The color choice can be bold yet balanced—think warm terracotta or lively mustard—adding warmth and cheerfulness. The textured surface of the paint, such as matte or semi-gloss, enhances the richness of the hue, while the surrounding neutral tones keep the look cohesive. The ceiling becomes a focal point that energizes the entire room, making it feel more dynamic and inviting. The visual impact is heightened with complementary pendant lights or layered lighting that accentuate the bold color, adding depth and dimension.
Getting started is simple and budget-friendly. First, clean and prep your ceiling surface thoroughly. Use painter’s tape to protect adjacent walls. Choose a high-quality, ceiling-appropriate interior paint in your selected bold hue—options include matte, satin, or semi-gloss finishes. For a more refined look, consider using faux painting techniques like color washing or ombré effects. Apply the paint with a roller for smooth coverage, and use brushes for edges and corners. Allow ample drying time, and finish with a clear sealant if desired for added durability. This easy upgrade can be completed in a weekend, giving your kitchen an instant style boost.
2. Textured Ceiling Panels for Depth and Dimension
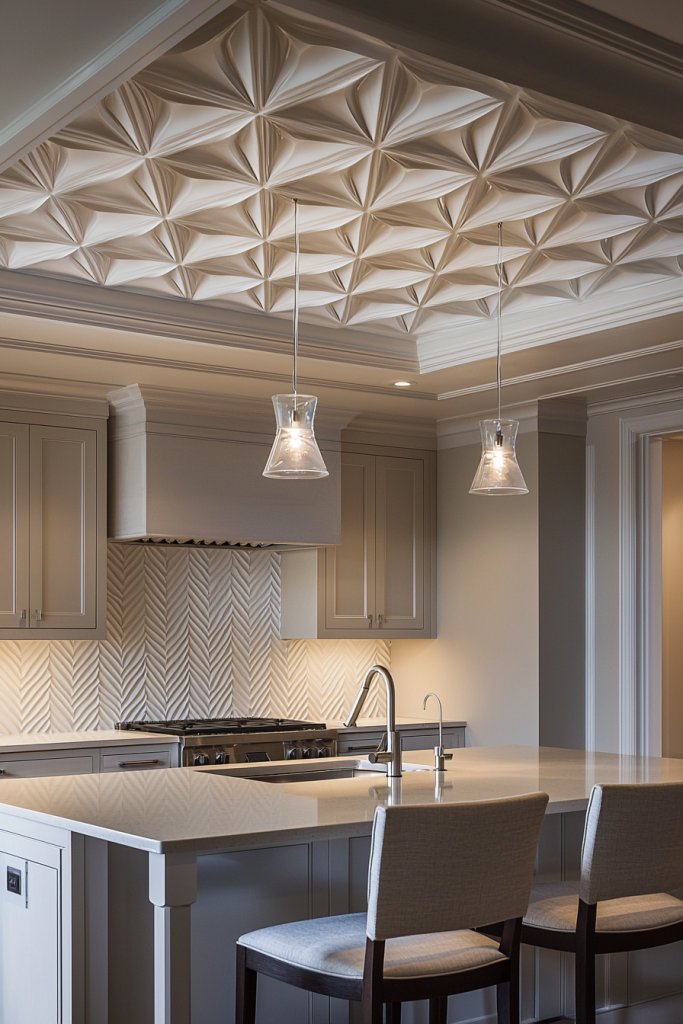
Textured ceiling panels are a fantastic way to add depth, tactile interest, and a sense of craftsmanship to your kitchen ceiling. They turn a flat surface into a work of art, creating a layered visual experience that draws the eye upward.
Picture embossed wallpaper with swirling floral patterns or 3D wall panels made of foam or wood that mimic natural textures like stone, brick, or wave-like ridges. These panels come in various finishes—matte, gloss, or satin—allowing you to match or contrast with your overall decor. The textured surfaces catch light differently throughout the day, casting gentle shadows that bring the ceiling to life. Their tactile quality invites touch and curiosity, adding an unexpected layer of sophistication to your space. When paired with subtle lighting—such as recessed or track lights—these panels become a captivating focal point that adds personality and charm.
Implementing textured ceiling panels is straightforward. Start by measuring your ceiling and selecting the appropriate panels—vinyl, foam, or wood options depending on your budget and style. Clean the surface thoroughly, then attach the panels using adhesive or mounting clips, following manufacturer instructions. For a seamless look, align the patterns carefully. Finish with a coat of sealant or paint if needed to match your desired color scheme. This DIY-friendly project can be completed in a few hours, transforming your kitchen into a textured masterpiece.
3. Metallic Finishes for a Modern, Luxurious Look
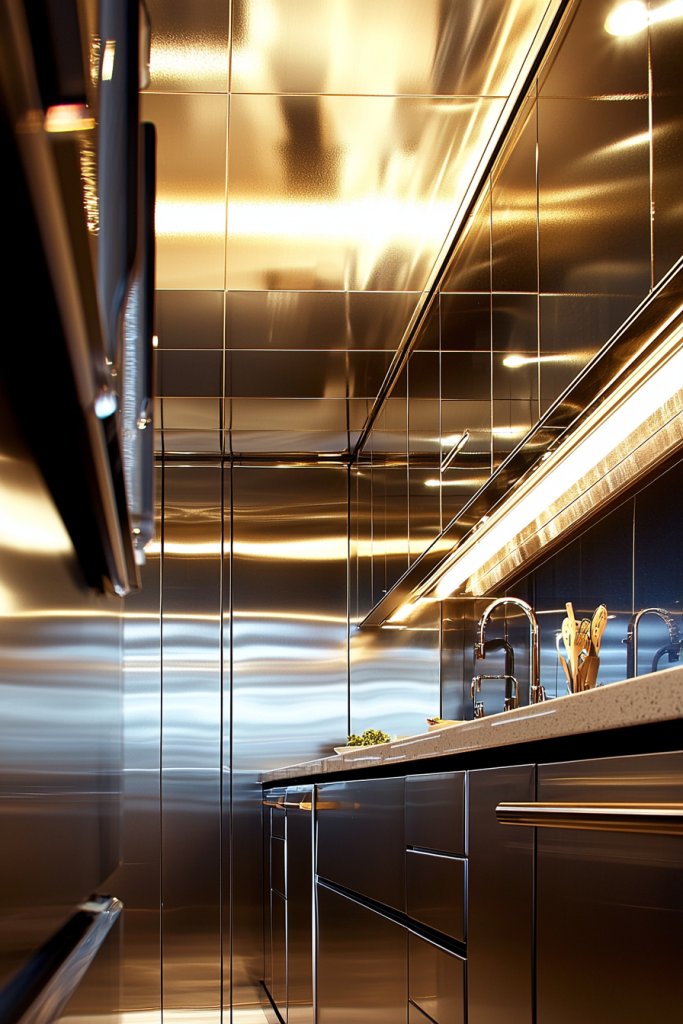
Metallic finishes on your kitchen ceiling add a touch of glamour and sophistication, creating a modern, high-end atmosphere that feels both sleek and inviting. The shimmer and reflective qualities of metallic paints or foil accents instantly elevate the space.
Visualize a ceiling painted with shimmering gold or silver or adorned with metallic foil panels that catch the light from your fixtures, casting a soft glow across the room. These finishes can be applied as a full coat of metallic paint or used as accents—stripes, geometric shapes, or borders—to add visual interest without overwhelming the space. The reflective surface amplifies natural and artificial light, making the room appear larger and more luminous. The result is a chic, contemporary aesthetic that pairs beautifully with minimalist cabinetry, glossy tiles, and sleek hardware, giving your kitchen an upscale vibe.
To achieve this look, start with a clean, primed ceiling. Use high-quality metallic paint—available in spray or brush-on varieties—for smooth, even coverage. For a more dramatic effect, consider applying metal foil or adhesive-backed metallic sheets in geometric patterns or borders. Use painter’s tape to create clean lines and shapes, and carefully smooth out bubbles or wrinkles. Finish with a clear protective coat for durability. This project is accessible for DIY enthusiasts and offers a stunning upgrade that shimmers day and night.
4. Recessed Lighting with Ceiling Design Elements
Incorporating recessed lighting with decorative ceiling features seamlessly combines functionality and style, providing optimal illumination while enhancing your kitchen’s design aesthetic. Layered lighting highlights architectural details and creates a warm, inviting atmosphere.
Envision a ceiling with strategically placed recessed lights embedded into a textured or painted surface, complemented by subtle design elements like coves, molding, or decorative panels. These lights can be dimmable, allowing you to adjust the ambiance for cooking, entertaining, or relaxing. The combination of light and design elements emphasizes specific areas—such as a cooking zone or breakfast nook—while adding depth through shadows and highlights. The clean, minimalist look of recessed lighting pairs well with modern, transitional, or even rustic styles, adding a sleek sophistication to your kitchen ceiling.
Getting started involves planning your lighting layout. Mark the positions of your recessed fixtures, considering the room’s size, work zones, and aesthetic focal points. Install the lights following manufacturer instructions, ensuring proper wiring and insulation. Enhance the effect with ceiling design features like crown molding, false beams, or decorative panels—these can be painted or finished with trim to add interest. Use a dimmer switch to control brightness and mood. This integrated approach offers both practical illumination and a polished, designer look with relatively straightforward installation.
5. Suspended Ceiling Clouds for a Soft, Elegant Effect
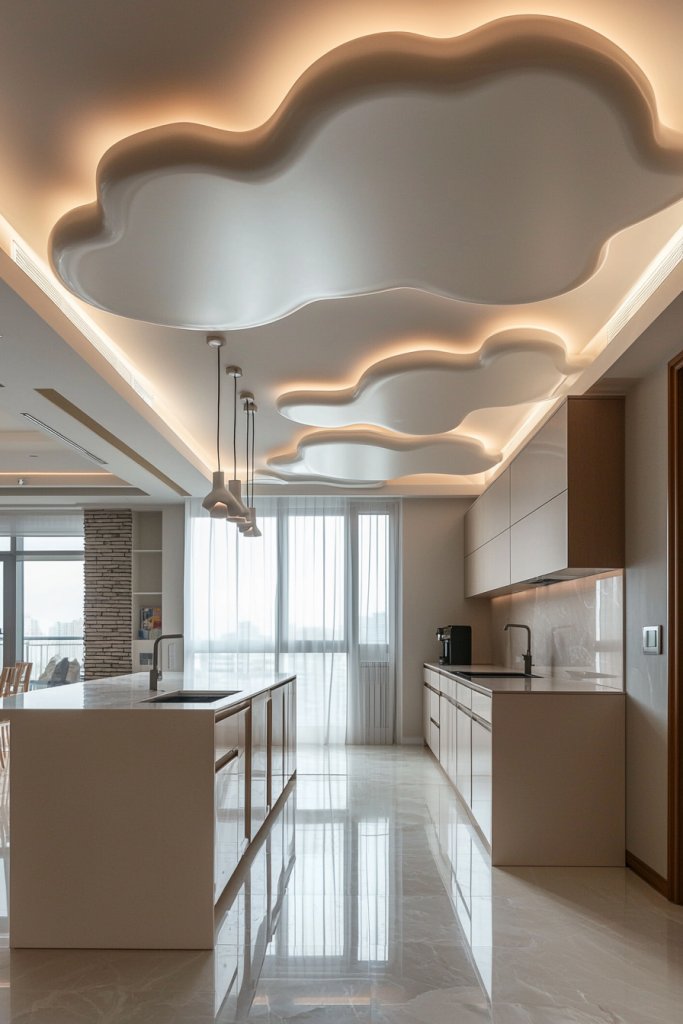
Suspended ceiling clouds introduce a soft, sculptural element that adds volume and a touch of whimsy to your kitchen, making the space feel more open and inviting. These floating panels create a sense of movement and softness, contrasting beautifully with sleek cabinetry and surfaces.
Imagine large, fluffy, cloud-like forms made from lightweight materials such as foam, fabric, or acoustical tiles, suspended from the ceiling at varying heights. They are often finished in soft, neutral tones—cream, white, or pastel shades—that reflect light gently, evoking serenity and elegance. The clouds can be rounded or abstract in shape, with some featuring integrated lighting or textured surfaces that add visual interest. As natural light filters through or artificial lighting is layered underneath, the ceiling appears dynamic and airy. This design creates a calming, dreamy atmosphere that transforms your kitchen into a sophisticated yet playful space.
Creating ceiling clouds is achievable with basic tools and materials. Measure your space and choose lightweight panels or foam shapes—these can be purchased pre-made or crafted from DIY-friendly materials. Attach them to the ceiling using strong brackets, wires, or cable systems, ensuring secure suspension. Finish with a coat of paint in soft hues to match your decor. Incorporate LED strip lighting underneath or within the clouds for a gentle glow. With some planning, this innovative feature can be assembled over a weekend, offering a stunning focal point that elevates your kitchen’s style and ambiance.
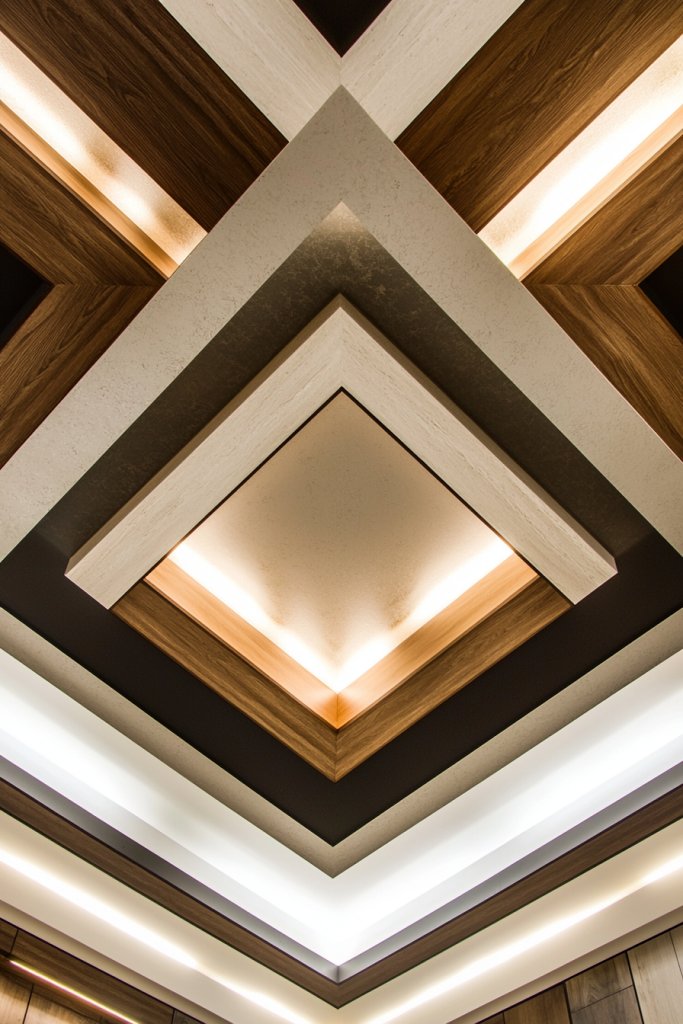
6. Geometric Patterns and Shapes for a Contemporary Edge
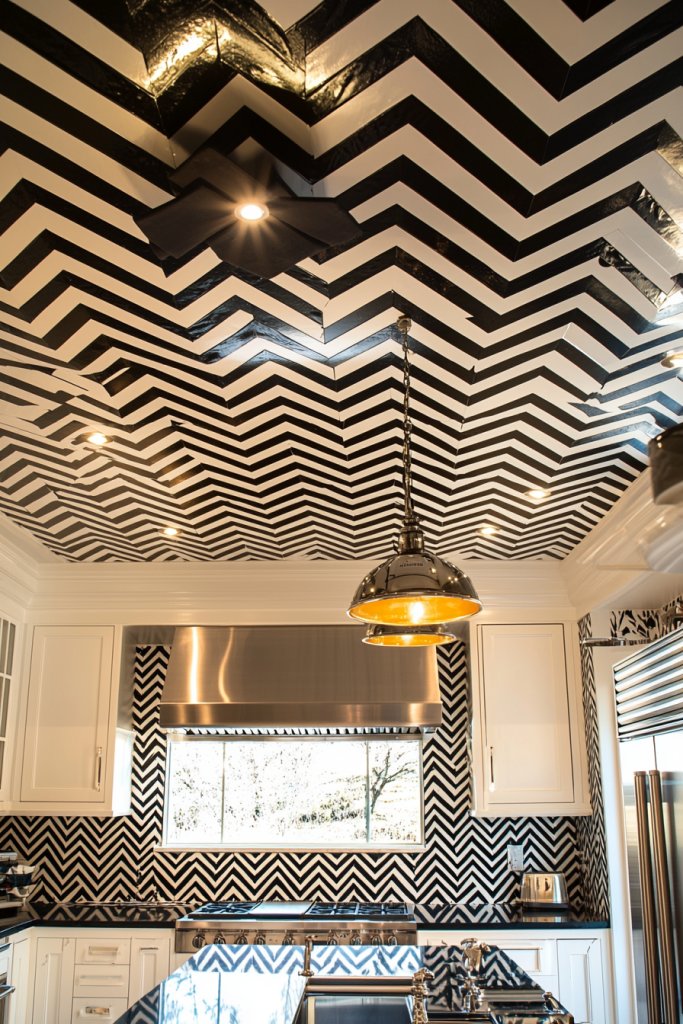
Adding geometric patterns and shapes to your kitchen ceiling instantly introduces a modern and dynamic vibe that catches the eye. These designs can range from bold chevrons and zigzags to intricate hexagonal or diamond layouts, creating a sense of movement and visual intrigue. Using contrasting colors or subtle shades, you can craft a ceiling that feels sophisticated yet playful, making the space appear more expansive and stylish. Geometric elements work well with minimalist, industrial, or even eclectic decor themes, allowing you to customize the look to match your personal aesthetic.
Imagine a ceiling painted with sharp, clean lines forming a tessellated pattern in monochrome tones—black and white triangles, for example—adding a crisp, contemporary feel. Alternatively, large, irregular polygon shapes in soft pastel shades or metallic finishes can create a more organic, artistic effect. The visual impact is heightened by strategic lighting, such as recessed spotlights illuminating the angles and shapes, emphasizing the geometric depth. This approach offers a fresh, modern twist that elevates your kitchen from ordinary to extraordinary, blending form and function seamlessly.
To implement this trend, start by choosing your preferred shapes and color palette. Use painter’s tape or stencil guides to carefully outline your design, ensuring crisp lines and symmetry. Paint with high-quality interior latex in your chosen shades, or opt for peel-and-stick tiles or decals for a quicker, less permanent option. For a more luxurious finish, consider gold or metallic foil accents applied within the shapes. Keep lighting in mind—installing recessed LEDs or track lights can further highlight your geometric patterns, making your ceiling a true focal point.
7. Wooden Beams or Faux Wood Accents for Warmth
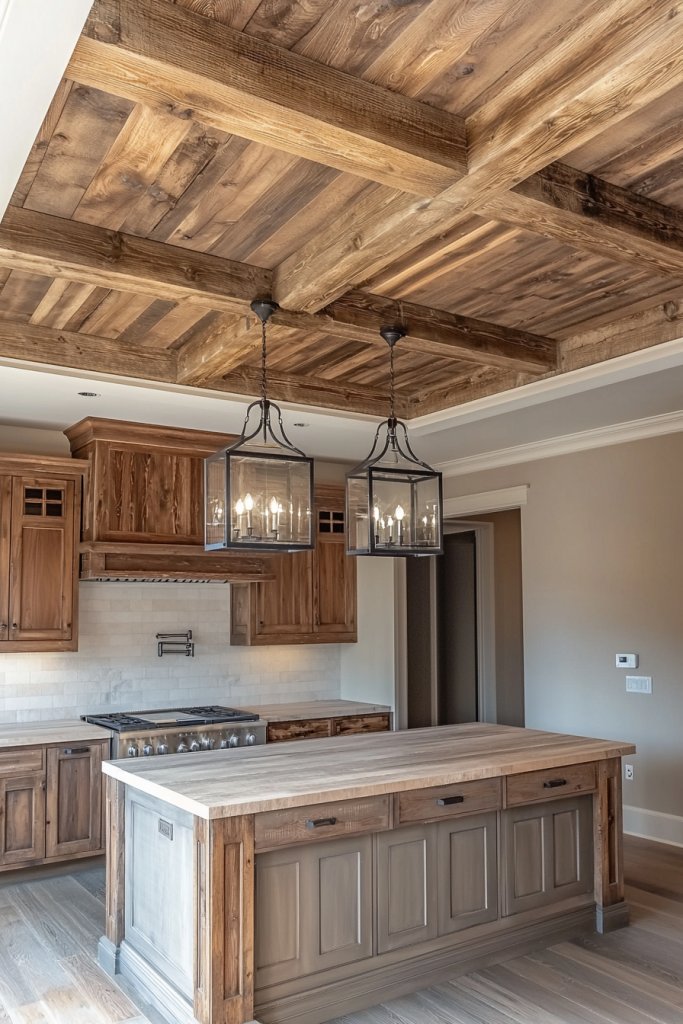
Incorporating wooden beams or faux wood accents brings a cozy, rustic charm to your kitchen ceiling, balancing modern design with natural warmth. Real wooden beams—whether stained in rich browns or weathered for a vintage look—can be installed across the ceiling to evoke a farmhouse or lodge ambiance. If you prefer a lighter, more uniform appearance or want a cost-effective alternative, faux wood panels or veneer planks offer the same aesthetic with easier installation and less weight.
Picture a ceiling with dark-stained wooden beams running parallel, creating a striking contrast against a crisp white ceiling. The natural grain, knots, and texture of the wood add tactile richness, while the scent of the timber enhances the sensory experience. Alternatively, faux wood panels in a lighter, weathered finish can mimic the rustic appeal without the structural work, offering a seamless, uniform look. Whether real or faux, these accents soften the overall space, making it feel inviting and warm—perfect for a family-centered kitchen.
To achieve this look, measure your ceiling space carefully and select the appropriate size and number of beams or panels. For real wood, choose high-quality, sustainably sourced lumber, and consider staining or sealing it for durability. Faux options are available as peel-and-stick panels or tongue-and-groove planks that can be easily attached with adhesive or nails. For added authenticity, incorporate decorative metal brackets or wrought iron accents at the beam joints. This transformation is achievable with basic carpentry skills or professional help, resulting in a cozy, timeless kitchen design.
8. Mosaic Tile Ceilings for Artistic Flair
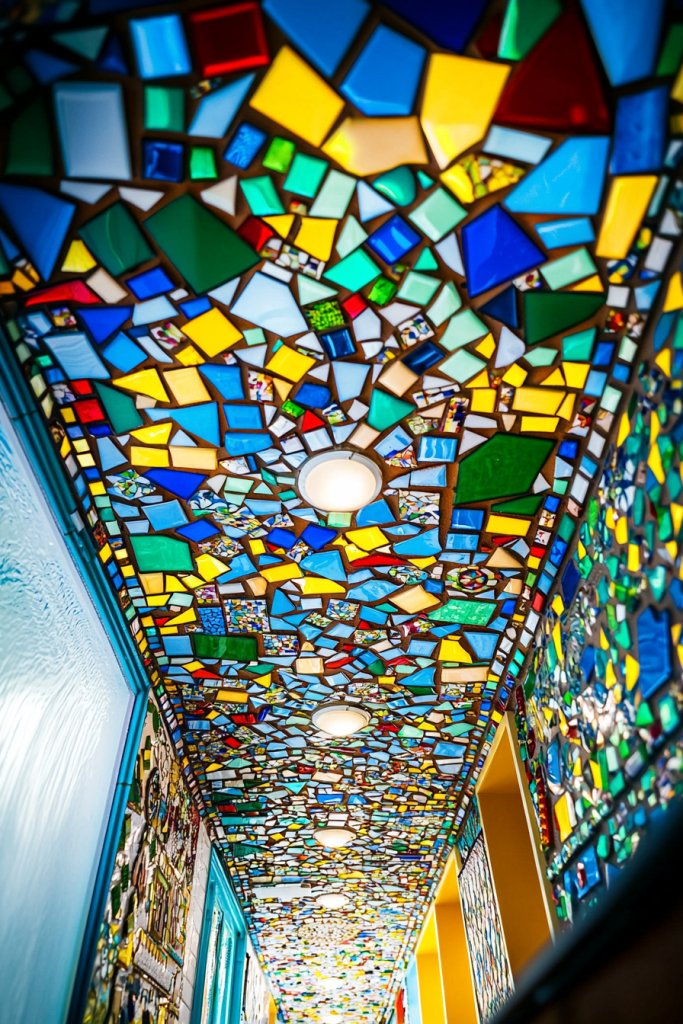
A mosaic tile ceiling transforms your kitchen into an artistic sanctuary, turning an often-overlooked space into a stunning centerpiece. This approach involves covering the ceiling with small, colorful tiles—ceramic, glass, or stone—arranged in intricate patterns, abstract designs, or even murals. The shimmering surfaces catch and reflect light, creating a lively, textured surface that adds depth and personality. Bright, jewel-toned mosaics evoke vibrancy, while monochrome or metallic options lend a sophisticated, modern edge.
Visualize a ceiling adorned with tiny, iridescent tiles arranged in a swirling, floral, or geometric pattern. The combination of colors, textures, and reflective qualities creates a captivating visual, especially when accentuated with strategic lighting such as tiny embedded LEDs or pendant fixtures. The tactile surface adds a sensory dimension, inviting touch, and the vibrant colors energize the kitchen ambiance. This artistic flair elevates your space, making it uniquely yours and perfect for creative cooks and design enthusiasts alike.
Getting started is straightforward: select your tile material and design pattern, then measure your ceiling to determine the quantity needed. Prepare the surface by cleaning and leveling it, then apply a suitable tile adhesive. Use a grout that complements your tiles’ color and seal the finished mosaic to protect it. For easier installation, consider pre-cut mosaic sheets or peel-and-stick tile options. With patience and attention to detail, this DIY project can be completed in a weekend, turning your ceiling into an awe-inspiring work of art.
9. Drop Ceiling with Decorative Borders
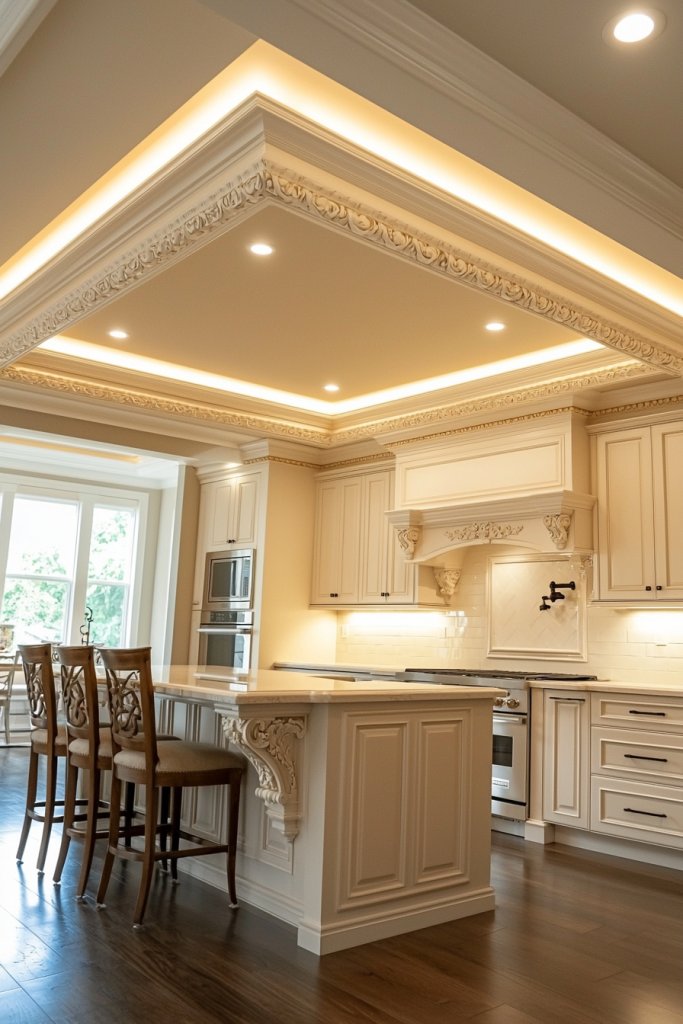
A drop ceiling with decorative borders offers a structural yet stylish solution to enhance your kitchen’s architectural appeal. This design involves installing a secondary, lowered ceiling—often with a grid system—that creates a layered look. The borders or moldings framing the drop ceiling add an elegant, defined edge, giving your space a subtle, classic sophistication. It’s especially effective in kitchens with high ceilings or open-plan layouts, adding visual interest and a sense of enclosure.
Imagine a ceiling with a smooth, painted surface, edged with ornate crown molding or decorative trim. The layered effect draws the eye upward, creating a sense of depth and dimension. You can also incorporate recessed lighting or cove lighting within the drop ceiling to add soft, ambient illumination. This approach balances formality with versatility, working well with both contemporary and traditional aesthetics, and providing an opportunity to hide imperfections or install additional lighting discreetly.
To implement, first measure your ceiling and choose a suitable drop ceiling system—either a DIY kit or professional installation. Attach the grid or framing securely to the existing ceiling, then install your chosen ceiling material, such as drywall or decorative panels. Finish the edges with decorative borders or crown molding, which can be painted, stained, or left natural. Add lighting fixtures or LED strips within the layered sections for added ambiance. This project is manageable with basic carpentry skills and offers a refined, architecturally interesting upgrade to your kitchen ceiling.
10. Mirror Panels to Reflect Light and Expand Space
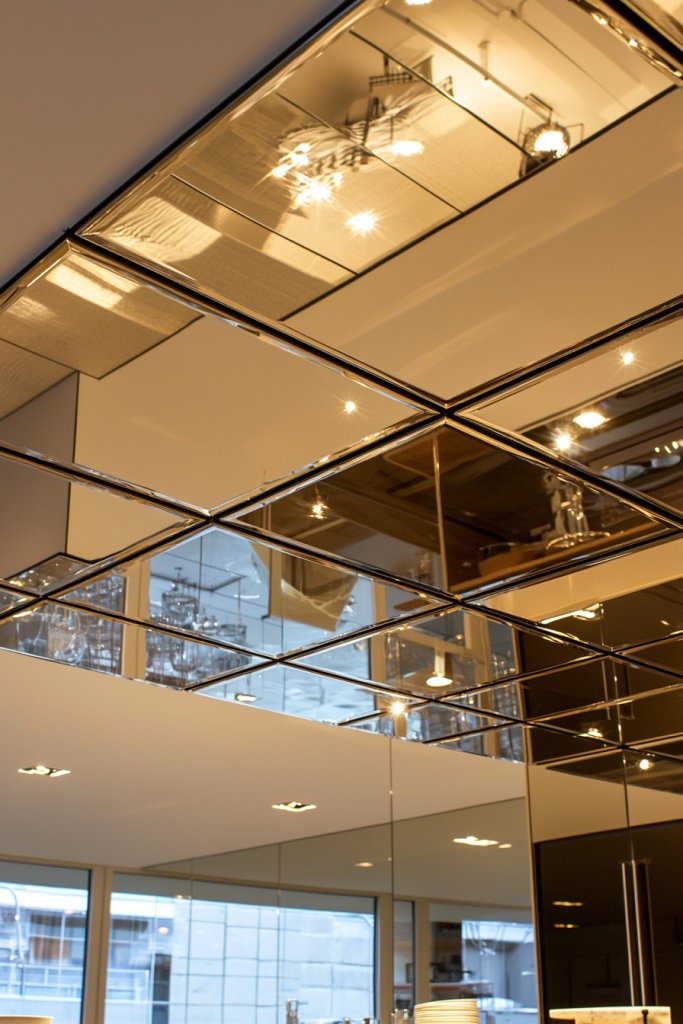
Using mirror panels on your kitchen ceiling is an innovative way to amplify light and create the illusion of a larger, more open space. Mirror tiles or large reflective panels reflect both natural and artificial light, brightening the room and giving a sense of height and spaciousness. This aesthetic choice is especially effective in smaller kitchens or those with limited windows, transforming the ceiling into a visual extension of the room.
Picture a ceiling covered with sleek, frameless glass or mirrored mosaic tiles, perfectly aligned for a seamless look. The reflective surface bounces light around, making the space feel airy and less confined. Additionally, mirror panels can enhance the visual appeal by adding a glossy, contemporary touch that pairs well with minimalist, industrial, or modern decor. When combined with layered or accent lighting, the reflective effect becomes even more dramatic, creating a lively, luminous environment.
For installation, choose high-quality, shatter-resistant mirror panels or tiles designed for interior use. Prepare the ceiling surface by cleaning and leveling it, then affix the panels with appropriate adhesive or mounting hardware. Ensure safety by rounding edges and using non-toxic, low-odor glue. For a less permanent option, decorative mirrored wall decals or adhesive sheets can be applied with less effort. Proper lighting placement, such as recessed or track lights, will enhance the reflective qualities, turning your ceiling into a captivating focal point that elevates your entire kitchen experience.
11. Stenciled or Painted Ceiling Designs for Personal Touch

Adding a stenciled or painted design to your kitchen ceiling is a fantastic way to infuse personality and creativity into your space. It transforms a plain surface into a focal point that reflects your style, whether it’s playful, elegant, or eclectic. This approach allows for endless customization options, making your kitchen truly one-of-a-kind.
Imagine a ceiling painted in a soft, matte shade like muted teal or warm beige, adorned with intricate stenciled motifs such as floral patterns, geometric shapes, or vintage-inspired designs. The patterns can be subtle, using slightly darker hues for a tone-on-tone effect, or bold, contrasting colors to create a statement. The textured surface of the paint or stencil adds depth, while a glossy finish on specific elements can catch the light, giving the ceiling a dynamic visual appeal. The overall effect is both charming and sophisticated, elevating the entire kitchen ambiance with a personal touch.
Recreating this look is simple and budget-friendly. Start with a base coat of your chosen color—light neutral tones work well as a canvas. Select a stencil pattern that matches your aesthetic, available at craft stores or online. Use painter’s tape to secure the stencil, then apply a contrasting or complementary paint color with a small roller or stencil brush. For added precision, use a foam pouncer or sponge to dab paint into detailed areas. Finish with a clear matte or semi-gloss sealant to protect your design and ensure longevity. This DIY project offers a delightful way to showcase your personality and add charm to your kitchen ceiling.
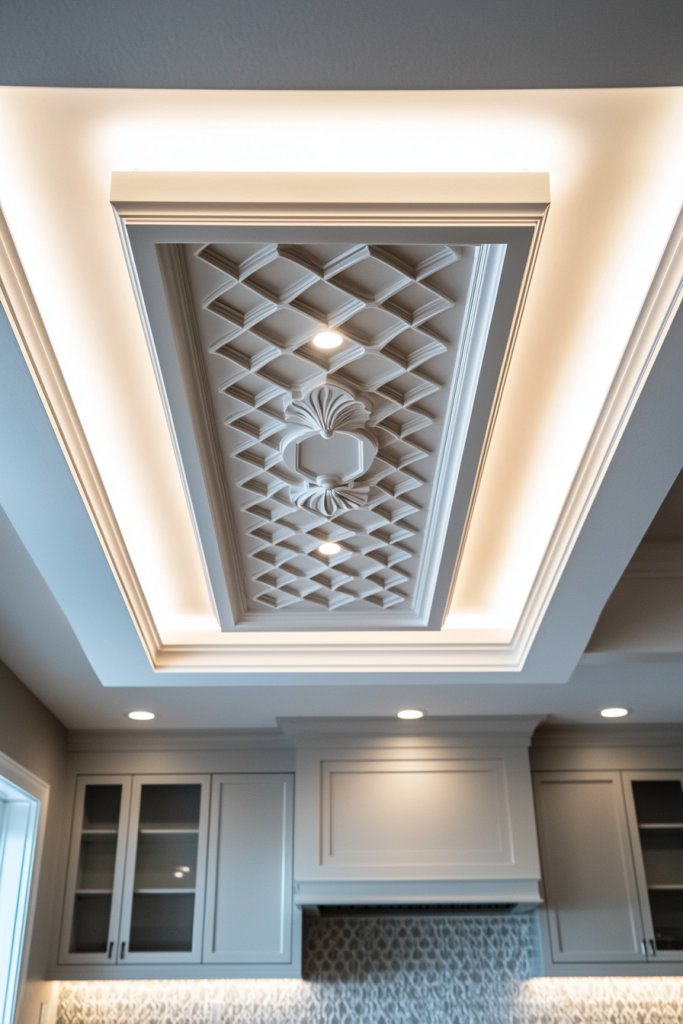
12. Faux Coffered Ceilings for Classic Elegance
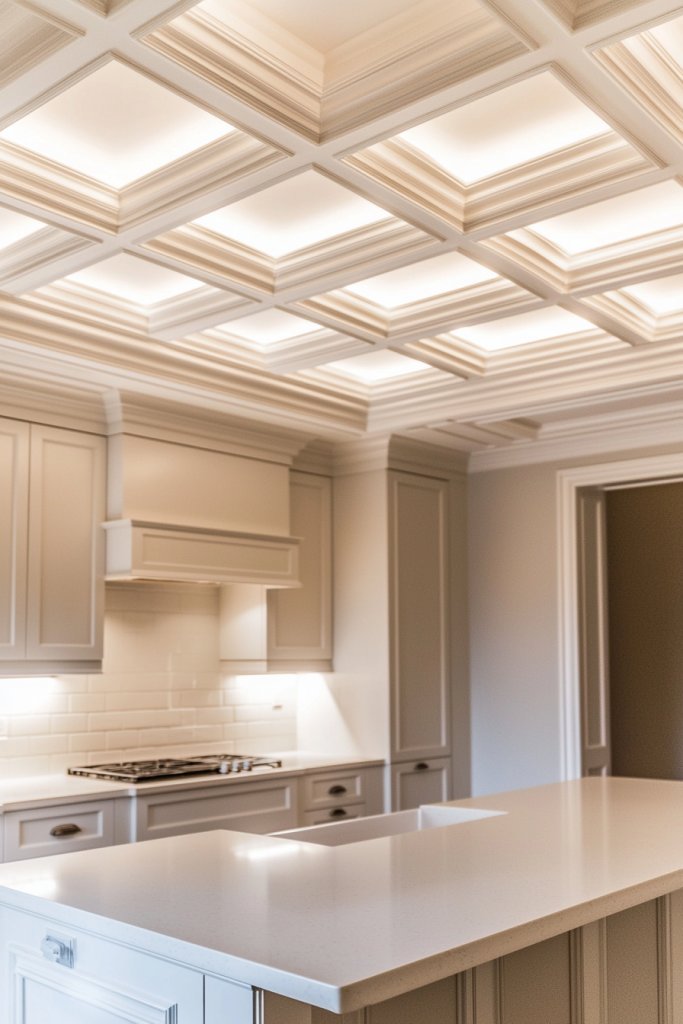
A faux coffered ceiling introduces timeless architectural elegance to your kitchen without the extensive work of constructing real coffered panels. This design mimics the look of traditional grid patterns with minimal effort, instantly elevating your space with a refined, classic feel.
Picture a ceiling divided into a series of rectangular or square sections, framed with painted moldings or decorative strips. These grid lines are typically painted in a contrasting color such as white on a darker background or a refined metallic tone for a more luxurious effect. The recessed areas within the grid can be painted in a soft, matte shade or finished with subtle wallpaper or textured paint to add visual interest. This layered look creates the illusion of depth and craftsmanship, giving your kitchen a sophisticated, timeless charm that pairs beautifully with both modern and vintage decor.
To implement this style, start by measuring your ceiling to determine the size and number of panels you want. Use painter’s tape and a level to mark out the grid lines accurately. Apply a base coat of paint across the entire ceiling, then carefully paint or tape off the grid sections. Use a contrasting color or finish for the moldings—white or metallic gold are popular choices. For a more polished look, you can add faux molding strips or adhesive corner trims. This project is accessible for DIY enthusiasts and instantly adds a polished, elegant touch to your kitchen’s ceiling.
13. Fabric-Covered Ceiling Panels for Soft Texture
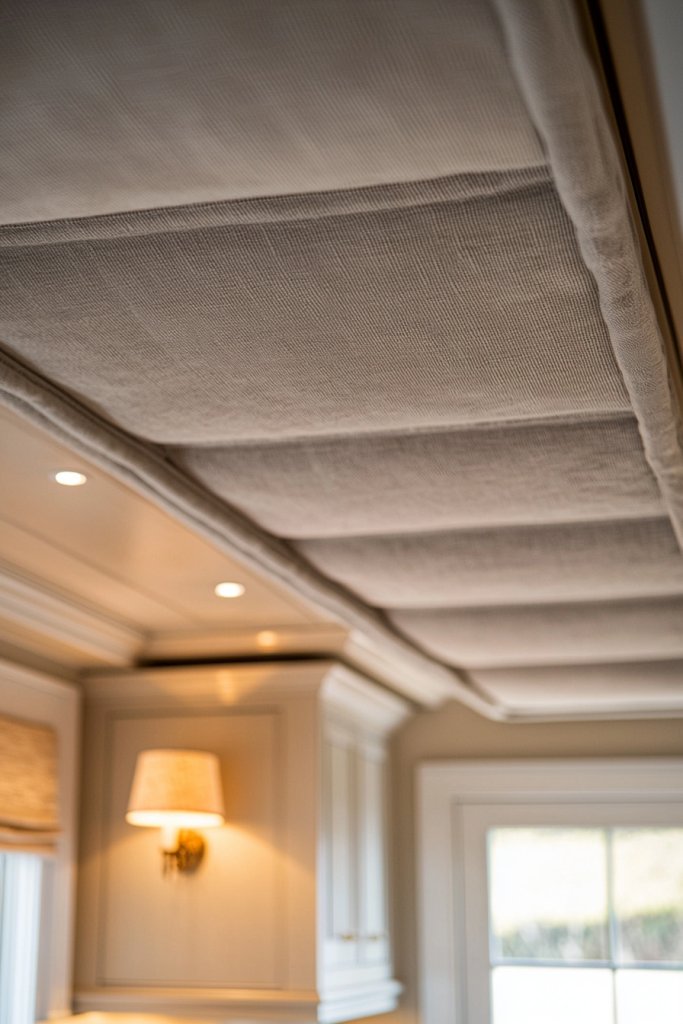
Covering your kitchen ceiling with fabric panels introduces a soft, inviting texture that enhances comfort and adds a touch of luxury. This creative idea softens the acoustics and creates a cozy, warm atmosphere perfect for family gatherings or entertaining guests.
Visualize lightweight fabric panels in neutral tones like cream, blush, or soft gray, stretched smoothly across the ceiling with a subtle, elegant drape. The fabric can be textured with linen, velvet, or burlap, adding tactile richness and visual depth. To keep it sleek, mount the fabric panels on a grid or secure them with discreet adhesive or hooks at the edges. The fabric’s gentle folds and subtle patterns create a layered, plush appearance, giving your kitchen a chic, boutique hotel vibe. When illuminated by warm lighting, the fabric’s softness enhances the overall ambiance, making the space feel intimate and welcoming.
Getting started is straightforward. Choose a durable, washable fabric suited for indoor use, and cut it to match your ceiling dimensions. Use a staple gun or adhesive strips to attach the fabric along the edges or to a lightweight frame. For a cleaner look, opt for fabrics with a slight sheen or subtle patterns that complement your decor. Ensure proper ventilation and avoid excess moisture to maintain the fabric’s appearance. This DIY project transforms your ceiling into a plush, textured feature that elevates your kitchen’s style while adding comfort and acoustic benefits.
14. Patterned PVC or Vinyl Ceiling Coverings for Easy Maintenance

Patterned PVC or vinyl ceiling coverings are a practical yet stylish choice for kitchens, combining durability with eye-catching design. They’re perfect for homeowners seeking a low-maintenance solution that doesn’t sacrifice aesthetic appeal.
Envision a ceiling dressed in waterproof vinyl or PVC panels with vibrant patterns such as geometric motifs, floral prints, or abstract designs. These panels are often available in self-adhesive or peel-and-stick varieties, making installation straightforward. The textured surface can mimic more expensive materials like textured wallpaper or stone, but with the added benefit of being water-resistant and easy to clean. The patterns draw the eye upward, adding visual interest and personality to your kitchen without the need for frequent upkeep. When paired with clean, bright lighting, these coverings create a modern, fresh atmosphere that’s both functional and fashionable.
To install, start by measuring your ceiling space and selecting patterned panels that fit your style and budget. Clean the surface thoroughly to ensure adhesion, then peel off the backing and carefully press the panels into place, aligning patterns for a seamless look. For larger spaces, you may need to trim panels with scissors or a utility knife. Regular wiping with a damp cloth keeps the surface looking new, making this an ideal choice for busy kitchens. This approach delivers a stylish, durable ceiling that remains beautiful and easy to maintain over time.
15. LED Strip Lighting for a Contemporary Glow
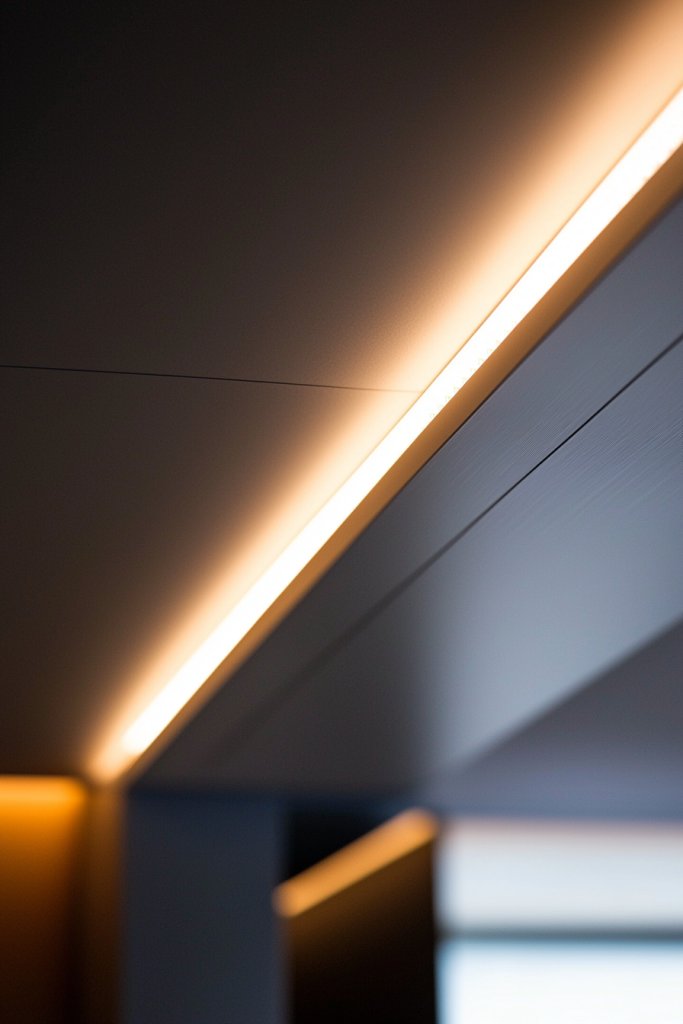
Incorporating LED strip lighting into your kitchen ceiling design creates a sleek, modern glow that enhances both ambiance and functionality. This flexible lighting solution allows you to customize the mood and highlight architectural features with ease.
Imagine a ceiling outlined with thin, diffused LED strips tucked into recessed grooves or along the edges, emitting a soft, even glow. The strips can be set to various color temperatures—from warm white for cozy evenings to cool white for bright, task-oriented lighting. For added drama, install color-changing LED strips that can shift hues via a remote or app, transforming your kitchen’s atmosphere instantly. The lighting accentuates ceiling details such as coffered panels or textured finishes, creating depth and visual interest. When integrated with dimmers, LED strips offer full control over brightness, making your space adaptable for different occasions.
Getting started is simple. Choose high-quality LED strips compatible with your power source and controller. Measure the perimeter of your ceiling to determine the length needed, then mount the strips using adhesive backing or mounting channels for a clean look. Connect the strips to a power supply and install a dimmer or controller if desired. For safety, ensure all wiring is concealed and compliant with electrical codes. This upgrade is DIY-friendly and provides a contemporary, energy-efficient way to transform your kitchen ceiling into a luminous centerpiece that elevates your entire space.
16. Artistic Sculptural Ceiling Installations
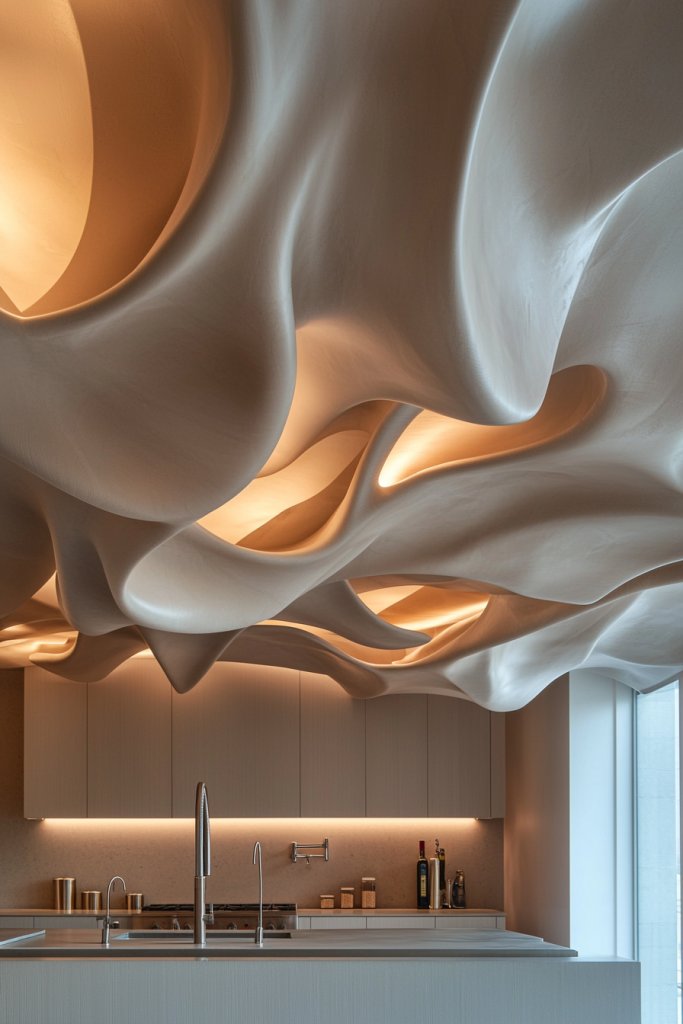
Transform your kitchen ceiling into a stunning focal point with artistic sculptural installations that blend creativity and craftsmanship. These bold designs turn ordinary ceilings into eye-catching art pieces, adding an unexpected touch of sophistication and personality. Whether you prefer abstract forms, flowing organic shapes, or modern geometric sculptures, this idea elevates your space from functional to truly artistic.
Imagine a ceiling featuring a large, handcrafted sculpture made from lightweight materials like fiberglass or resin, painted in metallic gold or matte black for dramatic contrast. The sculpture could resemble swirling clouds, interlocking rings, or abstract waves that add depth and movement overhead. Surrounding these focal points, subtle recessed lighting highlights the contours, creating shadows and highlights that change with the time of day. The overall effect is a dynamic, textured surface that invites curiosity and admiration, making your kitchen uniquely memorable.
To implement this idea, start by selecting a design concept that complements your kitchen’s style—be it modern, rustic, or eclectic. You can commission a local artist or explore DIY options with foam, papier-mâché, or lightweight plastic for a manageable project. Use sturdy ceiling anchors or hooks to securely suspend sculptures or installation elements. Finish with a coat of durable, washable paint, and install subtle LED spotlights or strip lighting to enhance the sculptural details. With a little creativity and some basic tools, you can create a captivating ceiling that doubles as a piece of art.
17. Multi-Layered Ceiling Designs with Contrasting Elements
Creating a multi-layered ceiling design with contrasting materials and colors adds depth and visual intrigue to your kitchen’s overhead space. This approach combines different textures, finishes, and hues—like a painted surface layered over wood panels or a suspended false ceiling with contrasting trim—to produce a sophisticated, architecturally rich look. It’s perfect for adding dimension and making a bold style statement.
Visualize a ceiling with a recessed central panel painted in a soft matte white, surrounded by a border of dark stained wood beams or faux wood panels. The contrast between the smooth paint and the warm, textured wood creates a layered effect that draws the eye upward. Incorporate contrasting lighting—such as warm LED strips within the recess and cool spotlights on the edges—to emphasize the layers and add ambiance. This layered approach lends a sense of depth, making the ceiling appear taller and the kitchen more dynamic, all while maintaining a balanced, cohesive aesthetic.
To bring this concept to life, start by measuring your ceiling to determine the size and placement of each layer or panel. Use materials like pine or oak wood veneer, PVC panels, or plywood for the contrasting elements, choosing finishes that suit your style and budget. Install the layers in sequential steps—first the main ceiling, then the recessed or suspended panels—using appropriate fasteners and supports. Finish with paint, stain, or lacquer, and add layered lighting fixtures to highlight the different textures. With careful planning, this multi-layered design can transform your kitchen ceiling into a striking architectural feature.
Conclusion
With so many creative options—from bold colors and textured panels to metallic finishes and artistic installations—your kitchen ceiling can truly become a stunning focal point. Whether you prefer modern geometric patterns, warm wooden accents, or soft fabric textures, these ideas offer endless ways to elevate your space with style and personality. Don’t be afraid to experiment and make your ceiling a reflection of your unique taste. Start transforming your kitchen today and let your ceiling design inspire the entire room!
Leave a Reply