Have you ever looked at a plain wall or an old piece of furniture and thought, “I wish I could give this a fresh, creative touch”? Simple painting ideas for beginners are incredibly popular because they offer an accessible way to transform your space without needing advanced skills or expensive tools. These projects are perfect for boosting confidence, adding personal flair, and making your home feel uniquely yours—all while having fun in the process!
In this article, you’ll discover a variety of inspiring and practical painting ideas that are perfect for newcomers. From bold accent walls and trendy geometric patterns to charming faux tiles and personalized wall quotes, there’s something to spark everyone’s creativity. Whether you’re looking to refresh a single room or add a little artistic charm to your furniture, these ideas will help you get started with confidence and enjoy the satisfying process of DIY home decor.
1. Create Bold Accent Wall Murals for a Modern Touch
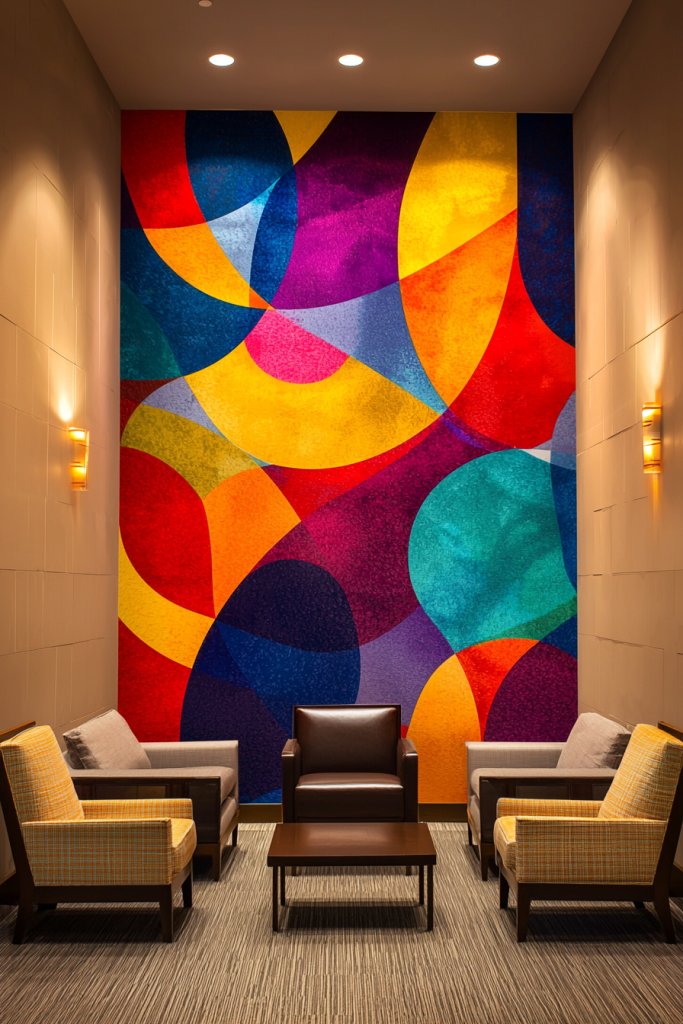
A bold accent wall mural can completely transform a room, adding a striking focal point that reflects your personality. It’s a simple way to make a space feel modern and stylish without overwhelming the entire room. Perfect for beginners, this idea allows you to experiment with large-scale designs that pack a visual punch.
Imagine a wall painted with a vibrant geometric pattern in deep navy, crisp white, and soft blush pink. The mural might feature sharp triangles or sweeping curves that create a sense of movement and energy. The textured paint adds depth, while clean lines keep the look polished. The surrounding room feels fresh and contemporary, with the mural serving as a conversation starter and a visual anchor.
Getting started is easier than you think. First, choose a wall that naturally draws attention, like behind the sofa or bed. Use painter’s tape to outline your design, whether it’s bold stripes, abstract shapes, or simple patterns. Pick high-quality, matte or semi-matte wall paint in your chosen colors—no special brushes needed, just steady hands and patience. For clean edges, use a small angled brush or a foam roller for larger areas, and remove the tape carefully once the paint is dry. This project is budget-friendly and highly customizable, making it perfect for a beginner’s creative upgrade.
2. Use Stenciled Patterns to Add Visual Interest to Entryways
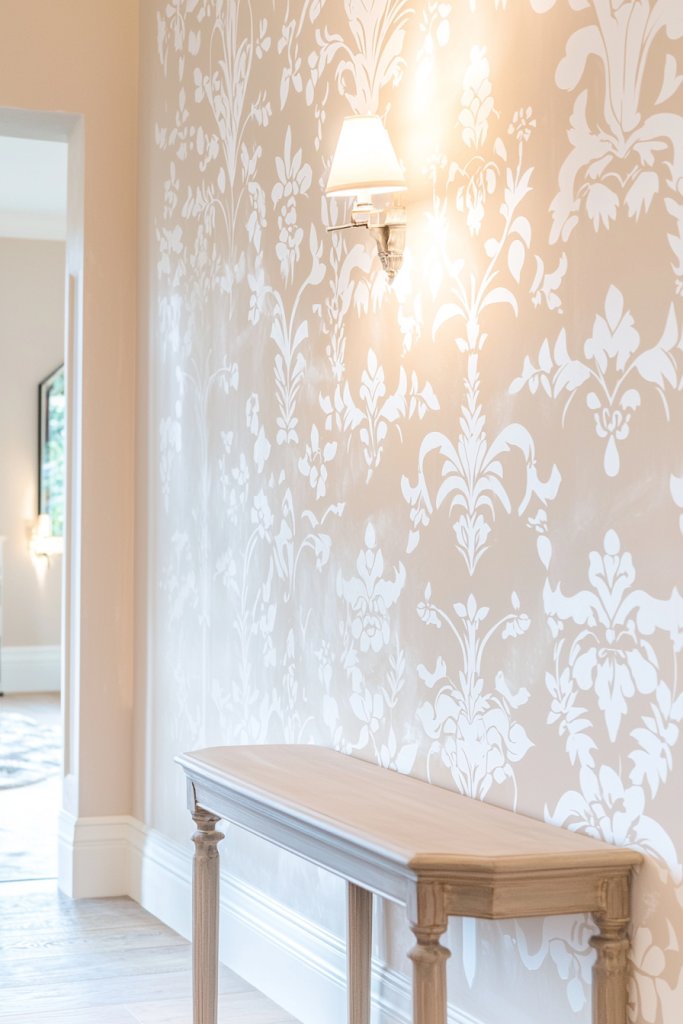
Stenciled wall patterns are an easy way to elevate an entryway, giving it personality without requiring advanced painting skills. This technique allows you to add decorative motifs—like floral, geometric, or abstract designs—that can be tailored to your style and space. It’s an affordable, beginner-friendly way to introduce pattern and charm.
Picture a cozy entryway painted in soft, neutral tones—beige or light gray—adorned with white or contrasting-colored stenciled motifs. Perhaps delicate floral patterns or modern geometric shapes are repeated across the wall, creating rhythm and visual interest. The textures are subtle but eye-catching, and the pattern can be scaled to fit small or large spaces. Bright lighting enhances the contrast, making the pattern pop and inviting guests into your home.
To achieve this look, start by selecting a stencil design you love, available at craft stores or online. Use painter’s tape to secure the stencil, and apply the paint with a sponge or stencil brush, dabbing lightly to avoid bleeding. Use a small roller for large areas of background color, and keep your paint consistent. Choose a semi-gloss or matte finish for durability. This approach is simple, requires minimal equipment, and can be completed in a few hours, giving your entryway a fresh, personalized touch.
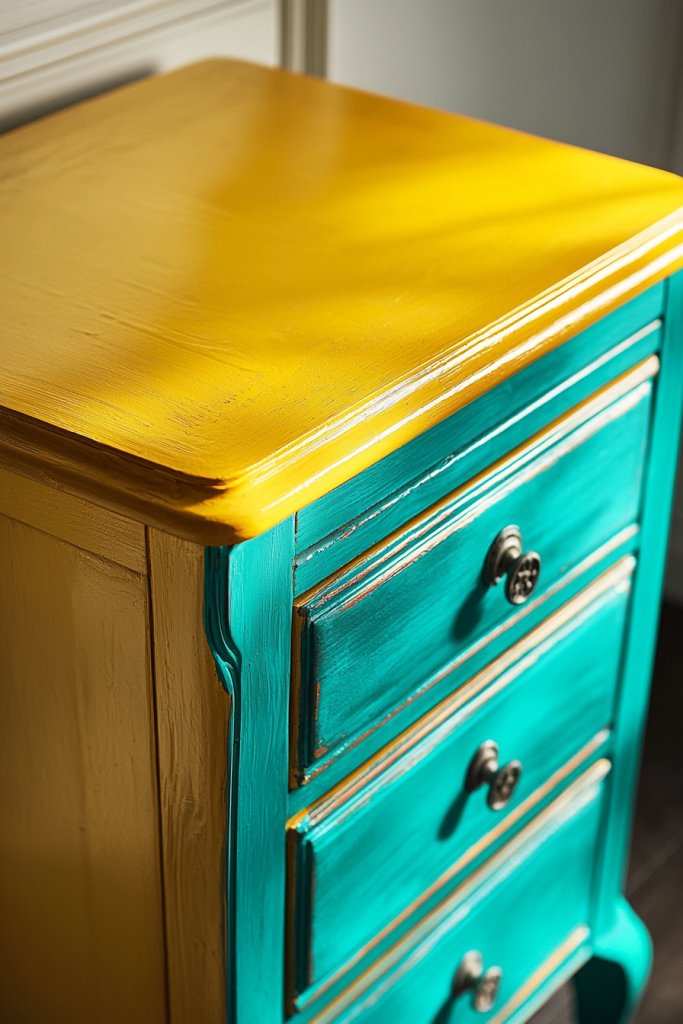
3. Paint Geometric Shapes on Furniture for a Fresh Look
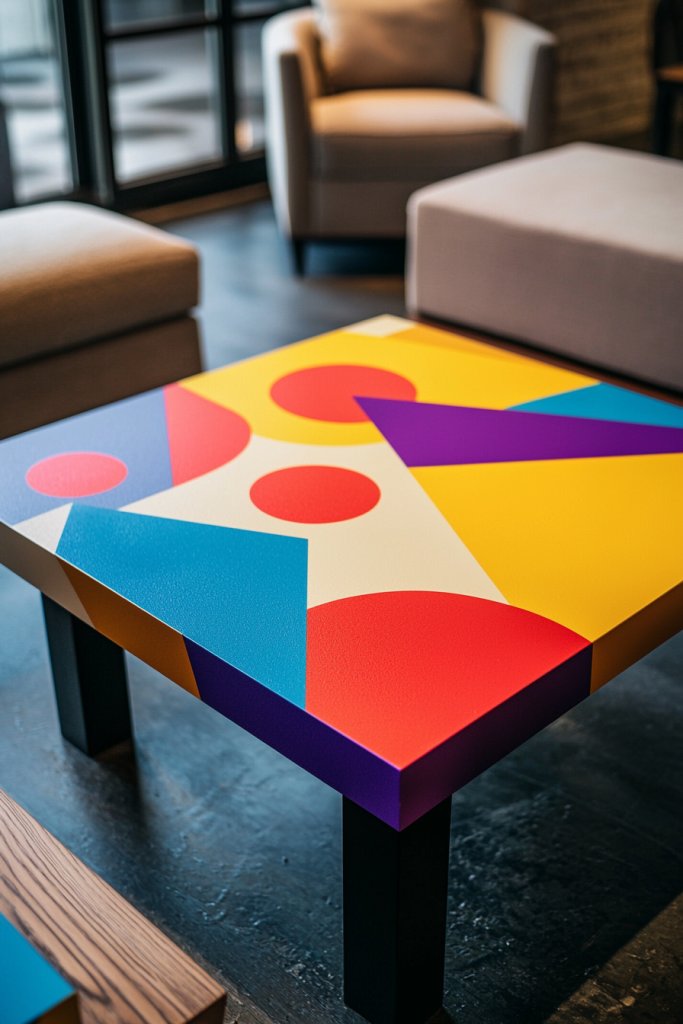
Adding geometric shapes to furniture pieces is an instant way to modernize and personalize your space. Whether it’s a dresser, coffee table, or side chair, painting bold shapes transforms ordinary furniture into statement pieces that reflect your style. It’s a creative project that’s approachable for beginners with a little patience.
Visualize a vintage wooden dresser with a fresh coat of white paint, accented with large, colorful triangles in shades of turquoise, coral, and mustard. The geometric shapes are crisp and clean, with sharp lines that contrast beautifully against the neutral background. The textured wood peeks through in some areas for added dimension, while the overall look feels vibrant and contemporary. This simple update can elevate a room with a pop of color and pattern, making your furniture stand out.
Start by cleaning and lightly sanding the furniture surface to ensure paint adhesion. Use painter’s tape to mark off your geometric shapes, and choose acrylic or chalk paint in your favorite colors—these are easy to work with and quick-drying. For sharp lines, use a small, angled brush or painter’s tape to define the edges. Fill in the shapes carefully, removing the tape once the paint is dry. Finish with a clear sealant for durability. This DIY project is budget-friendly, fun, and perfect for beginners eager to add a modern touch to their home.
4. Incorporate Ombre Effects in Bedroom Walls for Calm Ambiance
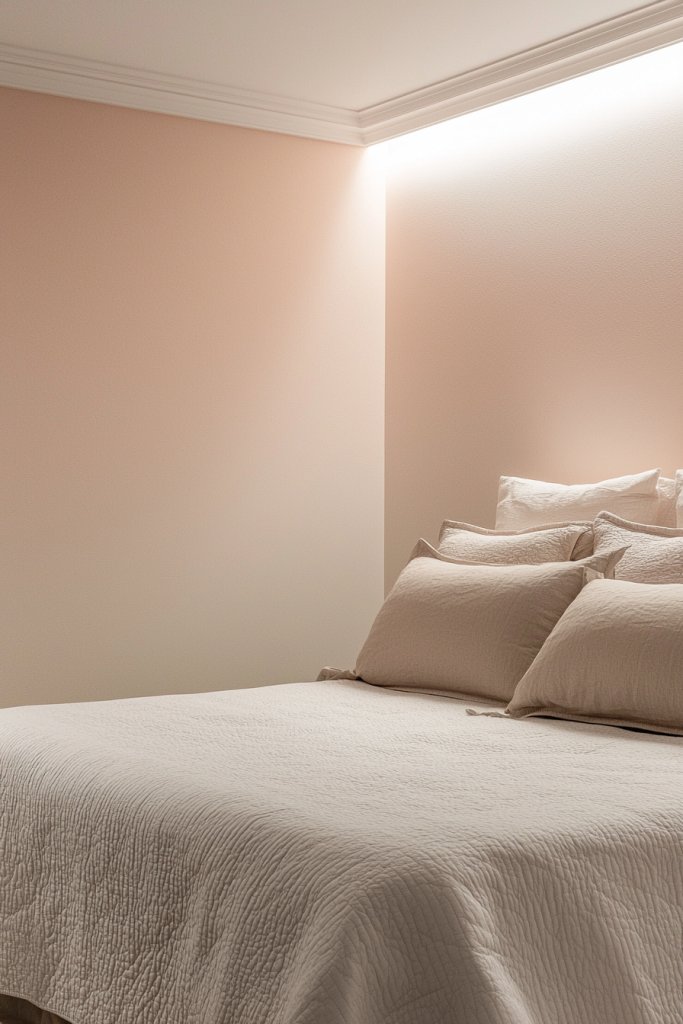
An ombre wall creates a soothing gradient that seamlessly transitions between shades, bringing a tranquil vibe to your bedroom. It’s a subtle yet impactful way to add depth and softness to your space, making it ideal for beginners who want a chic, personalized look.
Imagine a wall painted in gentle shades of blue fading from a pale sky at the top to a deeper navy at the bottom. The smooth transition of colors gives the room a calming, cloud-like effect that invites relaxation. The soft hues complement neutral bedding and minimal decor, creating a restful environment. The tactile experience of the gradient adds visual interest without overwhelming the senses, perfect for a cozy retreat.
To achieve this, start by choosing two or three shades within the same color family. Use a large sponge or wide brush to blend the colors while the paint is still wet, working from top to bottom, or vice versa. Apply the lighter color at the start, then gradually add the darker shade, blending edges as you go. You can also use a spray bottle with water to help blend the paint seamlessly. This technique requires patience but is straightforward, with minimal supplies—just paint, sponges, and painter’s tape. The result is a calming, stylish wall that looks professionally done but is easy for beginners to master.
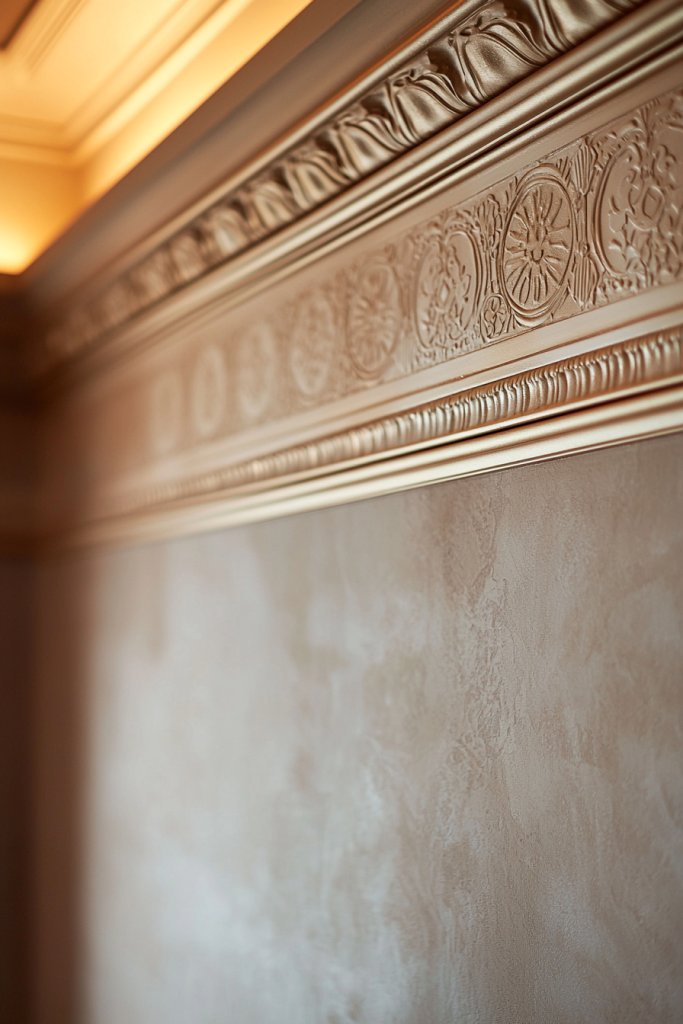
5. Add Metallic Accents with Gold or Silver Paint for Elegance
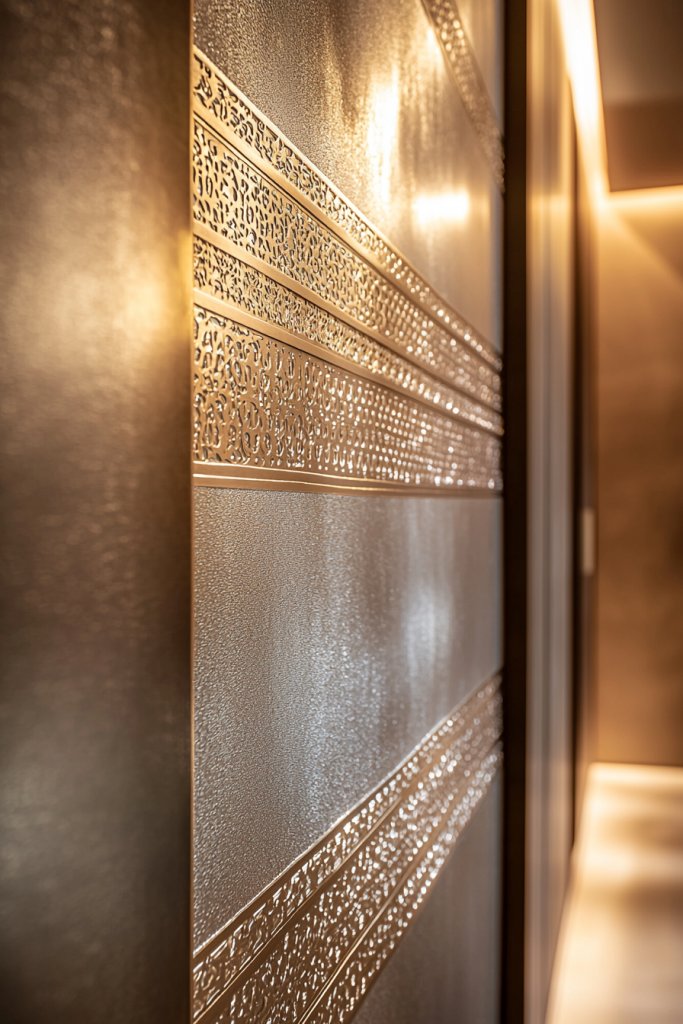
Incorporating metallic accents into your walls or decor adds a layer of sophistication and glamour to any space. Gold or silver paint can be used sparingly on borders, patterns, or decorative elements to create a luxurious vibe without a hefty price tag. It’s an easy entry into chic decor, perfect for beginners wanting to elevate their home.
Picture a neutral-colored wall with a thin, metallic gold border framing a painted pattern or a simple geometric design filled with shimmering silver. The reflective quality of the metallic paint catches light beautifully, making the space feel brighter and more polished. This subtle sparkle adds depth and interest without overwhelming the room, making it suitable for bedrooms, living rooms, or even dining areas. When done well, the metallic accents bring a sense of elegance and modernity that’s both timeless and trendy.
Start with a good-quality metallic paint—available at most craft stores—and a small detail brush or stencil brush. Use painter’s tape to outline your design, then carefully fill in with metallic paint, applying thin, even coats. For precise lines, a steady hand or painter’s tape helps create clean edges. Allow the paint to dry completely before removing the tape. For a budget-friendly option, consider using metallic foil or adhesive borders. This project is simple enough for beginners and instantly upgrades your space with a touch of luxe.
6. Paint Faux Tiles in Kitchen Backsplash Areas for a Stylish Effect

Transforming your kitchen backsplash with faux tiles is a clever and budget-friendly way to achieve a chic, designer look without the hassle of real tile installation. This simple technique allows you to add a stylish focal point that elevates your space and reflects your personal taste, all while keeping it easy and accessible for beginners.
Imagine a sleek, glossy surface that mimics classic subway tiles in a crisp white or soft gray, creating a clean and modern backdrop. You could opt for painted patterns that resemble intricate mosaic or geometric designs, adding visual interest and texture. The faux tiles might feature subtle shadows or beveled edges to create depth, while the surrounding walls stay smooth and matte. The overall effect is a polished, textured finish that invites you to run your fingers along the surface, feeling the layered dimension and sophistication. Light bouncing off the shiny painted “tiles” brightens the space, making your kitchen feel fresh and lively.
Getting started is easier than you think. First, choose a durable, high-quality wall paint—like semi-gloss or satin—which mimics the sheen of real tiles. Using painter’s tape, create your desired tile pattern—whether classic subway, herringbone, or a custom design—then carefully paint within the lines with contrasting colors or shades. For added realism, you can use a small brush to add shading or faux grout lines. Once dry, remove the tape, and you’ll have a stylish, faux tiled backsplash that instantly upgrades your kitchen’s look without the mess or expense of real tile work.
7. Create Abstract Art on Canvas for Living Room Decor
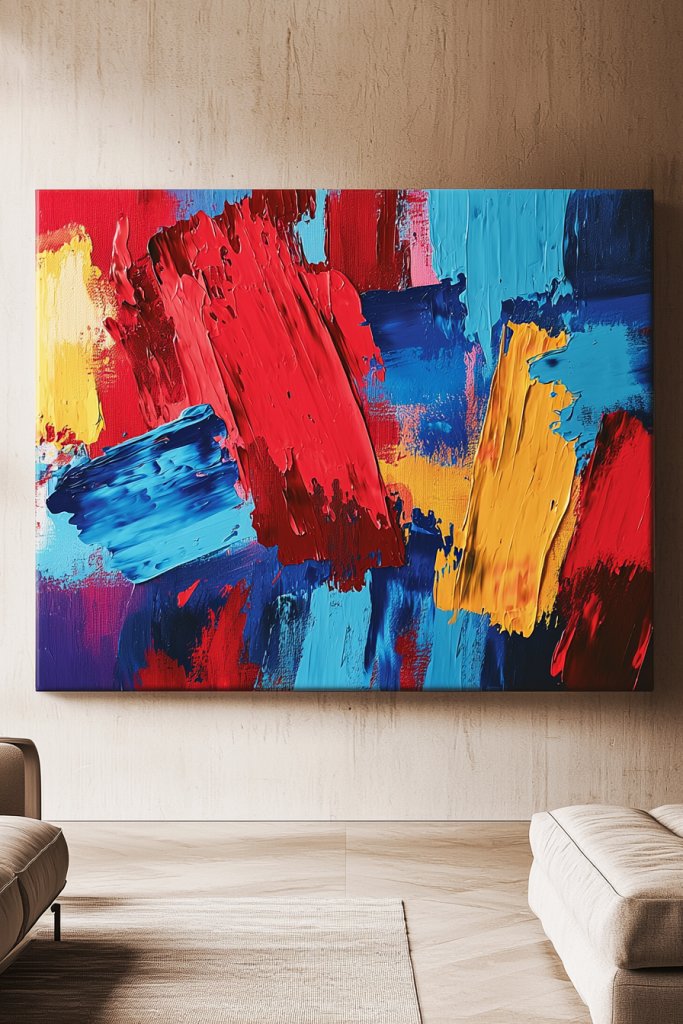
Transforming your living room with bold, abstract art on canvas can instantly elevate the space and showcase your personal style, even if you’re a beginner. It’s a fun way to add a splash of color and creativity without needing professional skills or complex techniques.
Imagine a large canvas featuring swirling strokes of deep navy, soft blush pink, and vibrant mustard yellow, layered with textured spatters and bold brushstrokes. The artwork has a dynamic, free-flowing feel, with areas of thick paint that invite touch, contrasting with smoother, more delicate sections. The colors blend seamlessly into the wall, creating a lively focal point that energizes the entire room, while the textured surface adds depth and tactile interest. The overall vibe is modern and inviting, making your living space feel both stylish and cozy.
Getting started is simple and approachable. Grab a blank canvas and select a few favorite acrylic or washable paints in your chosen colors—no need for perfect lines or symmetry. Use basic brushes, sponges, or even your fingers to create spontaneous, overlapping shapes and textures. Mix and layer the paints for depth, and don’t worry about making it perfect—embrace the abstract, freeform style. With just a few supplies and your imagination, you’ll have a one-of-a-kind masterpiece that makes your living room truly yours.
8. Add Chalkboard Paint to Kitchen Walls for Functional Style
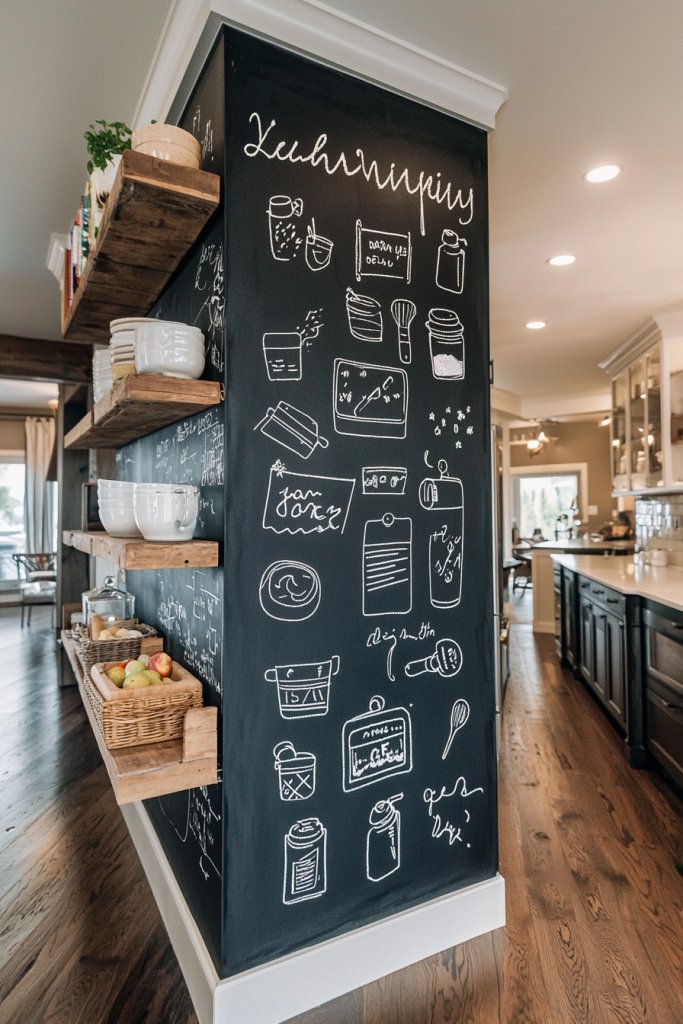
Adding a chalkboard paint feature to your kitchen wall is a fun and practical way to bring both style and functionality into your space. It transforms an ordinary wall into a versatile surface for notes, recipes, or everyday doodles, making your kitchen more interactive and personalized.
Imagine a large section of your wall coated in smooth, matte black chalkboard paint, creating a striking contrast against nearby white cabinetry or colorful backsplash tiles. The surface invites you to write with white or colored chalk, adding a playful element to your kitchen decor. Surrounding the chalkboard area, you might see sleek, minimalist shelves holding spice jars or a cozy ceramic mug set, with the chalkboard serving as a dynamic backdrop. The overall look is both modern and approachable, with a tactile, slightly velvety texture that invites touch, and the scent of fresh paint lingering just enough to remind you of your creative project.
To recreate this look, start by selecting a high-quality chalkboard paint suitable for walls—most brands are easy to apply with a roller or brush. First, clean and prime the wall to ensure a smooth surface, then tape off the edges for clean lines. Apply two coats of chalkboard paint, allowing each layer to dry thoroughly. Once dry, remove the tape and start customizing your space with chalk, adding daily menus, motivational quotes, or grocery lists. If you prefer a different look, you can opt for a dark gray or deep navy chalkboard paint to add subtle sophistication. With just a few simple supplies—paint, painter’s tape, and chalk—you’ll have a stylish and functional focal point in your kitchen that’s perfect for spontaneous creativity.
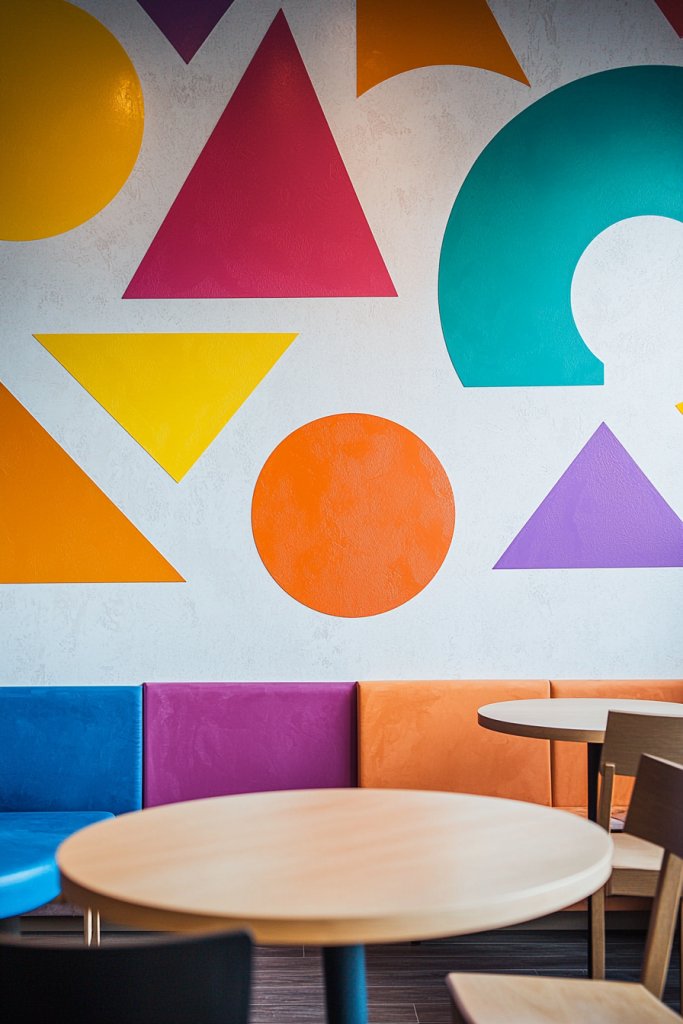
9. Use Color Blocking Techniques in Living or Dining Rooms
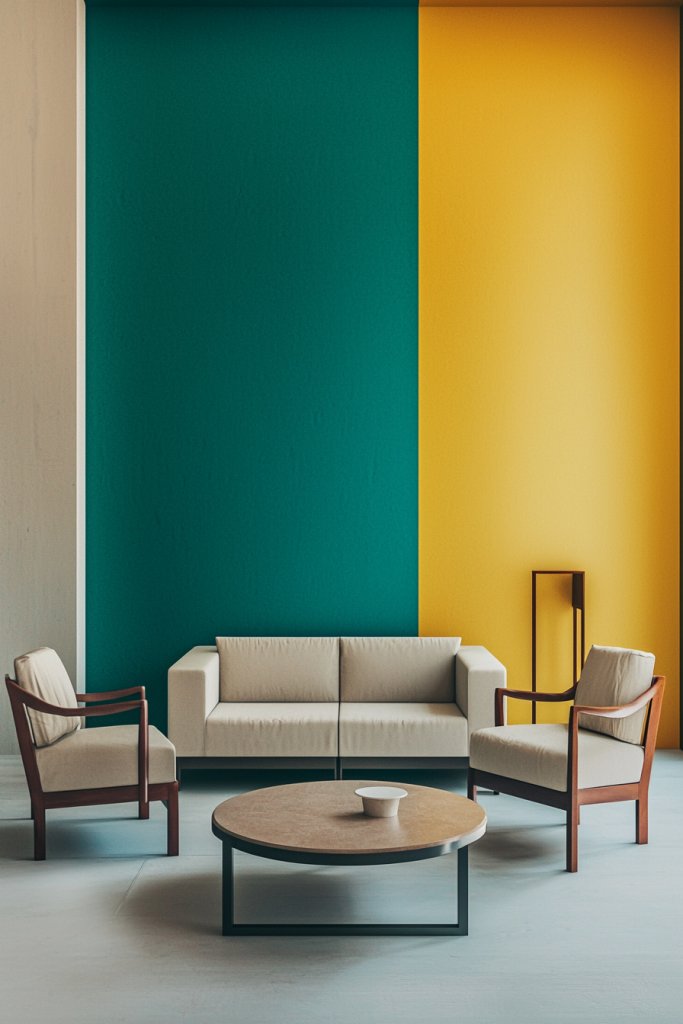
Transforming a living or dining room with color blocking is a fantastic way to add modern flair and bold personality without overwhelming the space. This technique allows you to play with vibrant or muted hues in a way that highlights architectural features and creates a visually striking environment.
Imagine a room divided into large, clean blocks of color—perhaps a deep navy wall paired with soft blush accents or a sunny yellow shape framing a cozy reading nook. The colors are crisp and matte, with smooth, straight edges that define each section clearly. Textures are kept simple, with a sleek painted surface contrasting beautifully against plush textiles like a chunky knit throw blanket or a silky cushion. The overall effect is lively yet balanced, giving the room a fresh, contemporary vibe that energizes the entire space.
Getting started is easier than you think: gather painter’s tape, high-quality wall paint in your chosen shades, and a steady hand. First, decide where you want to add blocks of color—perhaps on one feature wall or to create a subtle division between zones. Tape off the sections carefully to ensure sharp, straight lines, then apply your paint in layers, letting each dry thoroughly. For a softer look, you could use painter’s tape in a grid pattern for more intricate designs or choose muted pastel tones for a calming atmosphere. With a little patience and creativity, you’ll have a stunning, personalized space that’s both stylish and simple to achieve.
10. Personalize Space with Hand-Painted Wall Quotes or Motifs
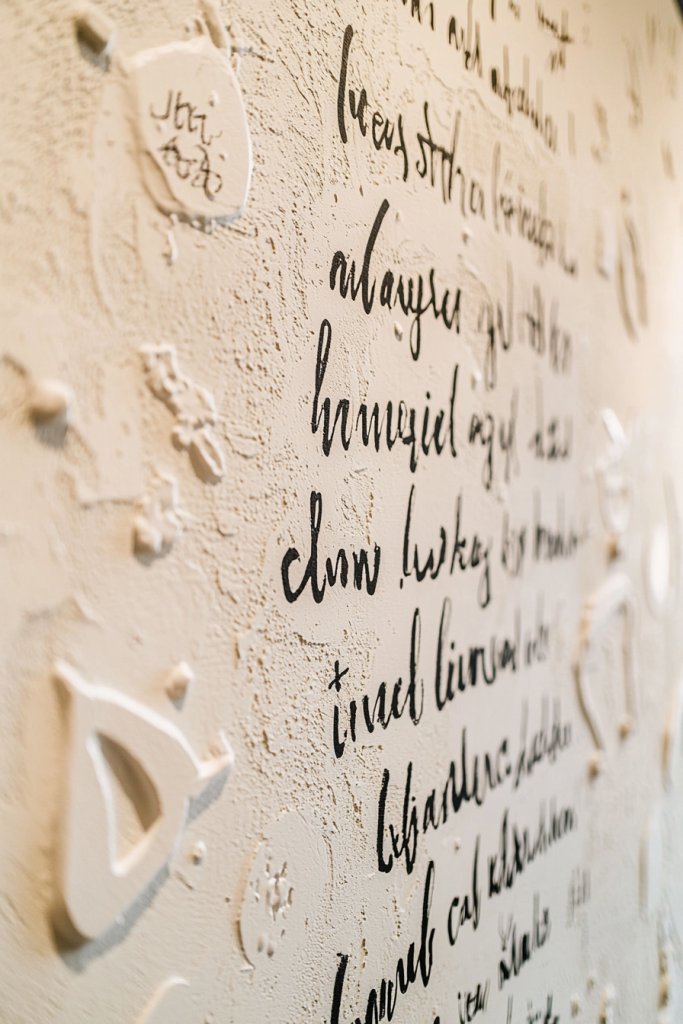
Adding hand-painted quotes or motifs to your walls is a wonderful way to infuse personality and inspiration into your space. It transforms plain walls into meaningful focal points, creating a cozy, motivational, or humorous atmosphere that truly reflects your style. This idea allows for creative expression without the need for expensive artwork, making your home uniquely yours.
Imagine a crisp, white wall adorned with a handwritten quote in elegant cursive or bold block letters, surrounded by simple floral motifs or abstract doodles. The paint might be a rich navy blue or a soft blush pink, contrasting beautifully against the wall’s neutral background. The textured strokes of your brush add depth, giving a handcrafted feel that feels warm and inviting. You could also incorporate small, personalized symbols or motifs that hold special meaning, like hearts, stars, or initials, to make it even more unique.
Getting started is easier than you might think. Select a high-quality, washable wall paint in your preferred color—latex or acrylic are perfect choices—and gather some stencils or painter’s tape for clean lines. Use a fine-tipped brush or paint marker for detailed lettering and motifs. Lightly sketch your design with a pencil before painting, then fill in with your chosen colors. Keep your workspace well-ventilated, and don’t worry about perfection—your hand-painted wall will have charm and character that store-bought art can’t match.
11. Transform Old Furniture with Bright, Cheerful Paints
Revamping old furniture with vibrant paint is a fantastic way to breathe new life into tired pieces and add a cheerful touch to your home decor. This approach is budget-friendly, eco-conscious, and highly customizable, letting you create statement pieces that reflect your personality and brighten your space instantly.
Picture a vintage wooden chair painted in a lively shade like sunny yellow or coral, with a smooth matte or glossy finish. The surface might feature playful patterns, stripes, or color-blocked sections, turning a plain item into a focal point. The paint’s bright hue contrasts against neutral surroundings, making the furniture pop and adding energy to the room. The tactile quality of the painted surface invites touch, while the colorful transformation elevates the overall vibe of your space.
To get started, choose a durable furniture paint such as chalk paint, latex, or acrylic—these are easy to work with and suitable for different materials. Sand the furniture lightly to help the paint adhere better, then apply a primer if needed. Use brushes or foam rollers for smooth coverage, and consider adding a clear sealant for longevity. Feel free to experiment with color combinations or stenciled accents—just ensure your workspace is well-ventilated and protected with drop cloths for easy cleanup.
12. Paint Mural Borders or Friezes to Frame Rooms Elegantly
Painting mural borders or friezes is an elegant way to define spaces and add a sophisticated, artistic touch to your interiors. This idea creates visual frames that highlight architectural features or separate areas without the need for additional furniture or partitions, giving your home a polished yet personalized look.
Envision a delicate, hand-painted floral or geometric border that runs along the top or bottom of a wall, framing the room like a picture frame. The design might feature soft pastel shades or bold contrasting colors, depending on your style. The border’s intricate patterns add a sense of craftsmanship and charm, subtly drawing the eye and creating a cohesive look across your space. When done well, it feels like a bespoke detail that elevates the entire room.
Begin by selecting your design motif—simple, repetitive patterns work best for beginners. Use painter’s tape to mark the boundaries and a fine-tipped brush for detailed work. Lightly sketch your design with a pencil first, then carefully apply paint in layers, allowing each to dry before proceeding. For precision, consider using stencils or masking tape to keep lines clean. Finish with a sealant to protect your work, and enjoy your custom, elegant room framing that’s both easy and impactful.
13. Use Washable Wall Paints for Easy DIY Wall Art Projects
Using washable wall paints opens up a world of creative possibilities for DIY wall art, especially for beginners. These paints allow you to experiment with designs, textures, and patterns without worrying about permanent mistakes, making the process fun, stress-free, and easily reversible.
Imagine a wall where you’ve created a playful geometric pattern or a soft, watercolor-like wash in soothing shades like mint green or lavender. The washable paint provides a smooth, matte finish that’s easy to wipe clean, perfect for spaces where kids or messy eaters might be present. This flexibility allows you to update your design periodically—simply wipe off or repaint sections to refresh the look. It’s an accessible way to add personality to your home with minimal commitment and maximum creativity.
To begin, select a high-quality washable wall paint in your favorite color or pattern. Prepare your wall by cleaning and patching any imperfections. Use stencils, painter’s tape, or freehand techniques to create your desired design, and apply with foam brushes or rollers for even coverage. Since the paint is washable, you can layer colors or add details over time, making it ideal for beginners eager to learn and experiment. Once finished, allow ample drying time, and enjoy a vibrant new look that’s easy to maintain and update whenever inspiration strikes.
14. Add Texture with Sponging or Rag Rolling Techniques
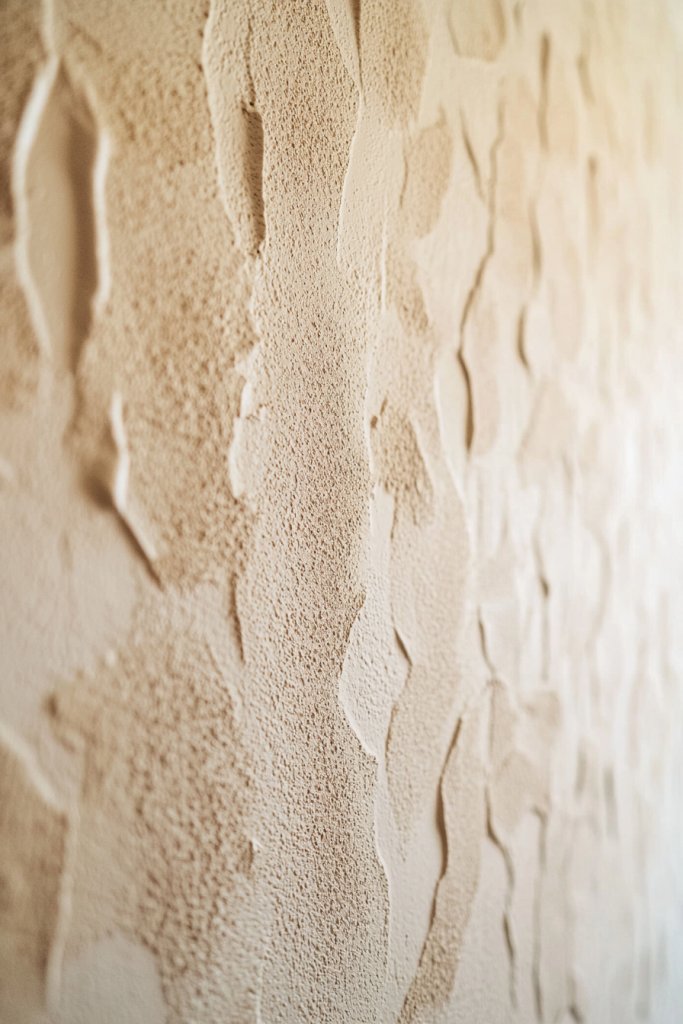
Introducing texture through sponging or rag rolling adds a rich, tactile dimension to your walls, transforming a simple paint job into a piece of art. These techniques are beginner-friendly, affordable, and perfect for creating subtle or dramatic effects that add depth and interest to any room.
Picture a wall with a soft, cloud-like mottling created by sponging on pale pastel shades like blush or sky blue. Alternatively, imagine a textured, marbled effect achieved through rag rolling in darker hues such as navy or charcoal, giving your space a sophisticated, aged look. The combination of colors and textures invites touch and visual intrigue, making your walls stand out without the need for elaborate murals or patterns. This approach is versatile and lends a handcrafted, cozy vibe to your decor.
Getting started is simple. Prepare your base coat and choose a sponging or rag rolling sponge or cloth—dampening the sponge slightly helps control the texture. Use a lighter or darker shade than your base color to layer on the texture, working in small sections to blend seamlessly. Practice on a scrap piece of drywall or cardboard first to perfect your technique. Once satisfied, apply your textured finish across the wall, then step back to see the beautiful, tactile effect unfold. Seal your work with a clear protective coat if desired, and enjoy your personalized textured wall that adds warmth and character to your space.
15. Paint Patterned Pillows or Textile Accents in Soft Colors
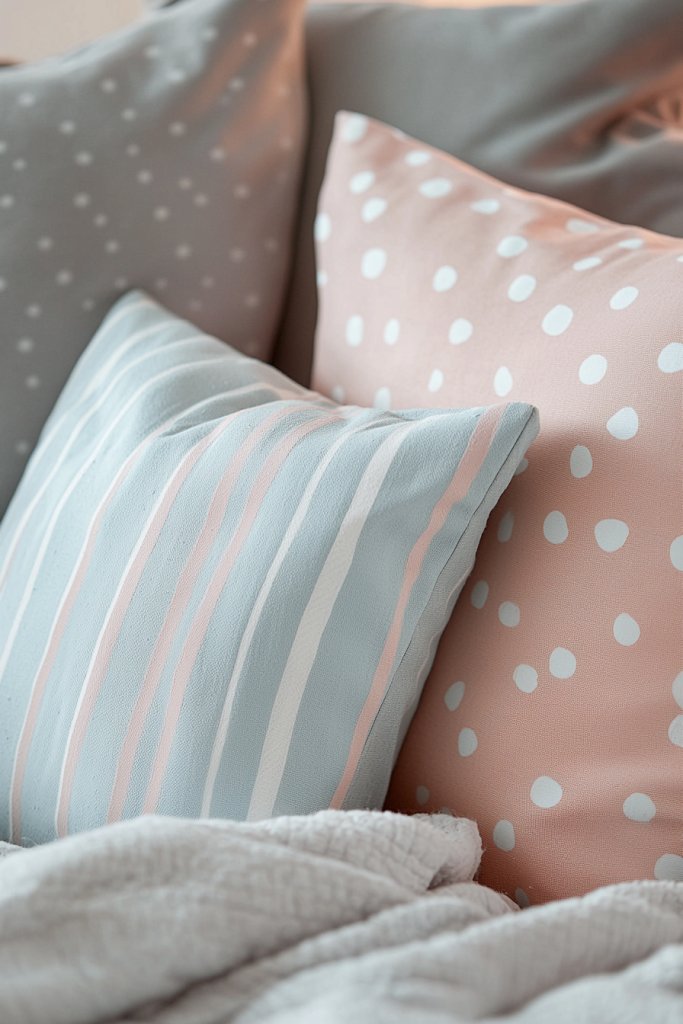
Adding painted accents to textiles like pillows and throws is a wonderful way to introduce subtle color and personality into your space without a big commitment. This idea allows beginners to experiment with color combinations and patterns on flexible, easy-to-change surfaces, making it perfect for those new to painting. It also offers a cozy, inviting vibe that can instantly refresh a room.
Imagine soft pastel hues—like blush pink, mint green, or pale blue—applied in gentle, repeating patterns on simple linen or cotton pillows. You might paint delicate polka dots, stripes, or even small floral motifs using stencils or freehand techniques. The textures of the fabric combined with the matte or satin finish of the paint create a tactile contrast, adding depth to your decor. These painted accents can be spread out across a sofa or bed, creating a harmonious, handcrafted look that’s both calming and cheerful.
Getting started is straightforward: choose fabric-safe acrylic paint or specialized textile paint, and gather your supplies—stencils, painter’s tape, or brushes for freehand designs. Wash and dry your textiles first for better adhesion, then sketch your patterns lightly with a pencil. Apply paint in thin, even layers, letting each dry completely before adding more. For a more durable finish, consider sealing with a clear fabric medium or fabric spray. With just a few supplies and some patience, you’ll have charming, personalized textiles in no time.
16. Create a Faux Headboard with Painted Wall Panels
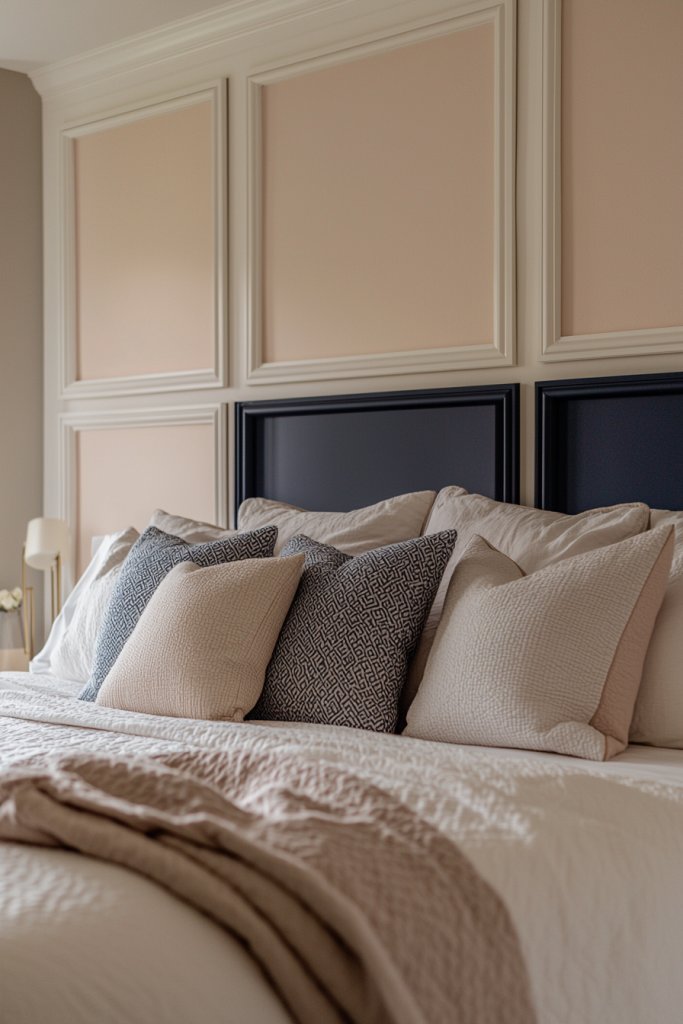
Transforming a plain wall into a stylish faux headboard is an easy, budget-friendly way to elevate your bedroom decor without buying new furniture. It’s perfect for beginners eager to add a touch of elegance or personality to their space, and it’s entirely customizable to suit your style.
Visualize a large, rectangular panel painted in a soft, restful hue—like creamy beige, muted blush, or pale gray—centered behind your bed. You could add decorative details such as painted molding lines, a faux tufted pattern with subtle shading, or even geometric shapes for a modern twist. The finish is smooth, with clean edges that mimic the look of a built-in headboard. Textured or matte paint can add depth, making the panel look more sophisticated, while a contrasting trim or border adds definition. The overall effect feels cozy and polished, transforming the bed into a focal point.
Implementation is simple: start by measuring your bed to decide the size of your panel. Use painter’s tape to outline your design on the wall, then fill in with your chosen paint colors—flat or matte finish works best for a soft, elegant look. For added dimension, you can use a darker shade along the edges or incorporate subtle shading techniques. Once dry, peel away the tape carefully, and you’re done! No special tools needed—just some painter’s tape, a level, and your favorite paint colors—making this a fun and accessible project for any beginner.
17. Use Metallic or Glitter Paint for Accent Pieces or Borders
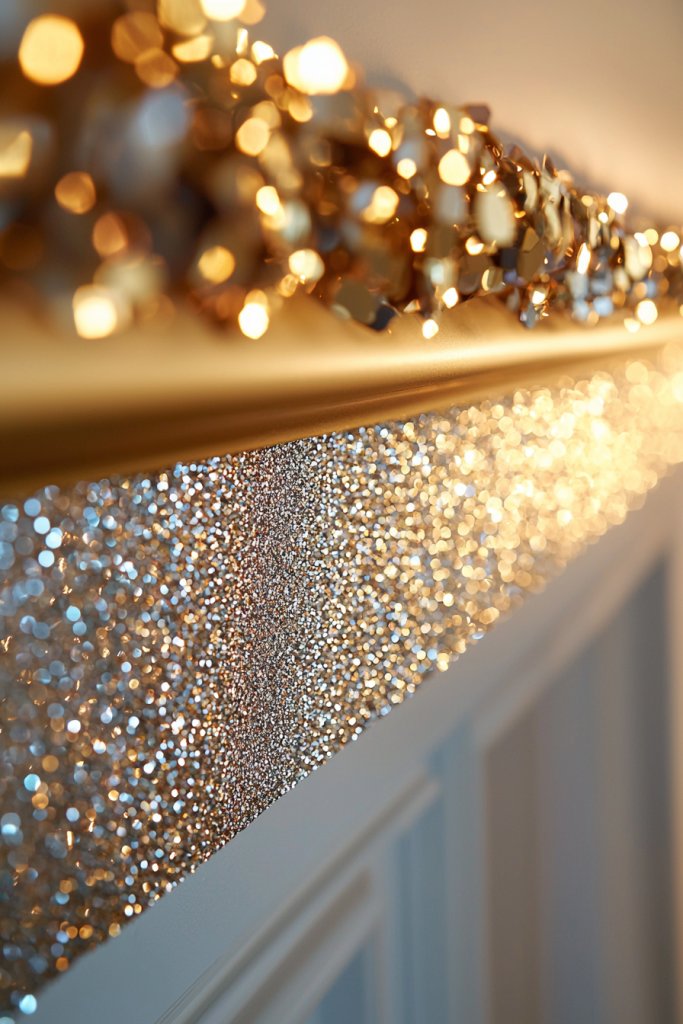
Adding metallic or glitter paint to your decor is an instant way to bring sparkle and sophistication to your space, making even the simplest elements stand out. This idea is perfect for beginners looking to add a touch of glamour without complex techniques or expensive investments.
Picture a sleek border along your wall or a decorative stripe on a piece of furniture, shimmering in gold, silver, or rose gold. Alternatively, you could paint small accents—like a silver-lined picture frame or a glittery tabletop—that catch the light and add visual interest. The textured shimmer of metallic or glitter paint creates a dynamic, eye-catching effect that elevates your space instantly. The tactile contrast of smooth matte paint with shiny metallic or glitter finishes adds a layer of richness and luxury, making your rooms feel more curated and stylish.
Getting started is easy: choose high-quality metallic or glitter acrylic paints available at craft stores. Use painter’s tape to create clean borders or shapes, then apply the paint with a flat brush or foam roller for even coverage. For a more intense sparkle, apply multiple thin coats, allowing each layer to dry thoroughly. For smaller details, use a fine detail brush to add accents or highlights. Remember to work in a well-ventilated area and wear a mask if using large quantities of glitter. With a little patience, you’ll add a dazzling, personalized touch to your home that’s perfect for special occasions or everyday glamour.
18. Paint Decorative Plates or Ceramics to Hang as Wall Art
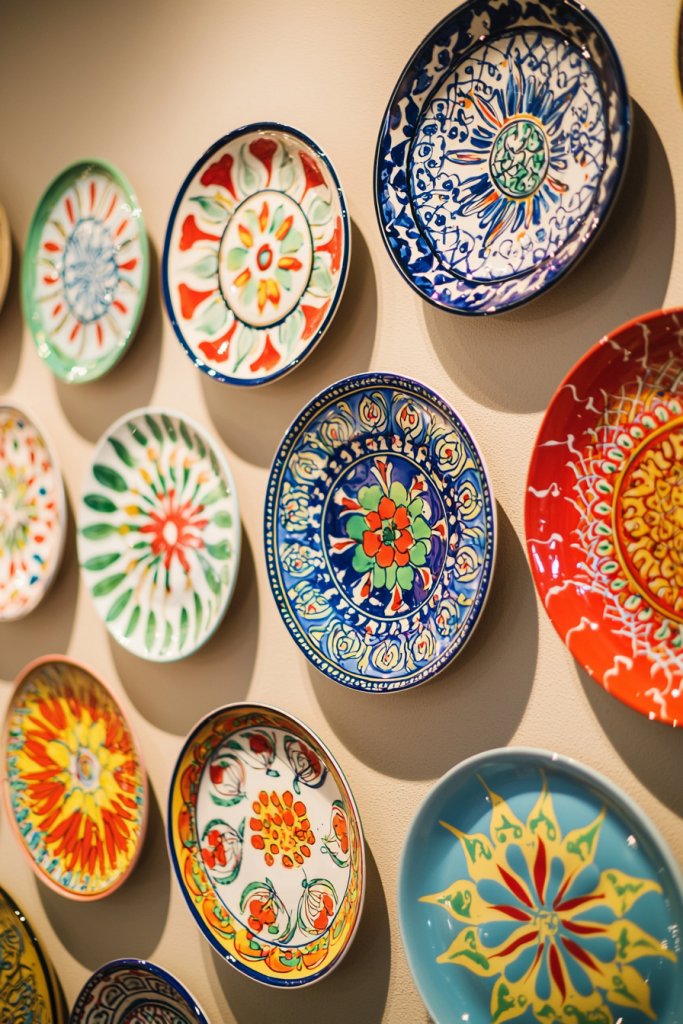
Transforming plain ceramics or decorative plates into wall art is a charming and creative way to personalize your space. This project allows beginners to combine painting skills with home decor, creating unique pieces that reflect their style.
Envision a set of vintage-style plates painted with intricate patterns, bold geometric designs, or simple motifs like florals or abstract shapes. You can choose colors that complement your room’s palette—think soft pastels, jewel tones, or monochrome schemes. The painted plates can be arranged in a gallery-style display or hung individually, adding visual interest and texture to your walls. The glossy finish of the ceramic combined with hand-painted details creates an artisanal, gallery-like vibe. Plus, painted ceramics are versatile—they work well in kitchens, dining rooms, or even as decorative accents in living spaces.
To begin, select plain ceramic plates made of porcelain, stoneware, or even unfinished terracotta. Use porcelain or ceramic-safe acrylic paints, and sketch your designs lightly with a pencil or transfer patterns with carbon paper. Paint with fine brushes, layering colors for depth and detail. Once dry, seal your artwork with a clear ceramic or acrylic spray to protect it from dust and moisture. Install hanging hooks or plate hangers on the back of each piece, and arrange them on your wall in a pattern that feels balanced. This project is straightforward, affordable, and highly customizable—perfect for beginners eager to craft unique wall decor.
19. Incorporate Stripes or Polka Dots on Doors or Window Frames
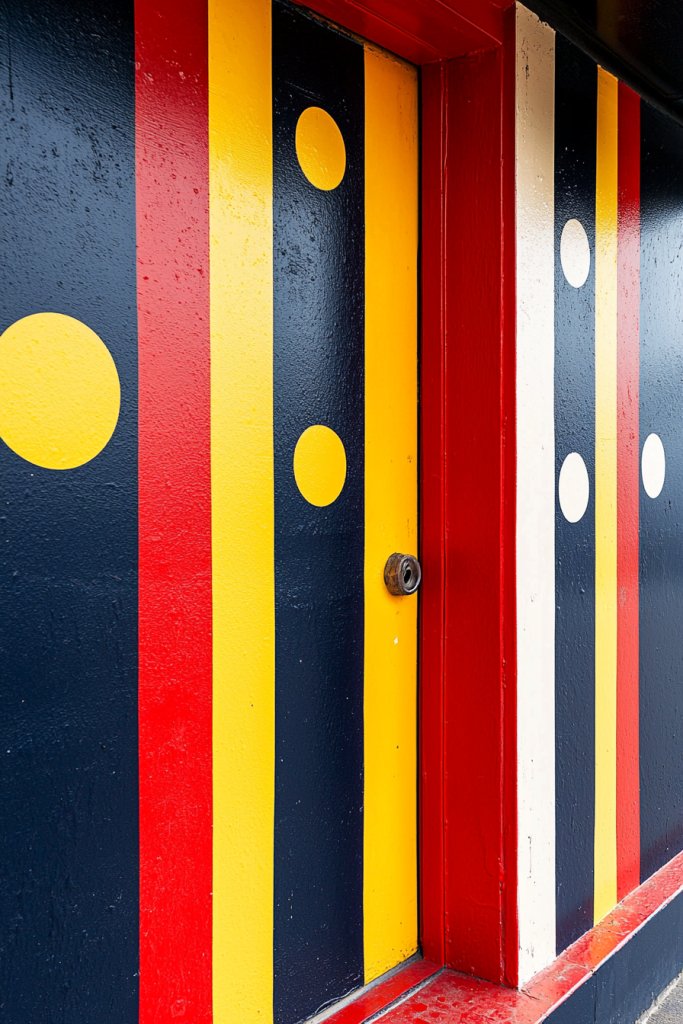
Adding stripes or polka dots to doors and window frames is a playful and visually striking way to refresh your home’s exterior or interior details. It’s a simple idea that packs a punch, making everyday features stand out with minimal effort.
Picture a classic white door with bold black stripes running horizontally or vertically, or a window frame decorated with cheerful, colorful polka dots in shades like sunny yellow, soft pink, or calming blue. These patterns instantly add personality and can be tailored to match your overall decor style—from modern minimalism to vintage charm. The texture of the paint contrasts with the smooth surface of the wood or metal, creating a lively, inviting look. This approach can also be adapted for furniture edges, stair risers, or even decorative panels, making it a versatile decorating technique.
Getting started is simple: gather painter’s tape, acrylic or latex exterior/interior paint depending on the surface, and small brushes or foam rollers. Use a level and ruler to draw light guideline lines for stripes, or a stencil for polka dots, to ensure precision. Tape off your pattern, then carefully apply the paint in thin, even coats, removing the tape while the paint is still tacky to ensure crisp lines. Multiple coats may be needed for vibrant, solid color. This project is affordable, quick, and perfect for beginners who want to add a fun, graphic element to their home.
20. Experiment with Two-Tone Walls for a Contemporary Look
Adding a two-tone wall is an eye-catching way to bring modern flair into any space without overwhelming it. This technique involves painting one part of the wall a different color from the rest, creating a striking visual contrast that instantly elevates your decor. It’s perfect for those who want a stylish update that’s easy to execute and highly customizable.
Imagine walking into a room where the lower half of the wall is painted in a soft, muted grey, while the upper is a crisp, clean white. The sharp line between the two shades adds depth and dimension, making ceilings appear taller and walls more dynamic. You might also choose bold color combinations, like navy and blush, or earthy tones like terracotta and cream, depending on your style. The result is a sophisticated, contemporary look that feels fresh and inviting, whether in a living room, bedroom, or hallway.
Getting started is simple: first, choose your two colors—consider shades that complement your existing decor. Use painter’s tape to mark a straight, level line at your desired height, typically around one-third or halfway up the wall. Paint the upper or lower section with your chosen color, applying at least two coats for even coverage. Once dry, carefully remove the tape. For a flawless finish, consider using a high-quality painter’s brush for touch-ups. This technique is budget-friendly and perfect for beginners eager to add a modern twist to their home.
Conclusion
With these 21 simple painting ideas, beginners have a wealth of creative options to transform their spaces—whether it’s adding bold murals, experimenting with geometric shapes, or personalizing walls with quotes and motifs. Don’t be afraid to try new techniques like sponging, color blocking, or faux finishes to infuse your home with personality and style. Embrace the process and let your imagination lead the way—your perfect DIY masterpiece is just a brushstroke away! Start painting today and watch your home come alive with fresh, inspiring beauty.
Leave a Reply