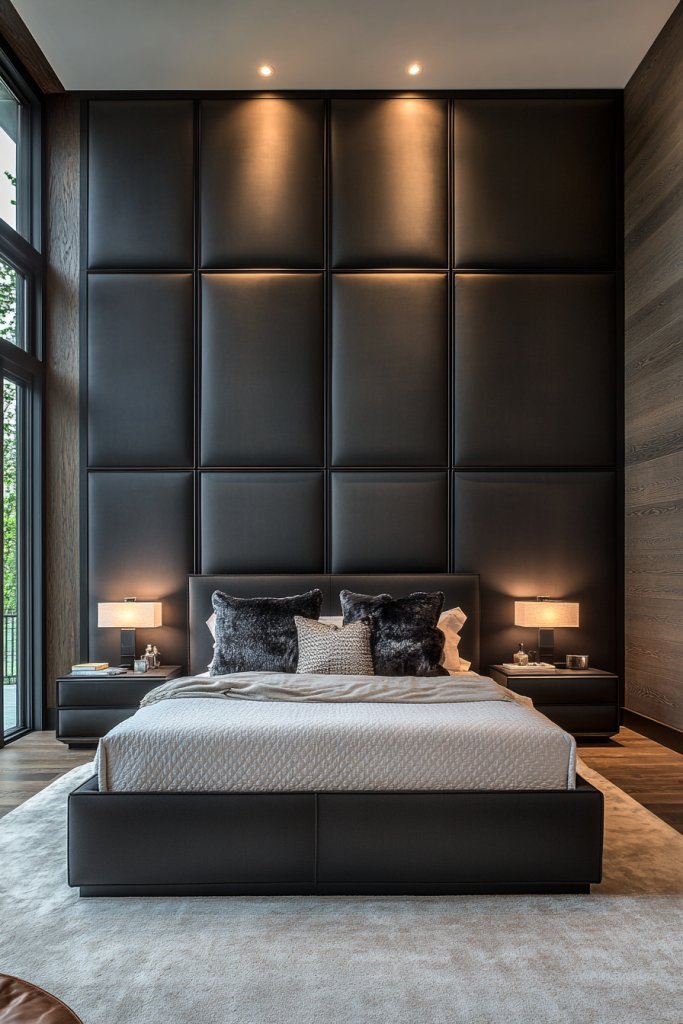
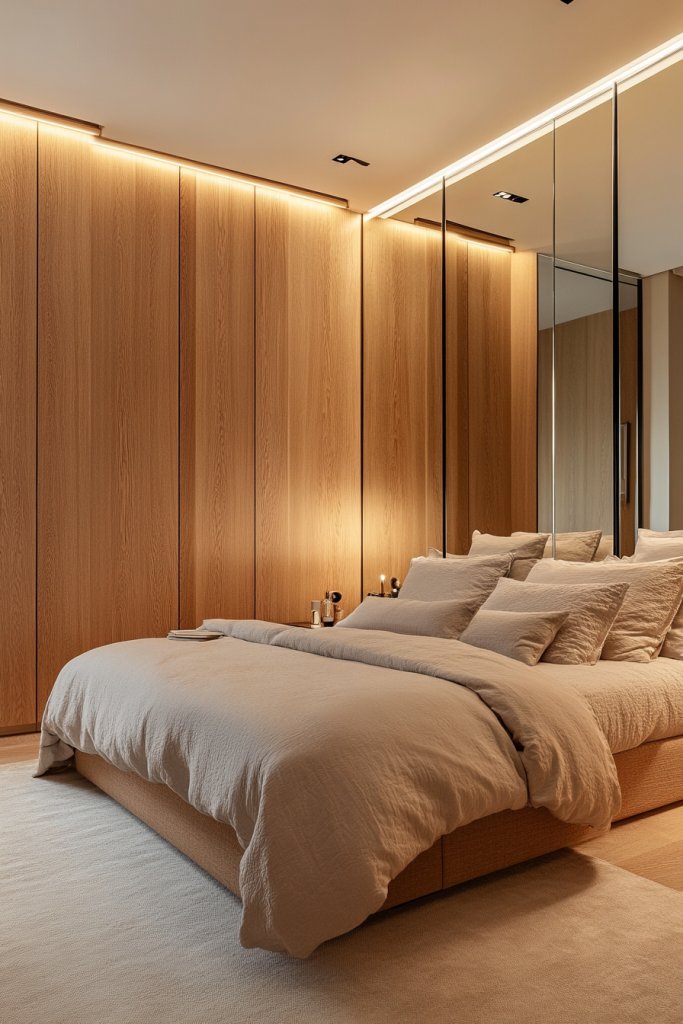
Transforming your bedroom with beautiful wall textures has become a favorite trend among interior enthusiasts, and for good reason! Panelling offers a versatile way to add depth, character, and style to any space, making it feel more inviting and personalized. From classic wood finishes to modern geometric patterns, bedroom panelling ideas are capturing everyone’s imagination because they seamlessly blend aesthetic appeal with functional charm.
In this article, you’ll discover a wide array of panelling styles to elevate your bedroom décor—whether you prefer sleek and minimalist looks or bold, statement-making designs. Each idea is thoughtfully curated to inspire creativity and help you achieve the perfect textured wall that reflects your unique taste. Get ready to transform your bedroom into a stunning sanctuary with these innovative panelling ideas!
1. Classic Shiplap Paneling for Coastal Charm

Ever dream of that cozy beach house vibe but live inland? Classic shiplap paneling offers a quick route to coastal charm without the ocean miles. It adds texture and brightness, transforming dull walls into inviting focal points. Plus, who doesn’t want a touch of seaside serenity at home?
Imagine crisp white horizontal planks running across your bedroom wall, their subtle grooves catching the light. The soft sheen of paint highlights the clean lines, creating a fresh, airy feel. The textured surface adds depth, making the space feel more layered and interesting. You can almost hear the gentle sounds of waves just looking at it.
Opt for painted white for a classic look or go for soft neutrals like beige or greige for warmth. For a more rustic vibe, choose distressed or weathered wood finishes. Vertical shiplap can add a modern twist, or combine with other textures like woven textiles. Seasonal accents, like cozy throws or nautical decor, can enhance the seaside feel.
Start by measuring your wall space and selecting tongue-and-groove shiplap planks. Choose pre-painted or raw wood to customize later. Use a nail gun or hammer and nails for installation, ensuring each plank aligns snugly. Seal the edges with caulk to hide gaps, and apply a topcoat if needed. For a seamless look, consider hiring a professional unless you’re handy.
Add personal touches like decorative corner trims painted in contrasting colors or embedded LED lighting behind the panels for a subtle glow. Incorporate nautical hardware or vintage-inspired clips for a unique twist. Layering with textured bedding and soft area rugs completes the cozy coastal retreat vibe. Don’t forget to keep the color palette light and breezy.
This timeless look is simple to achieve and endlessly customizable. With just a few materials, you can channel that beachside tranquility anytime. Whether you keep it pure or add layered decor, shiplap can turn your bedroom into a serene escape. Ready to bring that coastal charm home? It’s easier than you think!
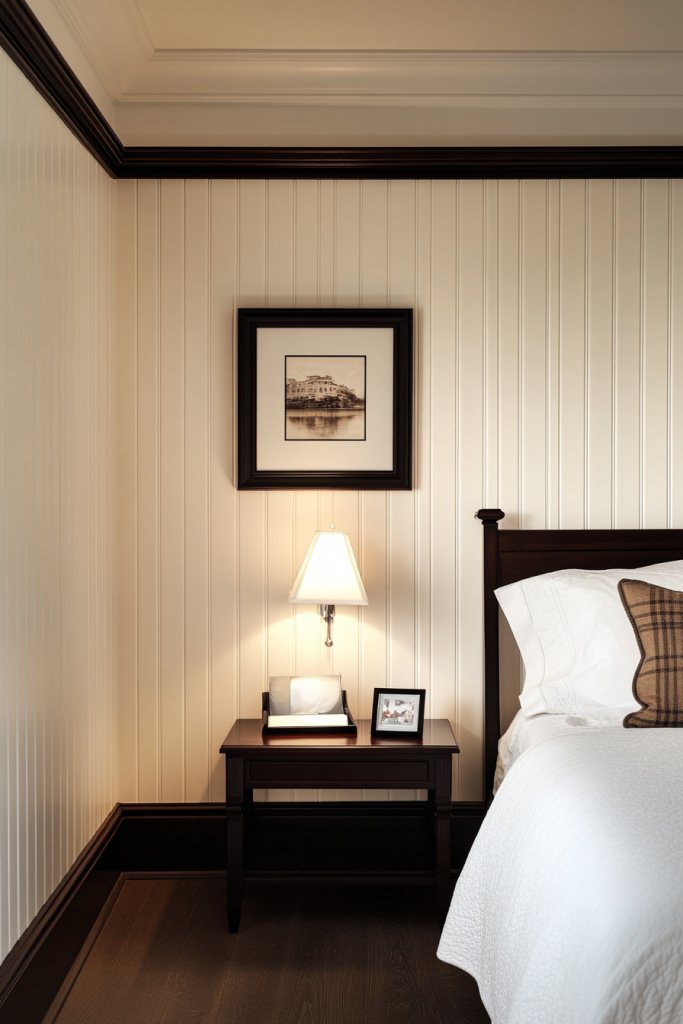
2. Half-Wall Wainscoting for Elegant Definition
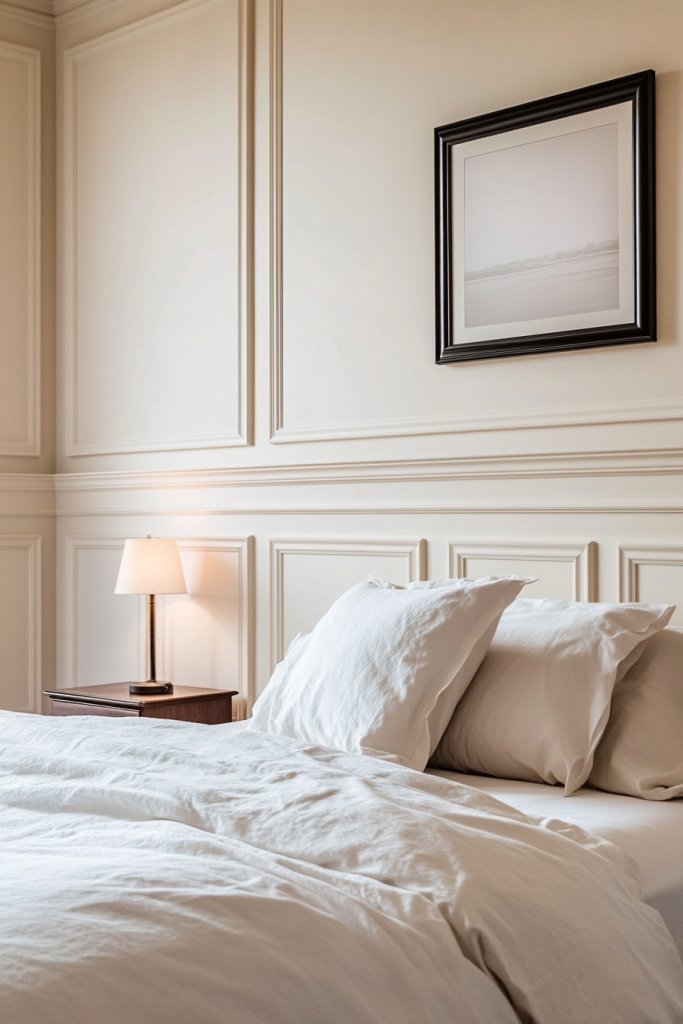
Do your walls lack that polished, sophisticated look? Half-wall wainscoting instantly adds elegance and visual interest, making your space feel more refined. It’s a classic design trick that balances texture with practicality, hiding imperfections and defining your room’s proportions.
Envision a panel of raised or flat wooden boards covering the lower half of your walls, painted in a contrasting color or classic white. The textured surface adds depth, while the clean separation between wall and ceiling creates a structured, intentional look. You might notice how this simple feature makes your room feel more cozy and upscale.
Choose traditional beadboard for a cottage vibe or go for sleek, flat panels in modern decor. Add decorative molding or cap rails for extra detail. For a transitional style, blend wainscoting with wallpaper or textured paint above. Seasonal decor can include cozy textiles or minimalist accessories to keep the look fresh.
Start by measuring the wall height and marking the wainscoting boundary. Cut the panels to size, then secure them with nails or adhesive. Use a level to keep panels straight and consistent. Install decorative molding along the top edge for a finished look. Paint or stain the panels before attaching for cleaner results. Seal all seams and nail holes for a smooth finish.
Add a bold painted border or a decorative chair rail for extra flair. Incorporate textured fabrics or faux finishes to complement the panels. Use contrasting colors to highlight the architectural detail. Personal touches like vintage hooks or small shelves can turn the wainscoting into a functional feature.
Half-wall wainscoting provides instant sophistication with minimal effort and expense. It’s a versatile upgrade that suits traditional, modern, or eclectic styles. With a few tools and a bit of patience, you can create a striking feature wall that elevates your entire room. Ready to add that touch of class?
3. 3D Geometric Wall Panels for Contemporary Style
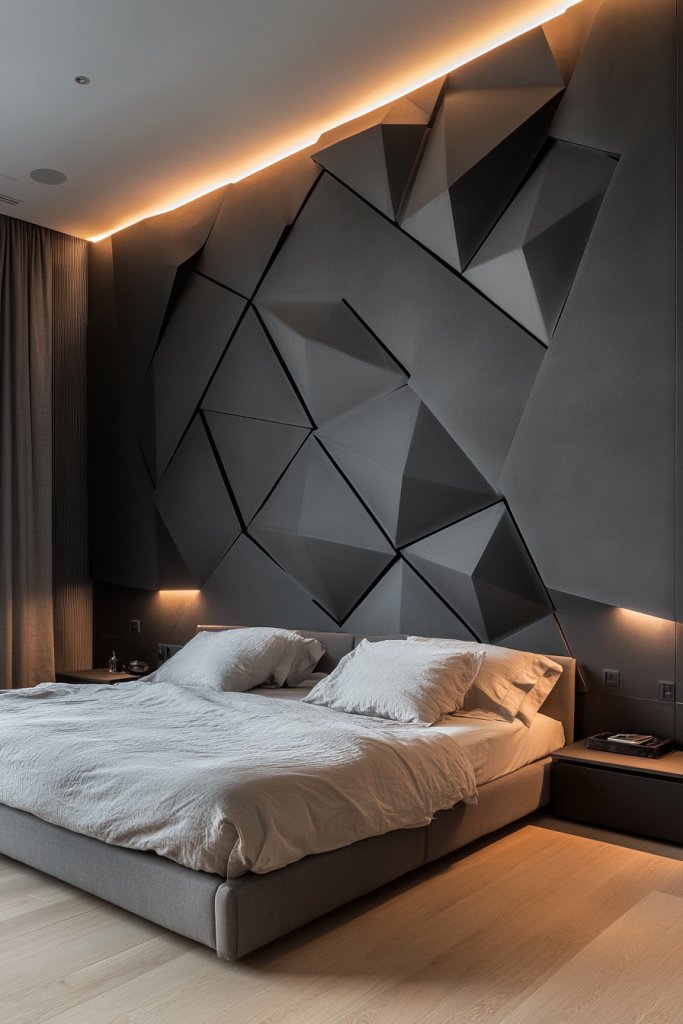
Looking for a statement wall that screams modern chic? 3D geometric wall panels offer a bold, textured focal point that transforms plain walls into eye-catching art. They add depth, dimension, and a touch of futuristic flair—perfect for making your bedroom stand out.
Imagine panels with intricate geometric patterns protruding and receding, creating a dynamic surface that plays with light and shadow. The design can range from subtle tessellations to striking sculptural forms, depending on your style preference. The textured surface invites touch and curiosity, breaking up flat wall space beautifully.
Choose panels in neutral tones for a sleek, minimalist look or vibrant colors for a more energetic vibe. Mix and match different patterns or combine with smooth surfaces for contrast. These panels work well in contemporary, industrial, or eclectic interiors, especially when paired with modern furniture and metallic accents.
Select pre-made 3D panels from specialty suppliers or DIY kits. Prepare your wall by cleaning and leveling the surface. Use adhesive or mechanical fasteners to attach panels securely. Ensure each piece fits tightly with neighbors, avoiding gaps. Seal edges with caulk if needed, then finish with paint or sealant to protect the surface. Lighting can be added to enhance shadows and depth.
Illuminate the panels with adjustable LED strip lighting for dramatic effects. Paint certain sections in metallic or bold colors for customized accents. Layer with textured textiles or minimal decor to allow the panels to shine. Use different panel patterns in various parts of the room for a curated, artistic look.
These panels add an instant high-end vibe and are surprisingly versatile. They work well in small or large rooms and can be DIY projects or professionally installed for a flawless finish. Embrace the boldness and let your walls become the main attraction. Your bedroom will thank you!
4. Vintage Beadboard for Cottage-Inspired Comfort

Want that charming cottage look without the pricetag? Vintage beadboard instantly adds cozy, nostalgic appeal to your bedroom walls. It’s a timeless choice that brings softness and character, making your space feel like a warm retreat.
Imagine narrow vertical panels with rounded beads running from floor to ceiling or halfway up the wall. The painted surface, often in white or pastel shades, reflects light and enhances the vintage vibe. The textured surface gives a handcrafted feel, adding depth and inviting touch.
Paint beadboard in classic white or soft pastel hues for a traditional look. For a more eclectic or modern feel, combine with bold wallpaper or textured fabrics. Install decorative moldings or trim for extra detail, or keep it simple for a minimalist cottage aesthetic. Seasonal accents like cozy quilts or vintage accessories can complete the look.
Begin by measuring the wall and purchasing beadboard panels or tongue-and-groove planks. Attach using nails or adhesive, making sure each panel aligns vertically. Install corner and base moldings for a polished edge. Paint or stain before installation for cleaner results. Seal all seams with caulk for a seamless appearance. Finish with a topcoat for durability.
Customize with contrasting trim painted in a different color or add faux distressing for a weathered look. Layer with textured throws or vintage-inspired textiles that complement the soft, cottage vibe. Incorporate small shelves or hooks for added functionality and charm. Personal touches turn this classic style into your unique retreat.
Vintage beadboard is a versatile and enduring choice, perfect for creating a cozy, inviting atmosphere. It’s achievable with basic tools and supplies, making it accessible for DIY enthusiasts. With its classic charm, it transforms your bedroom into a charming cottage escape. Ready to add that nostalgic touch?
5. Faux Brick Panels for Industrial Edge
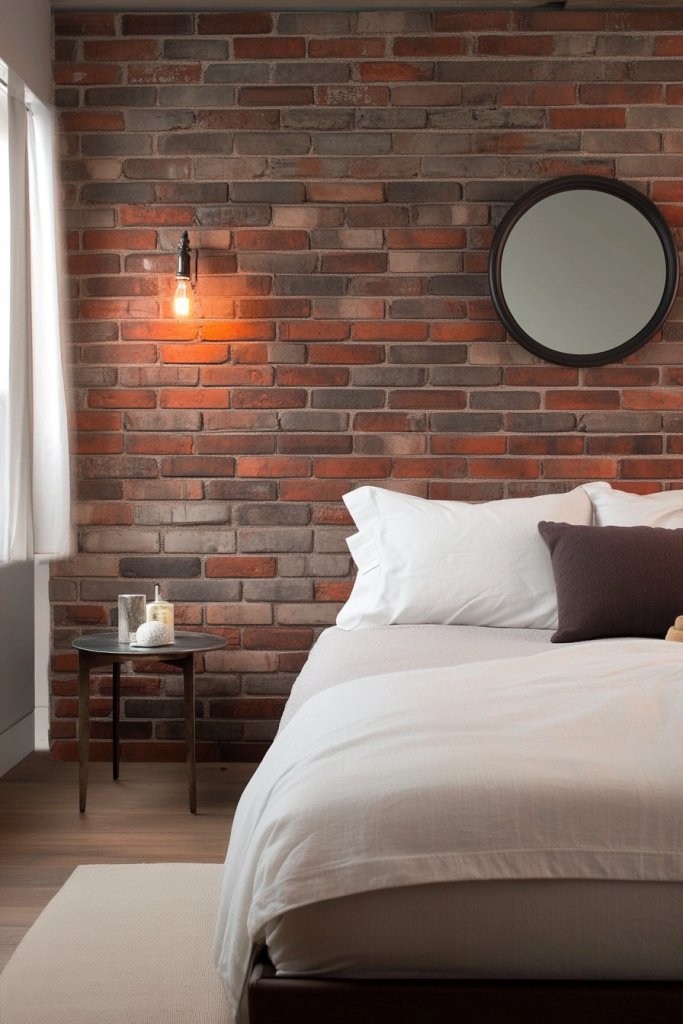
Dreaming of that raw, urban loft vibe but don’t want the hassle of real brick? Faux brick panels give you that industrial edge with none of the weight or mess. They add rugged texture and character, perfect for creating a bold feature wall.
Envision textured panels mimicking distressed brick in shades of gray, red, or taupe. The uneven surface and mortar lines add depth, while the rough finish brings an authentic, gritty feel. The tactile surface contrasts nicely with smooth, modern furniture, creating a compelling visual story.
Select panels in neutral tones for a subtle industrial look or go for vibrant red bricks for a statement wall. Pair with metal accents, vintage lighting, or exposed pipes for maximum effect. This style complements minimalist, modern, or even eclectic decor, and works well with concrete or wood flooring.
Choose lightweight faux brick panels from specialty suppliers or DIY kits. Prepare the wall by cleaning and leveling. Attach panels with construction adhesive or nails, ensuring tight seams. Seal gaps with caulk for a seamless appearance. Finish with matte sealant to enhance texture and durability. Adding spot lighting can highlight the textured surface.
Use dark grout paint or weathering techniques to age the bricks further. Incorporate industrial-inspired shelving or metal fixtures for extra authenticity. Keep decor minimal with sleek furniture and simple textiles. Personalize with vintage signage or artwork that echoes urban themes.
Faux brick panels are a cost-effective way to channel industrial chic. They’re easy to install and maintain, offering a durable, striking backdrop. Perfect for bold statements, they turn bland walls into conversation starters. Ready to add some urban edge to your bedroom?
6. Mirrored Paneling to Reflect Light and Add Glamour
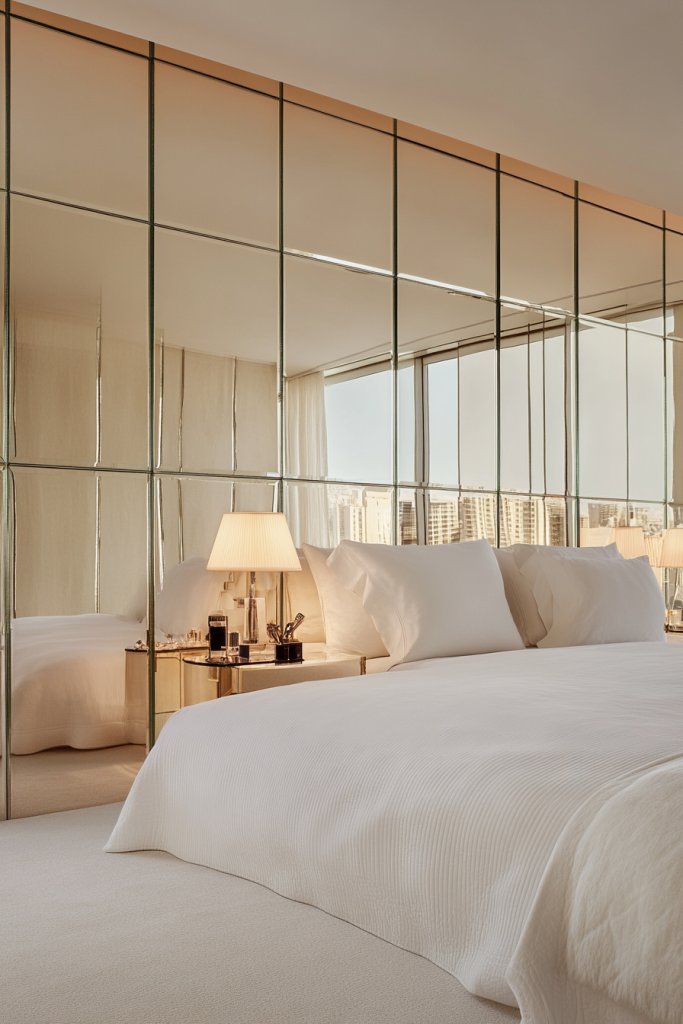
Want to make your bedroom feel more spacious and luxurious? Mirrored paneling reflects natural light and creates an illusion of depth. It adds a glamorous touch without the need for elaborate decor. Who doesn’t want a little sparkle and space?
Imagine large, sleek mirror panels covering an entire wall or framing sections of it. The reflective surface bounces light around, brightening even the dullest corners. The glossy finish introduces a modern, sophisticated vibe, making your room appear bigger and more open.
Use frameless, full-length mirror panels for seamless elegance or opt for framed versions in metallic finishes for a luxe look. Combine with minimalist furniture and neutral tones to keep the focus on the reflection. For a softer touch, layer in textured textiles or subtle lighting to prevent glare. This style pairs well with contemporary or art deco decor.
Select high-quality mirror panels or large mirrored tiles. Prepare your wall by cleaning and leveling it. Secure panels with heavy-duty adhesive or mounting hardware, ensuring they’re perfectly aligned. Use level tools during installation for precision. Seal edges with silicone or special mirror sealant to prevent moisture damage. Add lighting fixtures that highlight the reflective surface for maximum effect.
Personalize with decorative frames, LED backlighting, or etched patterns for a custom look. Mix in metallic accents or textured wall finishes to complement the mirror’s glamour. Keep surrounding decor minimal to maximize the reflective impact. Incorporate soft textiles or plush bedding to enhance the luxurious feel.
Mirrored paneling instantly elevates your space, combining function with style. It’s suitable for small rooms by visually expanding them and for glamorous aesthetics alike. With a straightforward installation, you can achieve a high-end look that’s both practical and beautiful. Ready to reflect your style?
7. Color-Blocked Panel Sections for Modern Contrast
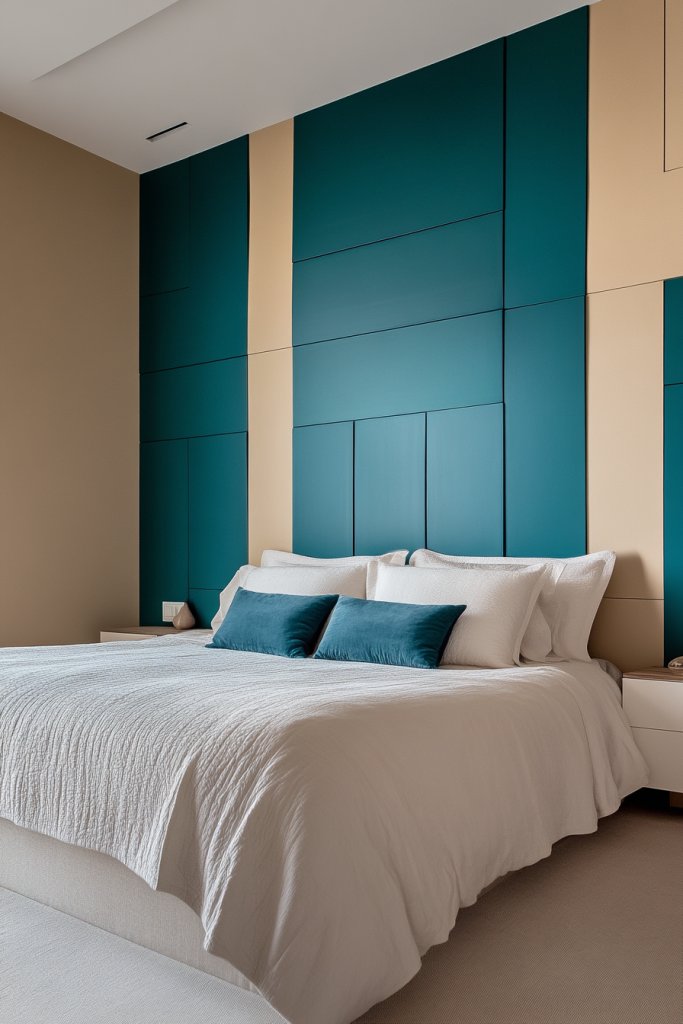
Bored with uniform wall colors? Color-blocked panel sections bring bold contrast and modern flair to your bedroom. They create eye-catching focal points and break the monotony with vibrant or subdued hues. Want to make a statement without overwhelming the space?
Visualize large rectangular panels painted in contrasting shades—like navy and blush or charcoal and mustard—arranged in geometric patterns. The sharp lines and vivid colors add energy and personality to your walls. The structured layout guides the eye across the room, emphasizing its dimensions and adding a playful yet sophisticated vibe.
Use bold, saturated colors for a lively look or softer pastel tones for a more subdued aesthetic. Play with asymmetrical arrangements or assemble panels in a grid for different effects. Incorporate textured or matte finishes to add depth, or combine with wallpaper for layered visual interest. Seasonal decor can include contrasting textiles or artwork to refresh the look.
Start by planning your panel layout and selecting contrasting paint colors. Measure and mark your sections with painter’s tape for clean edges. Paint each panel carefully, allowing each to dry before removing tape. Use high-quality paint and brushes or rollers for crisp lines. Seal the paint with a matte or satin topcoat for durability. For added dimension, create layered effects with different textures or finishes.
Add metallic or gloss accents within some panels for extra shine. Incorporate decorative borders or trim painted in complementary shades. Use textiles, such as throws or pillows, that echo one of the panel colors to tie everything together. Personalize with your favorite color palette to reflect your personality.
Color blocking is a versatile, modern technique that instantly energizes your space. It’s easy to update or change with new paint and tape, making it perfect for renters or those who love variety. With a little planning, your wall can become a bold art piece that defines your style. Ready to make a colorful statement?
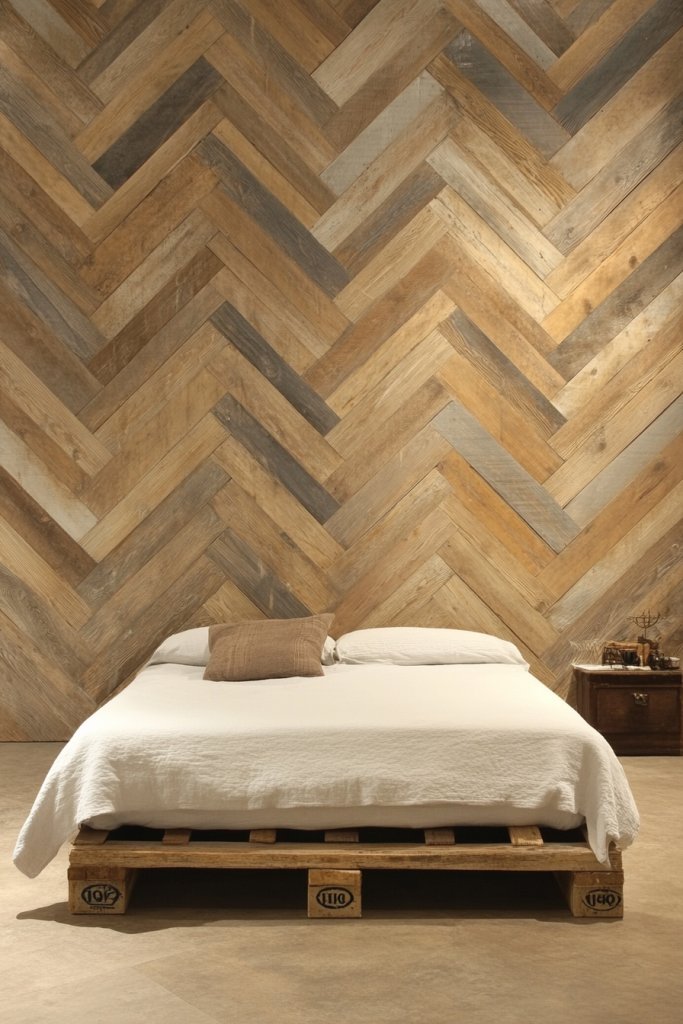
8. Chevron or Herringbone Patterned Panels for Dynamic Movement
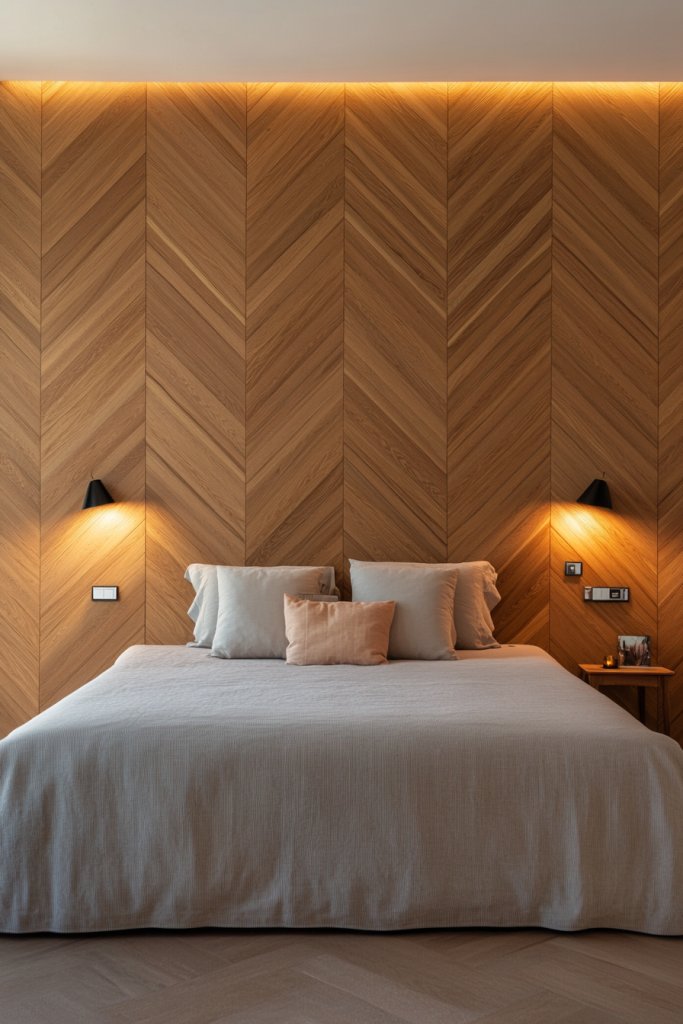
Looking to inject some energy into your walls? Chevron and herringbone patterned panels create a dynamic, eye-catching texture that adds movement and sophistication. They elevate a plain wall into a statement feature that’s full of personality. Ready to turn static surfaces into visual excitement?
Picture interlocking V-shaped or zigzag patterns running across the wall, with contrasting colors or finishes. The rhythmic pattern guides the eye, creating a sense of flow and movement. The textured surface catches light at different angles, emphasizing the geometric design and adding depth.
Choose natural wood tones for a warm, organic look or painted high-contrast colors for a bold statement. Opt for large-scale patterns for maximum impact or subtler, smaller repeats for a refined look. Incorporate metallic or gloss finishes to add shine. These patterns work well with minimalist, modern, or eclectic decor, especially when paired with sleek furniture and simple textiles.
Select or create patterned panels, either pre-made or DIY. Use painter’s tape or stencils to mark the pattern on your wall. Carefully apply paint or finish to enhance the geometric shape. Secure panels with adhesive or nails, ensuring they align perfectly. Seal with a clear topcoat if desired to protect the surface and enhance the pattern’s crispness. Lighting can be angled to highlight the textured pattern.
Mix different finishes—matte, gloss, or metallic—to accentuate the pattern’s details. Incorporate decorative trims or mouldings that follow the chevron or herringbone lines. Layer with textured textiles or simple accessories to prevent visual overload. Personalize with your favorite color combinations for a signature look.
These patterned panels create a lively focal point that energizes any room. They’re perfect for adding a touch of modern artistry and can be customized to suit your style. With some patience and planning, you can achieve a high-impact feature wall that looks professionally designed. Ready to add that dynamic movement?
9. Linen or Fabric Wall Panels for Soft Texture
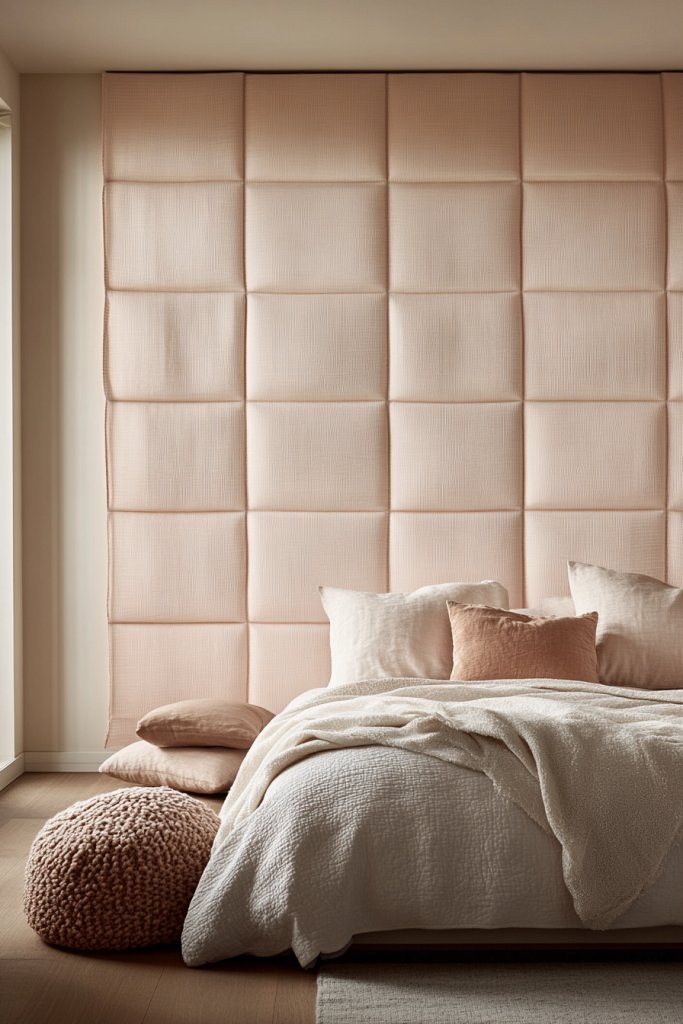
Craving a cozy, tactile wall that feels warm and inviting? Linen or fabric wall panels offer a soft texture that elevates your bedroom decor. They absorb sound and add a layer of comfort, making your space feel plush and luxurious. Who says walls can’t be cuddly?
Visualize large fabric panels stretched smoothly across the wall, with delicate textures like linen or velvet. The soft, matte surface diffuses light, creating a calming atmosphere. The subtle folds and tactile quality invite touch and add depth to your walls, transforming them into a cozy backdrop.
Choose natural linen for a minimalist, Scandinavian look or opt for textured velvet or boucle for richness. Cover entire walls or create a patchwork of panels for visual interest. Frame or edge panels with decorative trims or piping for a tailored appearance. Use neutral tones or muted colors for serenity, or go bold with jewel tones for drama.
Measure your wall and cut fabric panels to size, adding allowances for hems. Attach using a staple gun or fabric adhesive to a backing board or directly to the wall with a specialized spray. Ensure the fabric is taut and smooth for a polished look. Finish edges with decorative trim or piping. For added durability, apply a fabric protector spray. Keep panels clean with gentle vacuuming or spot cleaning.
Layer with textured bedding, throws, or pillows that complement the fabric. Incorporate decorative trims, embroidery, or quilting for a personalized touch. Use contrasting piping or piping in metallic finishes for extra detail. Personal touches like monograms or custom patterns make the panels uniquely yours.
Fabric panels are a cozy, stylish upgrade that’s surprisingly easy to install. They soften the room’s acoustics and add a tactile dimension that pure paint can’t match. With thoughtful selection, you can create a plush haven that invites relaxation. Ready to wrap your walls in softness?
10. Slim Vertical Slat Paneling for Minimalist Elegance
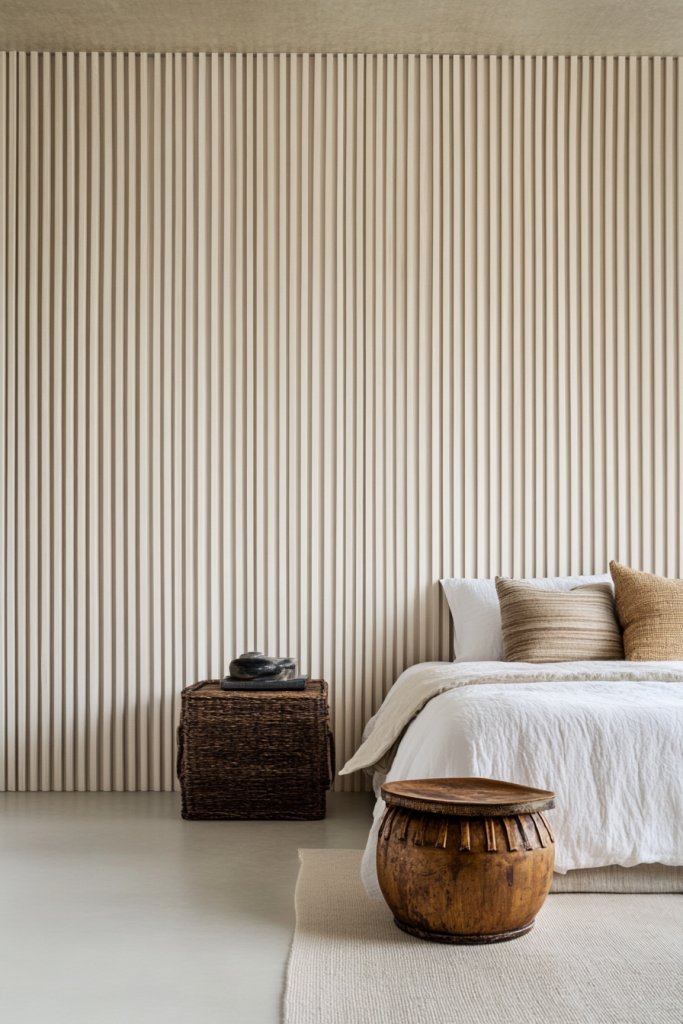
Want a sleek, understated wall that exudes modern elegance? Slim vertical slat paneling offers a minimalist approach with maximum impact. It emphasizes clean lines and height, making your space look polished and refined. Who knew simplicity could be so striking?
Imagine thin, evenly spaced wooden or MDF slats running from floor to ceiling, creating a rhythmic pattern. The narrow gaps add visual interest without cluttering the space. The smooth, matte or natural finish enhances the sleek, contemporary vibe, giving your room a streamlined feel.
Keep the slats natural for a warm, Scandinavian aesthetic or paint them in neutral shades for a monochrome, modern look. Vary the spacing or width for a more eclectic appearance. Pair with minimalist furniture and soft textiles to maintain the understated elegance. Seasonal accents like textured throws or simple art can add personality.
Measure your wall carefully and cut slats to size. Attach with clips, brackets, or adhesive, ensuring even spacing for a uniform look. Use a level and measuring tape to keep lines perfectly straight. Finish with paint, stain, or varnish, and seal for protection. Optionally, add lighting along the slats to highlight the pattern and create shadows.
Customize with contrasting colors on individual slats or add LED lighting strips for a dramatic effect. Incorporate small shelves or hooks between slats for functionality. Use textured or patterned textiles to soften the overall look. Personal touches like monogrammed accents or decorative hardware can add uniqueness.
Slim vertical slats are a timeless, elegant feature that suits many decor styles. They’re easy to install and maintain, offering a sleek upgrade that feels high-end. Whether you prefer wood or painted finishes, this style elevates your walls with subtle sophistication. Why not give your room a modern makeover?
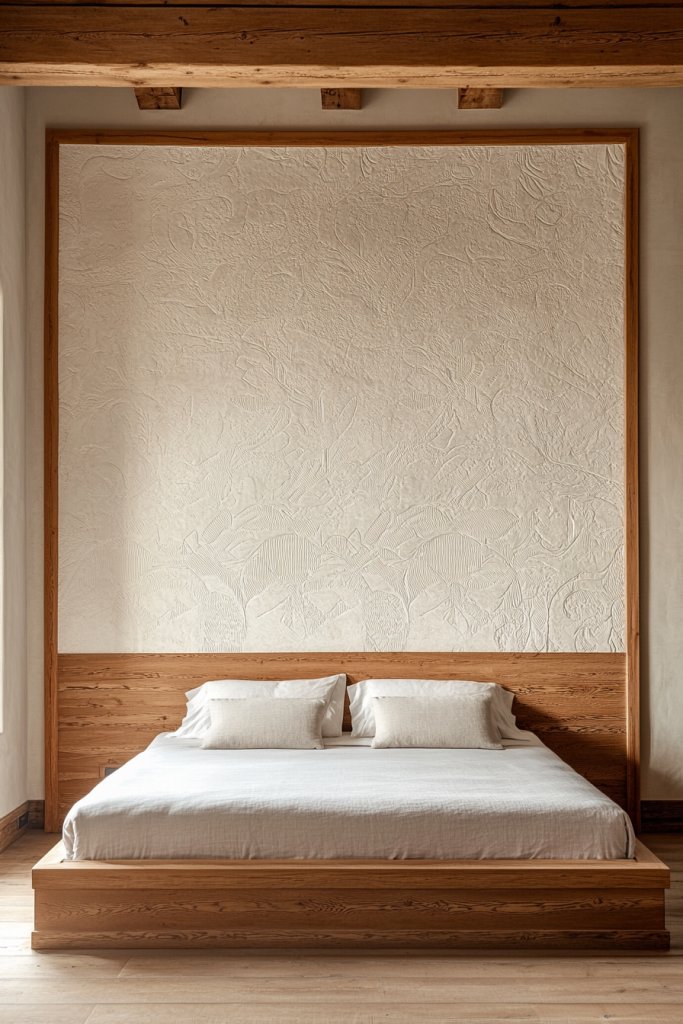
11. Oversized Panel Frames for Bold Architectural Detail
Looking for a statement wall that captures attention instantly? Oversized panel frames add a bold, architectural touch to your bedroom. They create a large-scale, gallery-like effect that transforms plain walls into eye-catching focal points. Ready to make a big impression?
Visualize huge wooden or MDF panels framed with substantial molding, arranged in a grid or as singular large features. The oversized frames define spaces and add depth, resembling custom-built architectural elements. The contrast between the frame and wall surface creates a dramatic, structured look that commands presence.
Use dark stained or painted frames for a modern contrast, or choose natural wood for warmth. Combine with textured or patterned wall finishes inside the frames for layered interest. Keep the surrounding decor minimal to let the frames stand out, or add art or photos within for personalization. This style adapts to traditional, industrial, or contemporary decor.
Create or buy large panels with built-in frames, then measure and mark their placement. Attach with heavy-duty fasteners or brackets, ensuring they’re level. Seal seams and edges with caulk for a polished appearance. Finish with your preferred paint or stain. To add extra impact, install subtle lighting along the edges or behind the panels to produce a floating effect.
Decorate the panels with mounted art or decorative accents inside the frames. Incorporate lighting or textured wall finishes around the frames to emphasize their depth. Use contrasting colors or finishes to highlight the architectural detail. Personal touches like engraved initials or custom paint effects can make it uniquely yours.
Oversized framed panels provide a powerful design statement with a professional look. They add structure and sophistication, elevating your bedroom’s style effortlessly. With simple tools and a bit of planning, you can craft a feature wall that’s truly grand and personalized. Ready to frame your space?
12. Pallet Wood Wall for a Budget-Friendly Rustic Look
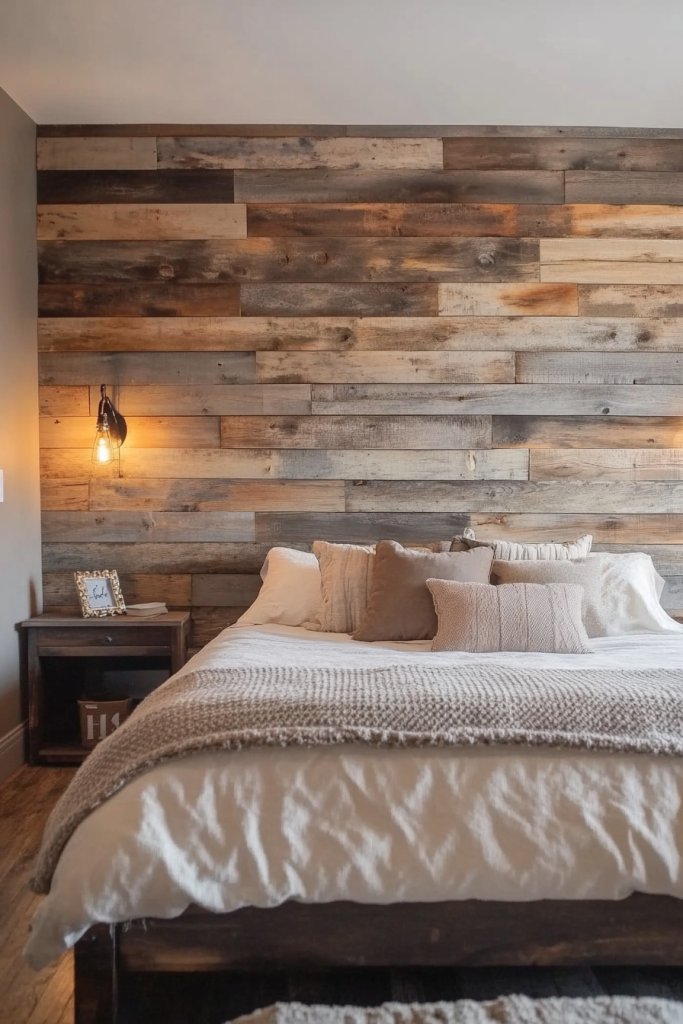
Craving cozy rustic charm without breaking the bank? A pallet wood wall is a budget-friendly way to add warmth and texture. It’s perfect for DIY enthusiasts who want a casual, textured feature that feels authentic. Want to turn everyday pallets into a stylish statement?
Picture wide, weathered wooden planks with knots, nails, and imperfections, arranged horizontally or in a herringbone pattern. The natural tones and rough texture create a welcoming, lived-in feel. The uneven surfaces and aged paint add character, making your wall a conversation starter.
Choose pallets with varying colors and textures for a more eclectic look or sand and stain for uniformity. Combine with vintage or industrial decor for maximum effect. You can also paint or whitewash pallets for different aesthetics. Seasonal accents like cozy textiles or vintage accessories enhance the rustic vibe.
Source pallets from local suppliers or reuse old pallets carefully disassembling them. Clean and sand the wood to remove splinters and dust. Arrange the planks on the wall, measuring carefully for even spacing. Attach with nails, screws, or heavy-duty adhesive. Seal with a clear finish or oil for protection. Regular maintenance involves dusting and re-sealing as needed.
Add decorative elements like small shelves, hooks, or vintage signs. Incorporate contrasting textiles or soft lighting to soften the rustic look. Personalize with painted designs or stenciled patterns. Layering with cozy textiles or vintage finds turns your pallet wall into a warm, inviting feature.
A pallet wood wall is a fantastic DIY project that offers maximum impact for minimal cost. It brings a warm, rustic charm that makes your bedroom feel cozy and personal. With patience and creativity, you can craft a feature wall that’s full of character and charm. Ready to embrace the rustic life?
13. Mirrored and Wood Combo Panels for Balance
Want a stylish wall that balances glamour with warmth? The combo of mirrored and wood panels creates a perfect harmony between modern sophistication and natural texture. It’s a versatile look that adds depth and personality to your bedroom. Ready to blend elegance with coziness?
Imagine sections of sleek mirror panels alternating with warm wood slats or framed wood panels. The reflective surface brightens the space, while the wood adds tactile warmth. The contrasting textures and finishes create a layered, balanced aesthetic that’s both contemporary and inviting.
Mix framed or frameless mirrors with natural or stained wood panels. Use light-colored woods for a Scandinavian vibe or darker finishes for richness. Incorporate textured or patterned textiles to soften the look. This combination suits eclectic, modern, or rustic decor styles, especially when paired with sleek furniture and neutral tones.
Choose high-quality mirror panels and wood slats or framed panels. Prepare the wall surface by cleaning and leveling. Attach the mirror sections with appropriate hardware or adhesive, then secure the wood panels with nails or clips. Seal edges with silicone or sealant to prevent moisture damage. Install lighting fixtures that highlight the reflective surfaces and textures.
Decorate the wood sections with painted patterns, decals, or textured finishes. Frame the mirror panels with decorative trim to add flair. Incorporate small shelves or hooks on the wood for functionality. Use accent colors in textiles or accessories to unify the look.
This combination creates a balanced, curated look that elevates your bedroom’s style. It’s a custom, high-end feel achieved with a simple mix of materials. With some planning, you can craft a feature wall that’s both glamorous and cozy. Ready to reflect your style?
14. Layered Paneling with Built-In Shelves for Functionality
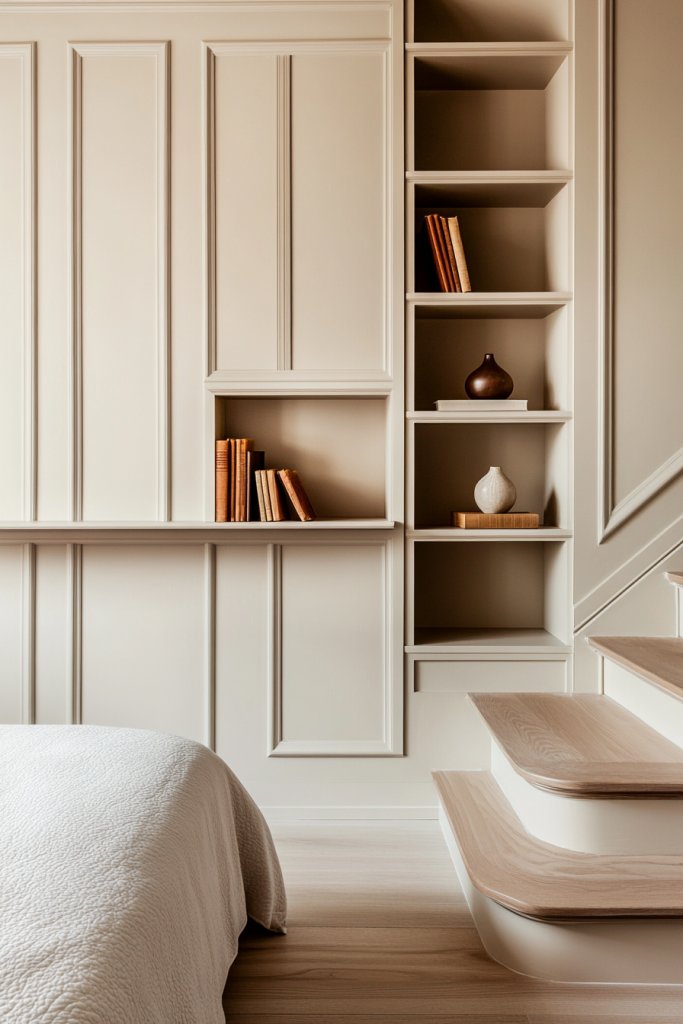
Looking to maximize storage without sacrificing style? Layered paneling that incorporates built-in shelves offers both function and design impact. It transforms plain walls into practical art pieces, perfect for displaying your favorite items. Why settle for plain when your walls can do more?
Visualize a wall of vertical or horizontal panels with integrated shelves or niches. The layered effect adds depth, while the open shelving invites decorative objects, books, or personal mementos. The combination of textures and storage creates a curated, lived-in look that’s both functional and beautiful.
Use wood, MDF, or painted panels for the layered sections. Combine open shelves with closed cabinets for a tidy look or keep everything open for easy access. Incorporate lighting within the shelves to highlight decor items. Styles range from sleek modern to rustic farmhouse, depending on your choice of materials and accessories.
Plan your wall layout and determine shelf placement for balance. Cut panels and shelves to size, then secure with brackets, screws, or adhesive. Ensure shelves are level and sturdy—use a level tool and anchors if needed. Finish with paint, stain, or sealant, and add lighting or decorative trims for extra detail. Organize items thoughtfully for aesthetics.
Display your favorite artwork, vintage finds, or plants on the built-in shelves. Incorporate decorative storage baskets or boxes for clutter control. Use personalized labels or tags for a fun touch. Layering textiles like throws or pillows nearby enhances the inviting atmosphere.
Layered paneling with shelves is a smart way to add personality and practicality. It’s a project that’s highly customizable and adaptable to any decor style. With a little effort, you create a wall that’s both beautiful and useful. Ready to build your dream wall?
15. Textured Wallpaper Panels with Paneling Borders
Tired of flat, boring walls? Textured wallpaper combined with paneling borders gives your bedroom depth and personality. It’s a quick and affordable way to add intricate detail without heavy construction. Want to create a luxurious yet subtle statement?
Imagine a wall divided horizontally or vertically, with textured wallpaper inside the panels. The borders frame the pattern, creating a refined, handcrafted look. The textured surface catches light differently throughout the day, adding richness and subtle movement to your walls.
Choose wallpaper in damask, geometric, or abstract patterns for visual interest. Opt for neutral tones or metallic sheens for a sophisticated look. Combine with painted borders or decorative molding for extra detail. Seasonal updates can include fabric accents or textured textiles to refresh the style.
Start by measuring and marking your panel layout. Apply textured wallpaper to each section, smoothing out air bubbles. Install decorative molding or trim along the edges for a framed appearance. Use compatible adhesive and tools for clean application. Seal seams with caulk or paint for a seamless finish. Finish with a topcoat if desired.
Layer with textured textiles or throws that echo the wallpaper pattern. Add metallic or gloss paint accents along the borders. Incorporate small decorative elements like hooks or shelves outside the panels for functionality. Personal touches like monograms or stenciled designs make it uniquely yours.
Textured wallpaper panels with borders are an elegant, affordable way to elevate your decor. They’re easy to update and customize, aligning with trending textured finishes. With a little planning, you can craft a feature wall that’s detailed and sophisticated. Ready to add texture and depth?
16. Accordion-Style Folding Panel Screens for Flexibility
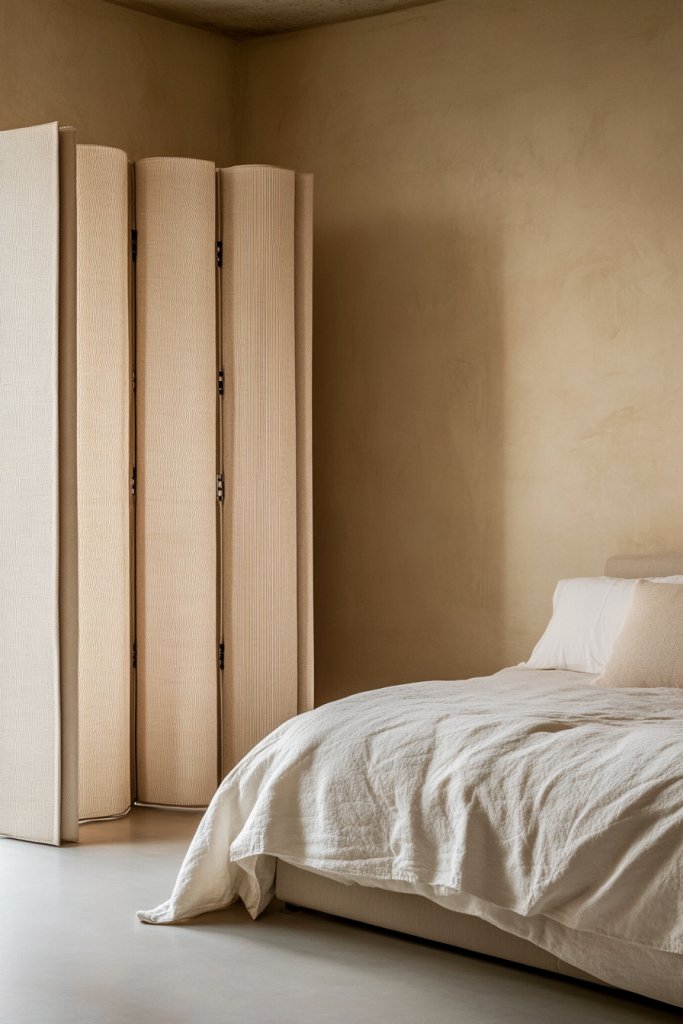
Need a flexible wall solution that can change with your mood? Accordion-style folding panels offer versatility and style in one package. They can create a private nook, hide clutter, or serve as a decorative feature. Who says walls have to be permanent?
Imagine lightweight panels that fold accordion-style, with textured or smooth finishes. They can be moved or removed easily, transforming your space in seconds. When closed, they add a layered, textured look; when opened, they reveal open space or other decor. The design invites interaction and customization.
Choose fabric, wood, or composite materials based on your decor style. Opt for neutral, bold, or patterned finishes to match your aesthetic. Use decorative hardware or trim for a finished look. They work well in eclectic, modern, or boho interiors, especially when paired with movable furniture or soft textiles.
Install tracks or hinges along the ceiling and floor to allow panels to fold and unfold smoothly. Use lightweight materials for easy handling. Secure panels with brackets or hooks that allow quick attachment and removal. Finish with paint, stain, or fabric covers. Regular maintenance involves cleaning the panels and ensuring hinges stay smooth.
Decorate panels with fabric patterns, textured paints, or custom artwork. Add decorative handles or trims for extra flair. Use different finishes on each panel for variety. Personalize with monograms or themed fabrics for special occasions or seasons.
Accordion panels are a playful, adaptable way to define or hide areas in your bedroom. They’re easy to install and reconfigure, perfect for renters or those who love change. With a bit of creativity, your walls can be both functional and fun. Who’s ready to fold and unfold?
17. Bamboo or Rattan Paneling for Natural Textural Warmth
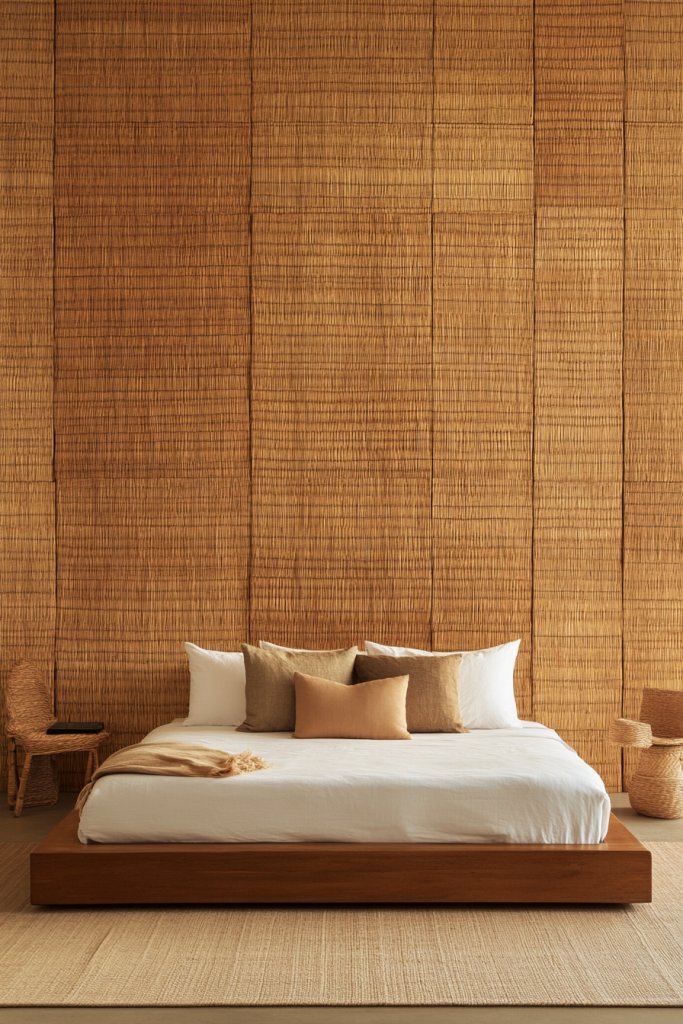
Looking to bring a touch of nature’s calm into your bedroom? Bamboo or rattan paneling introduces organic texture and warmth effortlessly. It’s a sustainable choice that adds a relaxed, tropical vibe, perfect for creating a serene retreat. Ready to embrace natural beauty?
Picture woven panels with intricate patterns, in warm honey or natural tones. The textured surface adds depth and tactile interest, reminiscent of beach huts or jungle retreats. The lightweight material creates a breezy, open feel, softening modern decor with a touch of bohemian charm.
Opt for natural bamboo for a minimalist, eco-friendly look or go for rattan with decorative weaving for a more textured aesthetic. Combine with neutral textiles, woven baskets, and wood accents. This style pairs beautifully with coastal, boho, or tropical decor themes. Seasonal accents might include linen or jute textiles.
Source panels from sustainable suppliers or craft your own by weaving natural reeds or rattan strips. Prepare the wall by cleaning and leveling. Attach panels with adhesive, nails, or hooks, ensuring even tension and alignment. Finish with a natural oil or sealant to preserve the material. Regular cleaning involves dusting or wiping with a damp cloth.
Add decorative elements like hanging plants, woven baskets, or textured textiles to complement the natural theme. Use lighting that mimics natural sunlight or soft warm tones. Incorporate ocean-inspired or tropical motifs for a themed look. Personal touches like monograms or custom weaving patterns make it uniquely yours.
Bamboo and rattan panels are a beautiful, eco-conscious way to add warmth and texture. They create a relaxed, resort-like atmosphere that invites calm. Easy to install and maintain, they’re perfect for a natural, tranquil bedroom retreat. Ready to bring the outdoors inside?
18. Faux Stone Panels for Earthy, Natural Feel
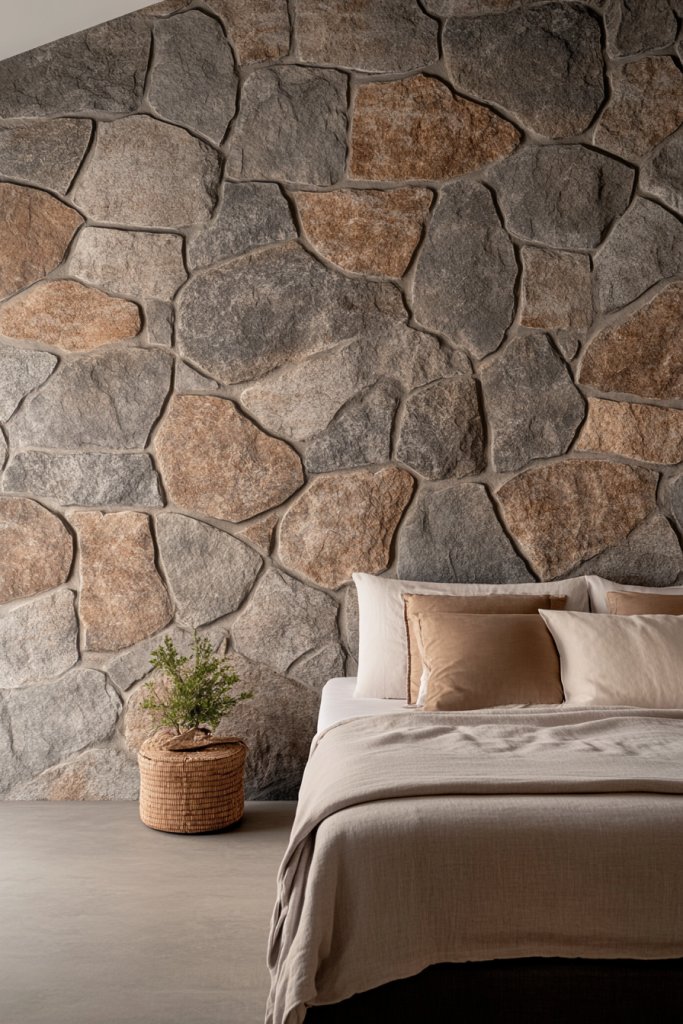
Craving a rugged, earthy vibe but worried about the weight and cost of real stone? Faux stone panels deliver that natural, textured look without the hassle. They bring a raw, organic charm that elevates your bedroom’s aesthetic with minimal effort. Want that earthy retreat feel?
Imagine lightweight panels mimicking rough-hewn stone in shades of gray, taupe, or warm beige. The textured surface adds tactile interest, with cracks and crevices that evoke rugged cliffs or mountain walls. The layered look creates depth and contrast, making your wall a natural centerpiece.
Choose darker tones for a dramatic, moody vibe or lighter hues for a more subtle, earthy appeal. Combine with wood accents or metal fixtures for an industrial-rustic mix. Pair with textured textiles and natural fibers for a cohesive, grounded style. Seasonal decor can include cozy throws or earthy pottery.
Select faux stone panels from specialty suppliers or DIY kits. Prepare the wall surface by cleaning and leveling. Attach panels with adhesive or mechanical fasteners, ensuring a seamless fit. Seal edges with caulk or sealant to prevent moisture intrusion. Finish with a clear protective coating if needed. Lighting from below or side creates shadows that highlight the textured surface.
Add decorative metal or wood trims to frame the panels. Incorporate earthy decor like clay pots, woven baskets, or textured textiles nearby. Use lighting to emphasize the natural textures and tones. Personalize further with artwork or symbols inspired by nature.
Faux stone panels give your room a natural, earthy vibe without the weight or expense. They’re easy to install and maintain, offering a durable backdrop that feels authentic. Perfect for creating a cozy, rustic retreat—ready to bring the outdoors inside?
19. Beadboard with Contrasting Trim for Classic Detailing
Craving a timeless, handcrafted look in your bedroom? Beadboard with contrasting trim adds classic charm and refined detail. It’s a versatile upgrade that elevates simple walls into a statement of craftsmanship and style. Want that cozy cottage or vintage vibe?
Picture narrow vertical beadboard panels painted in soft white or pastel hues, accented by bold, dark trim or molding. The beaded texture reflects light subtly, adding depth and a handcrafted feel. The contrast between panel and trim creates a striking visual boundary, framing your space beautifully.
Use traditional beadboard for cottage or farmhouse aesthetics, or opt for sleek, painted MDF for a modern twist. Play with contrasting colors—like navy and white or charcoal and cream—for a dramatic effect. Incorporate decorative moldings, picture rails, or chair rails to add layers of detail. Seasonal decor could include vintage textiles or soft lighting.
Begin by measuring and cutting beadboard panels to fit your wall. Attach using nails or adhesive, ensuring the panels are aligned vertically. Install molding or trim along the top and bottom edges for a finished look. Fill nail holes and seams with wood filler, then sand smooth. Paint or stain the beadboard and trim separately before assembly for cleaner results. Seal all seams with caulk for a seamless finish.
Highlight with decorative moldings or add a contrasting painted border to emphasize the paneling. Use vintage-inspired hardware or hooks on the trim for functional decor. Layer textured textiles or vintage accessories to enhance the classic charm. Personal touches like monograms or hand-painted designs make it uniquely yours.
Beadboard with contrasting trim is a tried-and-true style that adds warmth and character. It’s achievable with basic carpentry skills and materials, making it perfect for DIY lovers. This detail-rich feature instantly elevates your room, blending craftsmanship with comfort. Ready to add timeless charm?
20. Metallic-Finished Wall Panels for Modern Glam
Want to inject a dose of luxury and modernity into your bedroom? Metallic-finished wall panels offer a sleek, glamorous look that reflects light and elevates your decor. They turn ordinary walls into statement pieces that shine. Ready to add a touch of high-end sophistication?
Visualize panels with brushed or polished metallic surfaces in gold, silver, or rose gold tones. The reflective finish catches and amplifies light, creating a luminous backdrop. The textured or smooth finish adds depth, making your wall shimmer and shimmer at every angle. It’s like a piece of art on your wall.
Choose matte, satin, or high-gloss finishes depending on your style. Pair metallic panels with neutral furniture and minimal accessories for a modern, chic look. Incorporate textured textiles or dark accents for contrast. This style works well in contemporary, art deco, or luxe interiors, especially when combined with crystal or glass accents.
Select panels with metallic finishes from specialty suppliers or DIY kits. Prepare your wall by cleaning and leveling. Attach using adhesive, screws, or clips designed for metallic surfaces. Ensure panels are aligned precisely and sealed at edges with silicone or sealant. For added impact, install LED lighting to highlight the metallic sheen. Finish with a protective topcoat if needed.
Layer with textured fabrics, plush bedding, or glass accessories that reflect light. Incorporate decorative trims or backlit features to enhance the glow. Use contrasting colors or matte finishes nearby to balance the shine. Personal touches like monograms or custom patterns further elevate the luxe feel.
Metallic panels redefine glamour, offering a modern, upscale aesthetic. They are surprisingly versatile and can be customized to match any color scheme. With minimal effort, you achieve a high-end look that’s perfect for making your bedroom truly special. Ready to shine?
21. Recessed Paneling with Backlighting for Ambient Glow
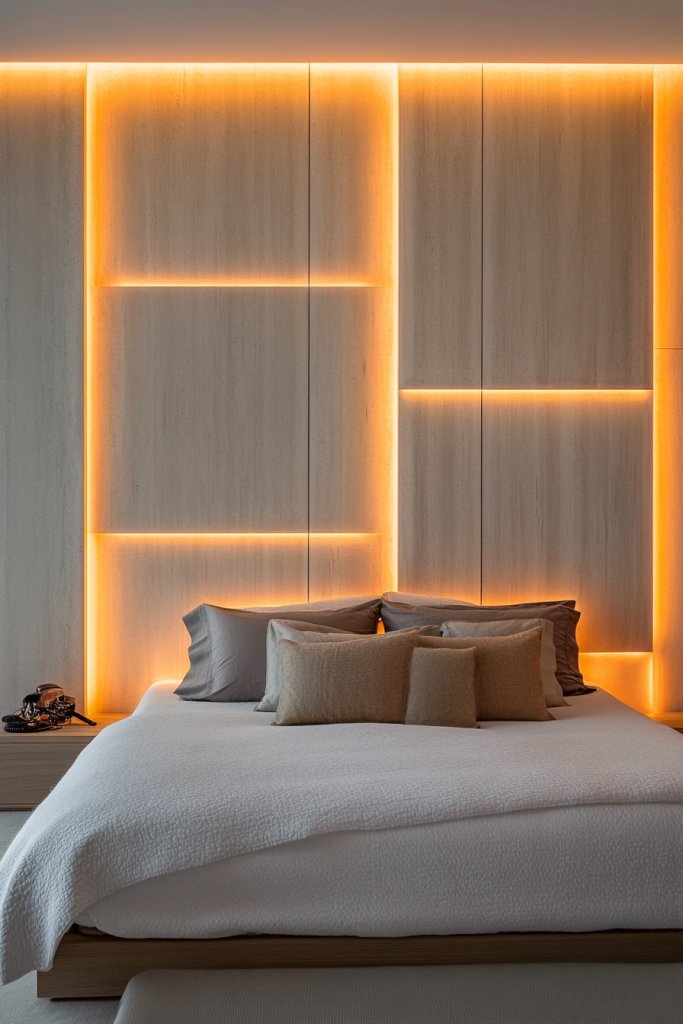
Looking to create a cozy, ambient atmosphere in your bedroom? Recessed paneling with integrated backlighting offers a soft glow that transforms your space into a tranquil retreat. It’s a stylish way to add both depth and mood lighting in one go. Who says walls can’t do double duty?
Picture deep-set panels inset into the wall, with LED strips hidden behind or inside for a gentle, diffused light. The recessed areas create shadows and highlights, emphasizing texture and architectural detail. The glow is warm and inviting, perfect for relaxing evenings or romantic nights.
Use wood, MDF, or textured panels for the inset areas, finished with paint or stain. Choose warm white or dimmable LED lighting for customizable ambiance. Incorporate geometric or organic shapes for different effects. This approach pairs well with minimalist, modern, or transitional decor, especially when combined with soft textiles or plush bedding.
Design your panel layout and install the inset frames or recesses. Attach panels securely, then hide LED strips behind the edges for a clean look. Connect lighting to a dimmer switch for adjustable mood. Seal seams and edges with caulk for a polished appearance. Test lighting for even diffusion and warmth. Consider a professional for electrical connections.
Add color-changing LED options to match your mood or season. Decorate the inset panels with textured finishes or metallic accents for extra richness. Incorporate soft textiles or layered bedding to complete the cozy atmosphere. Personal touches like engraved patterns or subtle color shifts personalize your retreat.
Recessed backlit paneling elevates your wall to an architectural feature that’s both functional and stylish. It creates a calming ambiance perfect for winding down. With simple installation, you can achieve a high-end, spa-like effect. Ready to glow softly into relaxation?
22. Multi-Tonal Paneling for Colorful Depth
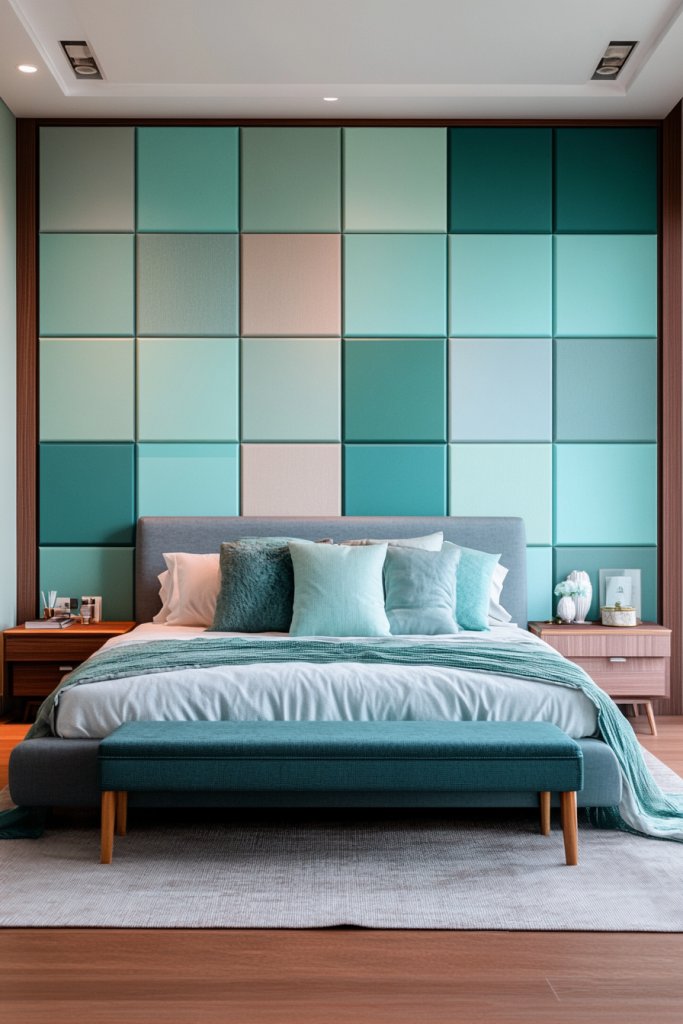
Bored of single-tone walls? Multi-tonal paneling introduces vibrant depth and visual intrigue, making your bedroom walls lively and dynamic. It’s a creative way to add personality and break the monotony with color variation. Want your walls to tell a story?
Imagine panels painted in different shades of the same color family, from light to dark, creating a gradient effect. The variation in tone adds depth and visual movement, making the walls appear richer and more layered. The subtle color shifts catch light differently, adding a shimmering effect that enlivens the space.
Use monochromatic schemes for a sophisticated look or combine contrasting hues for bold impact. Play with different finishes—matte, satin, or gloss—to enhance the color dynamics. Mix panel sizes or shapes for an eclectic vibe, or keep it uniform for a more polished appearance. Seasonal accents could include layered textiles or art that echoes the color palette.
Select your color scheme and plan panel placement carefully to achieve a smooth gradient or contrasting effect. Paint panels in stages, blending colors at the edges for seamless transitions. Use painter’s tape for clean lines and multiple coats for vibrancy. Seal with a matte or satin topcoat to protect the finish and enhance colors. Lighting can be adjusted to emphasize tonal variations.
Add metallic or iridescent paints to certain panels for extra shimmer. Incorporate textured or patterned textiles that complement the color scheme. Use decorative trims or borders to define sections further. Personalize with painted motifs or your favorite colors to reflect your personality.
Multi-tonal paneling offers endless creative possibilities to energize your walls. It’s an artistic and customizable approach that adds depth and vibrancy. With patience and a steady hand, you can craft a feature wall that’s as unique as you are. Ready to add colorful depth?
23. DIY Pallet Wood Chevron Accent Wall for Personalized Style
Want a truly custom, handcrafted look without the hefty price tag? A DIY pallet wood chevron accent wall combines personality with budget-friendliness. It’s a perfect project for creative DIYers eager to add a unique touch to their bedroom. Ready to craft your own signature style?
Visualize wide, reclaimed pallets cut into strips and arranged in a chevron or zigzag pattern. The natural grain and imperfections add authenticity and charm, making your wall a focal point. The pattern’s dynamic movement draws the eye and creates a lively, textured backdrop. It’s a rustic yet modern statement that feels personal.
Opt for natural, stained, or painted finishes to match your decor. Play with contrasting colors or keep it monochrome for subtlety. Vary the width of the strips for a more eclectic look, or keep them uniform for clean lines. This project suits farmhouse, industrial, or eclectic styles and can be customized seasonally.
Disassemble pallets carefully, then cut the wood into strips of your desired width. Arrange the strips in a chevron pattern on the floor or table first to plan your design. Attach using nails, screws, or heavy-duty adhesive, starting from the center and working outward. Seal and finish with stain, paint, or clear coat. Mount the finished panel on your wall with nails or brackets. Regular upkeep involves dusting and occasional re-sealing.
Incorporate decorative elements like painted patterns, stenciled designs, or personal symbols. Add lighting or textured textiles nearby for extra warmth. Use contrasting colors or finishes to emphasize the pattern. Personalize with family initials, quotes, or seasonal motifs for a truly one-of-a-kind feature.
This DIY chevron wall is a labor of love that results in a stunning, personalized feature. It’s affordable, eco-conscious, and highly customizable. With patience and a few basic tools, you can craft a textured wall that’s full of character and pride. Ready to make your mark?
Conclusion
There’s a world of bedroom panelling ideas waiting to be explored, from timeless wood panels to contemporary textured designs, each adding its own unique charm. These diverse options can easily be adapted to suit any style or space, turning your bedroom into a cozy, stylish retreat. Don’t be afraid to experiment and personalize these ideas—your perfect textured wall is just a project away! Embrace the opportunity to refresh your space and make your bedroom truly yours.
Leave a Reply