Your bedroom walls are more than just a backdrop; they’re a canvas for your personality, style, and creativity. With so many innovative and beautiful ideas out there, updating your walls has become one of the easiest ways to refresh your space and make it truly feel like your own sanctuary. Whether it’s bold colors, textured finishes, or artistic accents, bedroom wall ideas are incredibly popular because they allow for personalization and transformation with minimal effort.
This article is packed with inspiring ideas that cater to every taste and style, from modern minimalism to boho charm. You’ll discover a variety of creative solutions, including DIY projects, statement wall treatments, and clever decor tips—all designed to help you craft a fresh, inviting atmosphere. Get ready to explore a world of possibilities and find the perfect walls to elevate your bedroom to new heights!
1. Create a Bold Accent Wall with Removable Wallpaper
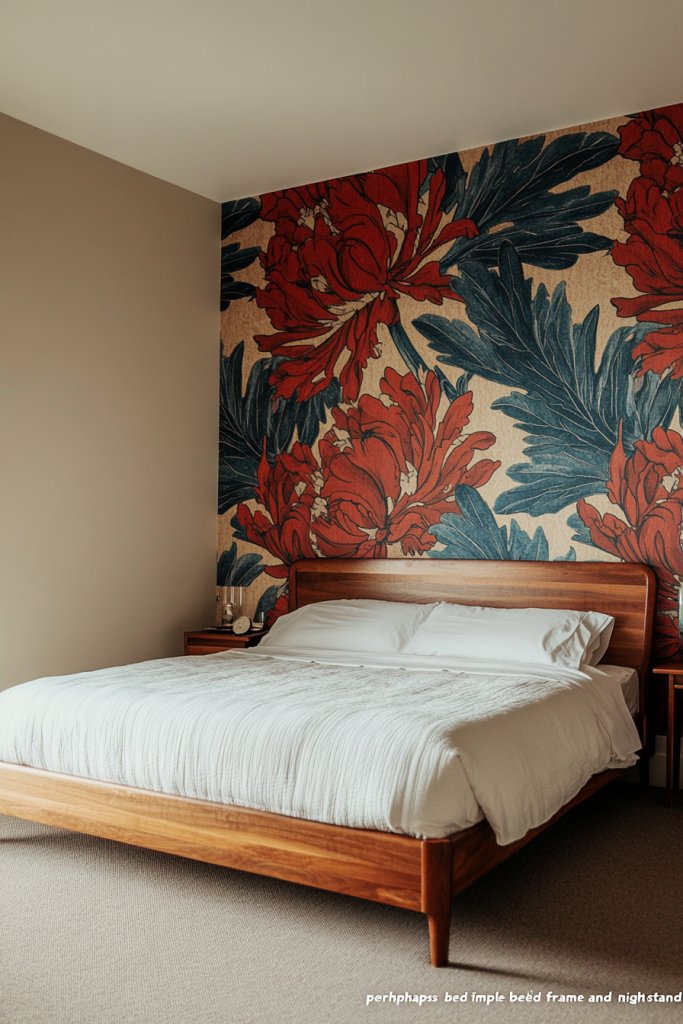
Ever feel like your bedroom is missing that wow factor? Maybe your walls look dull or too plain, and you crave a quick upgrade that doesn’t involve repainting or permanent changes. Removable wallpaper offers a hassle-free way to inject personality and color into your space without the commitment. It’s perfect for renters or anyone who loves changing their style often.
Picture a wall covered in vibrant, geometric patterns that instantly catch your eye. The peel-and-stick material features bold colors and fun textures that mimic traditional wallpaper but with the ease of a sticker. When applied, it creates a seamless, eye-catching statement wall that transforms the entire room’s mood. Plus, it’s easy to remove or reposition if you want a fresh look.
Choose designs that match your personality, from subtle pastels to loud prints. Seasonal variations are simple—swap out a floral pattern for a modern metallic look during holidays or special events. This method works well in bedrooms of all sizes and styles, from minimalist spaces to maximalist retreats. You can even combine multiple patterns for a playful collage effect.
Start by cleaning and priming your wall surface to ensure a smooth application. Measure and cut your wallpaper panels accurately, leaving a small overlap for seamless edges. Peel off the backing gradually while smoothing the material with a squeegee or credit card to avoid air bubbles. For uneven surfaces, use a hairdryer to help the adhesive stick better. When ready to change, simply peel off the wallpaper without damaging paint or drywall.
Add metallic accents or custom decals over the wallpaper for extra flair. Incorporate complementary textiles such as throw pillows or bedding that pick up the colors in your wall design. You could also create a layered look by combining the wallpaper with textured paint or wall decals for a multidimensional effect. Personal touches like monograms or inspirational quotes can also be added using removable adhesive letters.
Removable wallpaper makes transforming your bedroom fun and achievable without a huge budget or mess. It allows you to experiment with bold styles that reflect your personality. Ready to turn a bland wall into your favorite feature? Just peel, stick, and enjoy your fresh new vibe!
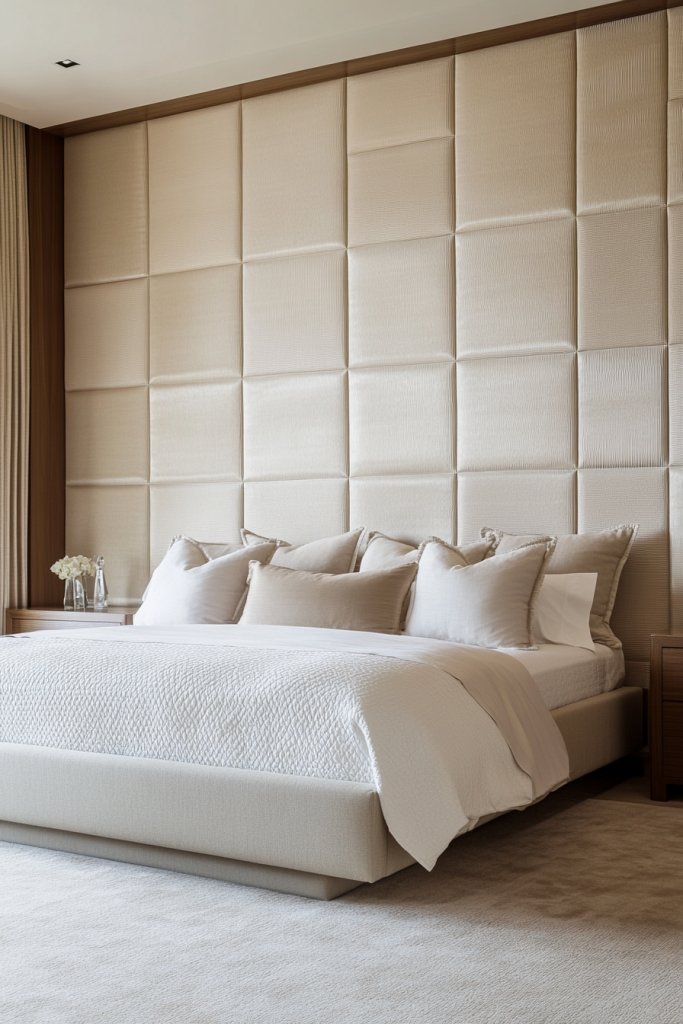
2. Incorporate Textured Wall Panels for Depth and Interest
Does your bedroom feel flat or uninspired? Sometimes paint alone isn’t enough to add the character you crave. Textured wall panels offer a quick way to give your space depth and tactile interest, making your walls more than just a backdrop. This approach creates a cozy, inviting atmosphere that’s as stylish as it is unique.
Imagine a wall covered with panels resembling reclaimed wood, soft fabric, or geometric foam shapes. The textures catch light differently throughout the day, adding dynamic shadows and visual complexity. The tactile surface invites you to touch, making the room feel more layered and lived-in. These panels can be arranged in patterns or simply used to cover an entire wall for maximum impact.
Select panels that complement your decor style—sleek wood for Scandinavian or rustic looks, soft fabric for bohemian vibes, or 3D foam for modern minimalism. Seasonal changes can be achieved by swapping out panels or adding decorative trims. In small rooms, vertical or diagonal patterns can elongate the space, while larger rooms benefit from horizontal or expansive designs. Mixing textures can elevate an eclectic aesthetic.
Start by measuring your wall and choosing panels that fit your space and style. Adhesives or mounting brackets vary depending on the material—some panels stick directly to drywall, while heavier options may require screws or anchors. Prepare the wall surface by cleaning thoroughly and marking guidelines for even placement. Install the panels in a pattern or randomly, ensuring tight joins and alignment. Finish with sealants or edge trims if desired for a polished look.
Add LED backlighting behind panels for a subtle glow that highlights textures at night. Incorporate decorative LED strips or hidden lighting for a modern touch. Personalize further with paint or stain to match your color scheme, or combine with other wall treatments like wallpaper accents. Accessories like soft textiles or minimalist art can soften the texture while maintaining visual interest.
Textured panels instantly elevate the room’s style, giving you that designer look on a budget. They’re easy to install, customize, and replace if your tastes evolve. Don’t be afraid to experiment with different textures and placements—it’s your space, after all. Ready to add depth and personality to your bedroom walls? Go ahead, get tactile!
3. Achieve a Minimalist Look with Monochrome Paint Techniques
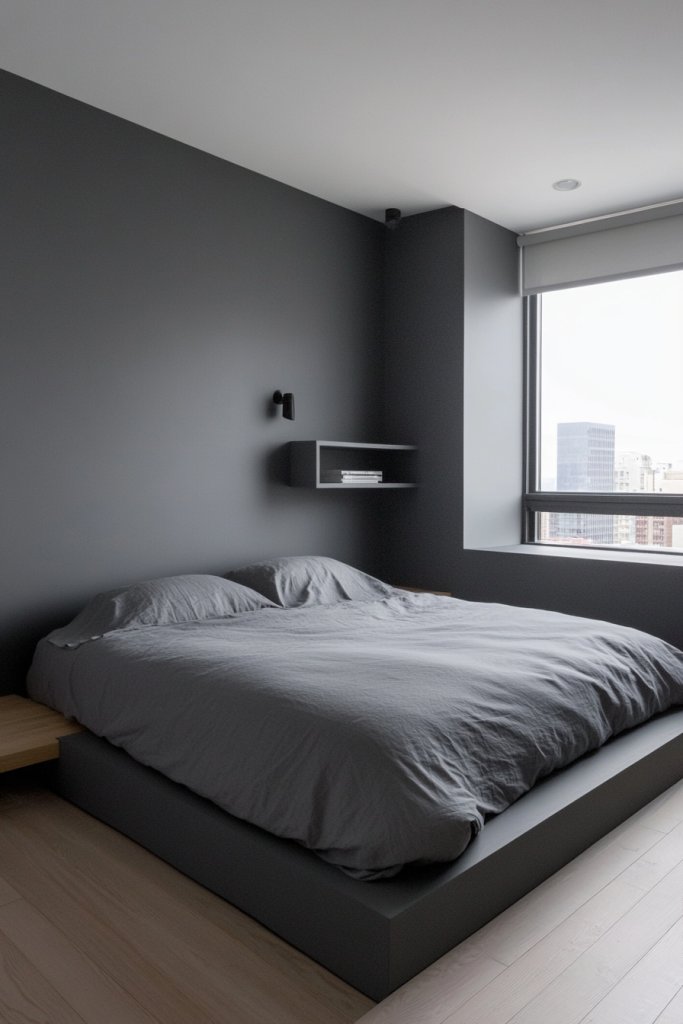
Feeling overwhelmed by busy patterns or vibrant colors? Sometimes, less truly is more, especially when it comes to creating a calming retreat. Monochrome paint techniques help you achieve a sleek, sophisticated look that promotes peace and relaxation. Plus, it’s a timeless style that never goes out of fashion.
Visualize a wall painted in varying shades of gray, from charcoal to light dove. The subtle gradations create depth without visual clutter, making the room feel expansive and serene. Matte finishes absorb light softly, while semi-gloss adds a gentle sheen. The result is a smooth, seamless surface that whispers elegance and restraint.
Choose a monochrome palette that suits your mood—warm neutrals for cozy vibes, cool blues for tranquility, or rich blacks for drama. You can incorporate texture through techniques like sponge painting, color washing, or gentle blending. Seasonal updates might involve adding metallic or pearl accents for a touch of shimmer, or sticking to matte for a more understated effect. This approach works well in both small and large bedrooms.
Start by selecting a monochrome color scheme and prepping your wall with clean, smooth surfaces. Use quality brushes or rollers suited for your paint type to ensure even coverage. For gradient effects, employ sponges or dry brushes to blend shades seamlessly. Apply painter’s tape for clean edges if you want geometric patterns within the monochrome theme. Multiple coats may be needed for consistent color depth. Finish with a protective sealant if desired.
Add subtle metallic or iridescent sheen to certain areas to catch light and create visual interest. Incorporate textured textiles like woven throws or plush bedding that complement the monochrome palette. Layering different finishes—matte, satin, gloss—can add richness without breaking the minimalist aesthetic. Personal touches such as engraved wall decals or subtle patterns can make the space uniquely yours.
A monochrome palette offers endless versatility and elegance, allowing you to focus on textures and accents. It’s a safe yet stunning choice for a tranquil bedroom oasis. Embrace the simplicity—your walls can be both calming and striking when done right. Ready to master minimalism? Your serene retreat awaits!
4. Install Floating Shelves for Functional Decor Displays
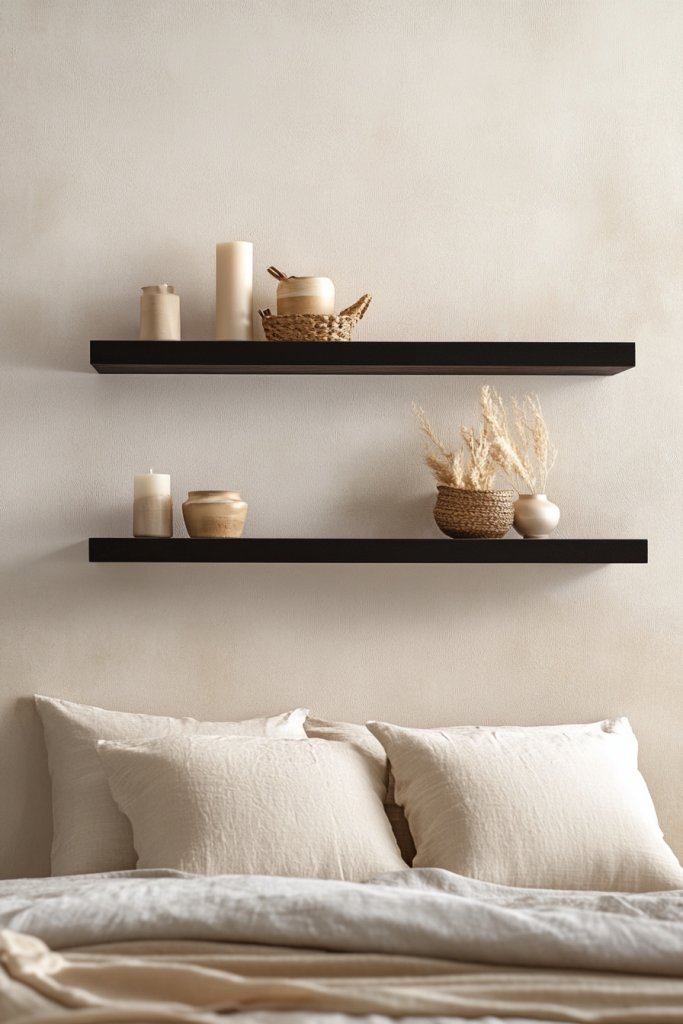
Are your walls feeling empty despite all your decor attempts? Floating shelves are the perfect solution to add both storage and style without cluttering your space. They turn blank walls into display areas for your favorite treasures, books, or tiny plants (if you ignore the rule). Best part: they look sleek, modern, and unobtrusive.
Imagine a set of slim, matte black shelves holding a curated collection of your favorite novels, decorative boxes, or framed photos. The shelves cast subtle shadows that add depth, while items arranged in varying heights create visual rhythm. The minimalist design keeps your space open yet personalized, making your wall a focal point instead of an afterthought.
Choose materials to match your decor—wood for warmth, metal for industrial edge, or acrylic for a modern feel. Install multiple shelves at different heights for an eclectic, layered look. In small bedrooms, narrow shelves maximize space without overwhelming. Seasonal swaps of decor items keep your display fresh and interesting. Mix and match accessories like candles, sculptures, or framed quotes for an ever-changing visual story.
Start by measuring wall space and selecting sturdy brackets or wall anchors suitable for your shelf material. Mark the positions carefully, ensuring level installation with a bubble level. Drill holes and insert anchors if needed, then mount the shelves securely. Arrange your items thoughtfully, balancing visual weight and color for harmony. Regularly check for stability, especially if you add heavier objects. Clean dust from shelves periodically to keep the look fresh.
Paint or stain shelves in your favorite colors or finishes to match your room’s theme. Incorporate decorative storage solutions like baskets or boxes for a tidy appearance. Add LED strip lighting underneath shelves for a subtle glow that highlights your display. Personal touches, such as DIY crafts or vintage finds, make your wall truly yours.
Floating shelves give you freedom to display your personality boldly and change things up effortlessly. They turn plain walls into versatile, functional art. Whether you prefer a minimalist or maximalist look, shelves adapt to your style. Ready to elevate your bedroom decor? Just install and decorate!
5. Use Washi Tape for Creative Geometric Patterns
Want to add some personality to your walls without committing to paint or wallpaper? Washi tape is your best friend for quick, fun, and temporary design updates. It allows you to create intricate geometric patterns or simple accents, making your walls a canvas for your creativity. Plus, it’s renter-friendly and easily removable.
Imagine bold lines and shapes layered in contrasting colors—black and white, metallic and pastel—forming a modern abstract design. The tape adheres smoothly without damaging paint, and you can experiment with different patterns until you find what suits your mood. The textured, matte finish of washi tape adds a subtle tactile element that catches the eye. It’s like creating a custom mural with tape instead of paint.
Use tape in monochrome schemes for sleek sophistication or in vivid colors for playful energy. Change patterns seasonally or for special occasions—try chevrons, stripes, or asymmetrical designs. Small bedrooms can benefit from vertical or diagonal lines to elongate the space, while larger rooms can handle bold, large-scale patterns. Combine with other wall treatments like paint or decals for layered effects.
Start by sketching your pattern on paper or directly on the wall with light pencil lines. Carefully apply washi tape along your guidelines, pressing firmly to ensure smooth edges. Use a ruler or level for precise straight lines, especially for complex geometric shapes. For clean corners, cut tape at angles or overlap edges slightly. When finished, step back and review for any uneven edges, pressing down as needed. To remove, gently peel at a corner, leaving no residue.
Add metallic or holographic washi tapes for a luxe touch. Create themed patterns for holidays, seasons, or personal milestones. Use tape to frame mirrors, windows, or artwork to add visual interest. Incorporate complementary textiles or accessories nearby to tie the look together. Play with layering different widths and colors for a truly custom design.
Washi tape turns wall decorating into a playful, approachable project—no skills needed! It’s a great way to express your personality boldly and change your decor frequently. Ready to make your walls pop with color and pattern? Grab some tape and start designing!
6. Apply Wall Decals for Playful, Non-Permanent Decor
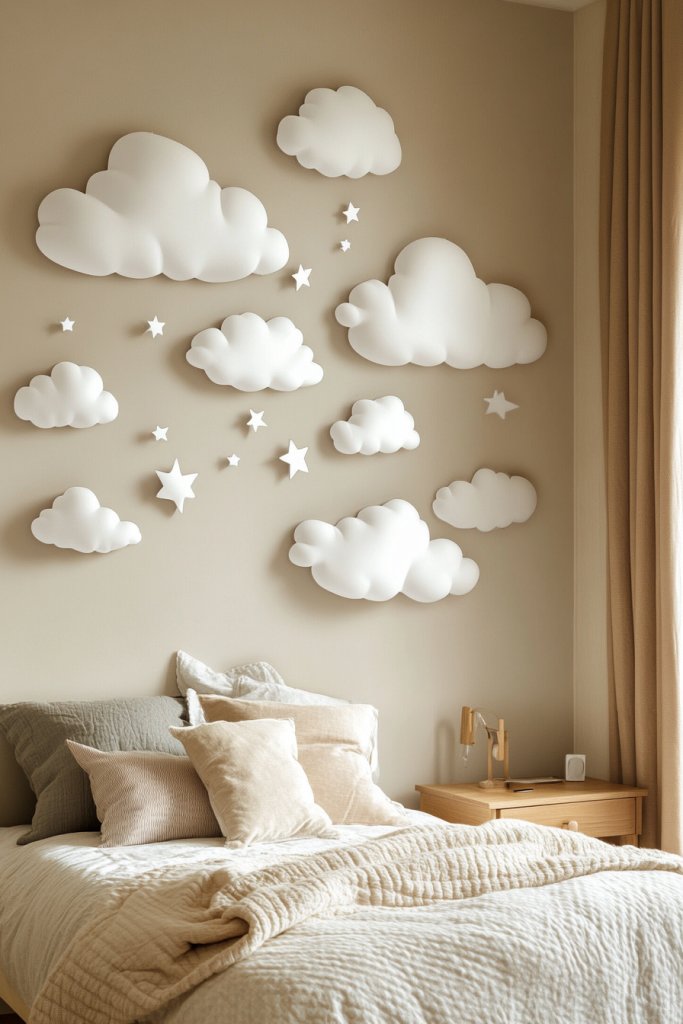
Looking for a fun way to personalize your bedroom without the permanence of paint or wallpaper? Wall decals are your answer—easy to install, remove, and reposition. They bring a playful, whimsical touch or an inspiring message without the fuss. Best of all, they’re perfect for renters or anyone who loves changing their decor frequently.
Imagine a wall decorated with delicate floral or star-shaped decals creating a dreamy, layered effect. Bold quotes or motivational words can be arranged artistically to motivate you every day. The decals can be matte or glossy, adding texture and shine to the surface. When light hits them, they cast gentle shadows, enhancing their visual appeal.
Choose decals that match your style—minimalist, boho, or playful. Mix and match sizes and shapes for a dynamic look. Seasonal themes, such as snowflakes or leaves, can be added temporarily for a festive touch. You can also combine decals with other wall treatments like paint or fabric for a layered, personalized aesthetic.
Start by cleaning your wall surface thoroughly. Plan your layout on the floor first, then transfer it to the wall with painter’s tape or light pencil marks. Carefully peel the backing and press the decal gently onto the surface, smoothing out air bubbles with your hand or a squeegee. For complex designs, work from the center outward. To remove, gently peel from the edges without damaging your paint.
Add glitter or metallic accents to some decals for extra sparkle. Layer decals over painted patterns or textured walls for contrast. Create a themed wall—such as a motivational quote surrounded by stars or clouds. Incorporate LED lights or fairy lights nearby for a magical glow.
Wall decals let you decorate with ease and flexibility. They give your space a fresh, youthful vibe without a long-term commitment. Feeling inspired to personalize your room? Pick decals that speak to you and start transforming your walls today!
7. Paint a Mural or Artistic Wall Design
Want to make a bold statement but don’t want the hassle of wallpaper? Painting a mural or artistic wall design is a fantastic way to showcase your creativity and add a unique touch. It transforms an ordinary wall into a personal masterpiece that reflects your style and personality. Plus, it’s a project that can be as simple or complex as you like.
Visualize a large, hand-painted tree branch with blossoms stretching across your wall, or an abstract splash of colors blending seamlessly. The brushstrokes add texture and depth, making the design feel alive and dynamic. The mural can be soft and subtle or vibrant and eye-catching, depending on your taste. The wall becomes a focal point, inviting admiration and sparking conversations.
Opt for a mural that matches your decor—nature scenes for tranquility, geometric patterns for modern flair, or whimsical designs for a playful vibe. Use stencils, painter’s tape, or freehand techniques based on your skill level. Seasonal or mood changes can be accommodated by repainting or adding overlays. This approach suits both large and small walls, with scale adjusting to your room size.
Start with a clear concept or sketch, then prepare your wall by cleaning and priming. Choose quality paints suitable for interior walls, and gather brushes, rollers, and stencils if needed. Work in sections, applying paint with smooth, even strokes. Use painter’s tape for clean edges or intricate designs. Allow ample drying time before adding details or additional layers. Protective sealants can preserve your artwork for years.
Add metallic or glow-in-the-dark paints for special effects. Incorporate your favorite colors or themes to match your personality. Frame the mural with decorative molding or borders for a finished look. You can also add other artistic elements like textured paste or metallic leaf for added dimension. Personal touches make it uniquely yours.
A painted mural turns your bedroom into a creative sanctuary and a reflection of your personality. It’s a rewarding project that boosts confidence and artistic skills. Feeling inspired? Grab your brushes and bring your vision to life—your wall is waiting to tell your story!
8. Add a Tapestry for Bohemian and Cozy Vibes
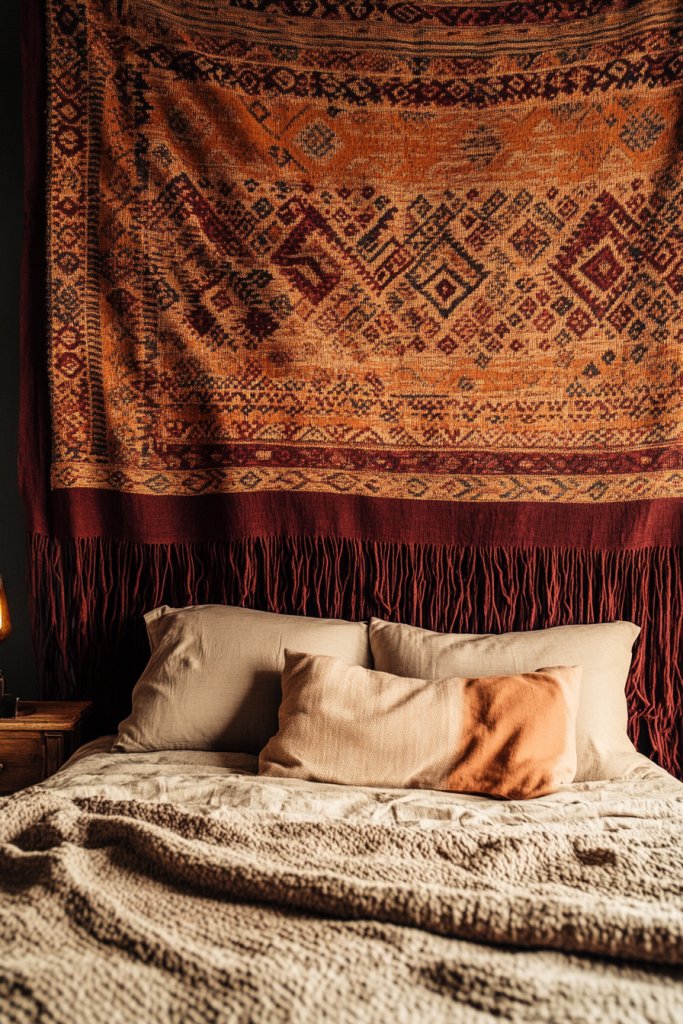
Looking to add warmth and texture to your bedroom without clutter? Tapestries are an easy way to introduce bohemian charm and coziness. They instantly soften hard walls, making your space feel inviting and relaxed. Plus, they’re versatile and easy to swap out whenever you want a fresh look.
Picture a large, intricately patterned tapestry hanging behind your bed, with fringed edges and rich, earthy tones. The fabric’s texture absorbs and diffuses light, creating a warm glow. The detailed patterns evoke a worldly, eclectic vibe, turning your wall into a piece of art. When draped loosely, it adds a layer of softness that invites you to sink in.
Choose tapestries with bold patterns, subtle textures, or neutral tones based on your style. Seasonal updates can include swapping out different fabrics or colors—think cozy wool for winter, lightweight cotton for summer. Hang them with decorative rods or hooks for a casual, layered look. Pair with string lights or decorative pillows for a cozy ambiance.
Start by selecting a tapestry that fits your wall size and decor theme. Use hooks, nails, or a decorative rod to hang it securely. For a more polished look, you can attach the tapestry with double-sided tape or velcro strips along the top edge. Make sure it hangs evenly and smooth out any wrinkles or folds. You can also fold or gather the fabric for a textured, boho look.
Layer with additional textiles like throw blankets or cushions to amplify the cozy feel. Incorporate complementary colors in your bedding or rugs. Add string lights or lanterns nearby to cast a soft, inviting glow. Personalize further with embroidery or patches for a handcrafted touch.
A tapestry transforms your bedroom into a relaxed retreat that reflects your free-spirited side. It’s a simple yet impactful decor piece that can be changed easily. Ready to add warmth and personality? Just hang, style, and enjoy your cozy new vibe!
9. Use Mirror Walls to Enhance Space and Light
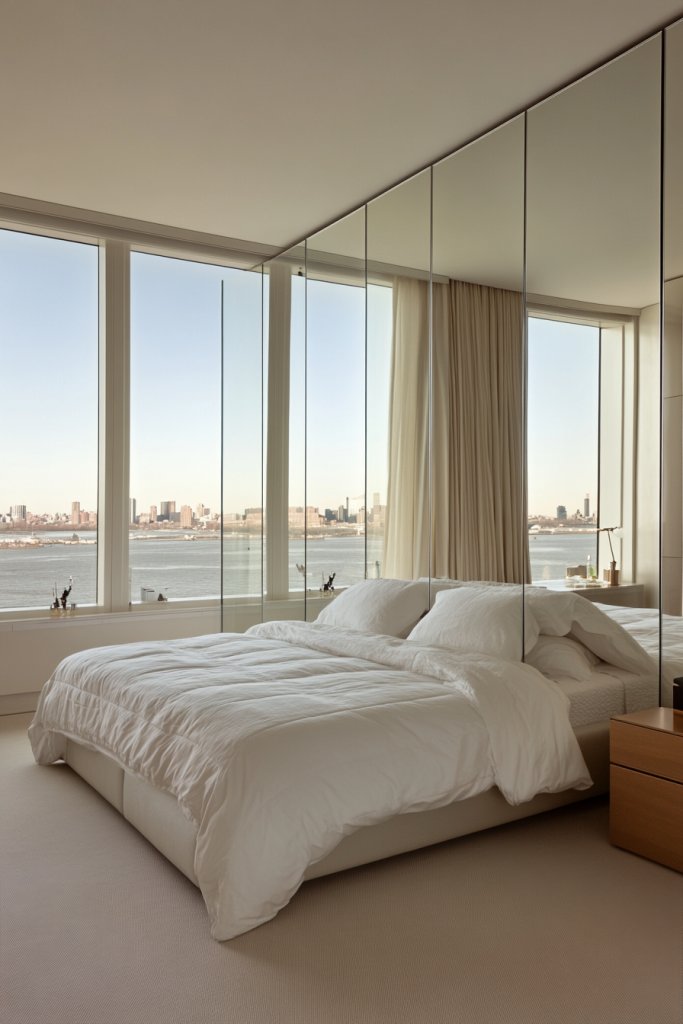
Does your bedroom feel cramped or dark? Mirrors are a classic hack to make any space look bigger and brighter. A full wall of mirrors visually expands the room, reflects natural light, and adds a touch of glamour. Best of all, they’re simple to install and can be a statement feature or a subtle addition.
Imagine a sleek, floor-to-ceiling mirror wall that reflects your entire room, doubling the visual space. The reflective surface catches sunlight from your windows, spreading it across the room and creating a luminous atmosphere. The mirror’s frame can be minimalist or ornate, depending on your style, adding depth and elegance. When you walk into the room, it feels more open and inviting.
Choose frameless panels for a seamless look or decorative frames for a vintage or luxe vibe. Incorporate mirrored closet doors or wall panels in small rooms to maximize space. Seasonal or mood changes can be achieved by adding decorative borders or contrasting frames. Use multiple mirrors in different shapes and sizes for an eclectic, modern aesthetic.
Decide whether to mount full-length mirrors directly onto the wall or create a mirrored wall with panels. Measure carefully to ensure proper placement, and use appropriate hardware—heavy-duty anchors or brackets for safety. Prepare the wall surface thoroughly, then secure the mirrors with strong adhesive or mounting clips. For large panels, consider professional installation to ensure stability. Clean the mirror surface with glass cleaner for a streak-free finish.
Frame your mirrors with decorative trim, LED strips, or backlighting for added drama. Pair with stylish furniture or textiles that complement the reflective surfaces. Use the mirrors to highlight art or architectural features elsewhere in the room. They can also serve functional purposes, such as dressing or grooming stations.
Mirror walls are a timeless way to boost your bedroom’s style and functionality. They create a sense of openness and brightness that can transform even the smallest spaces. Feeling inspired? Install a statement mirror wall and enjoy a more luminous, expansive retreat!
10. Create a Gallery Wall with Framed Prints and Photos
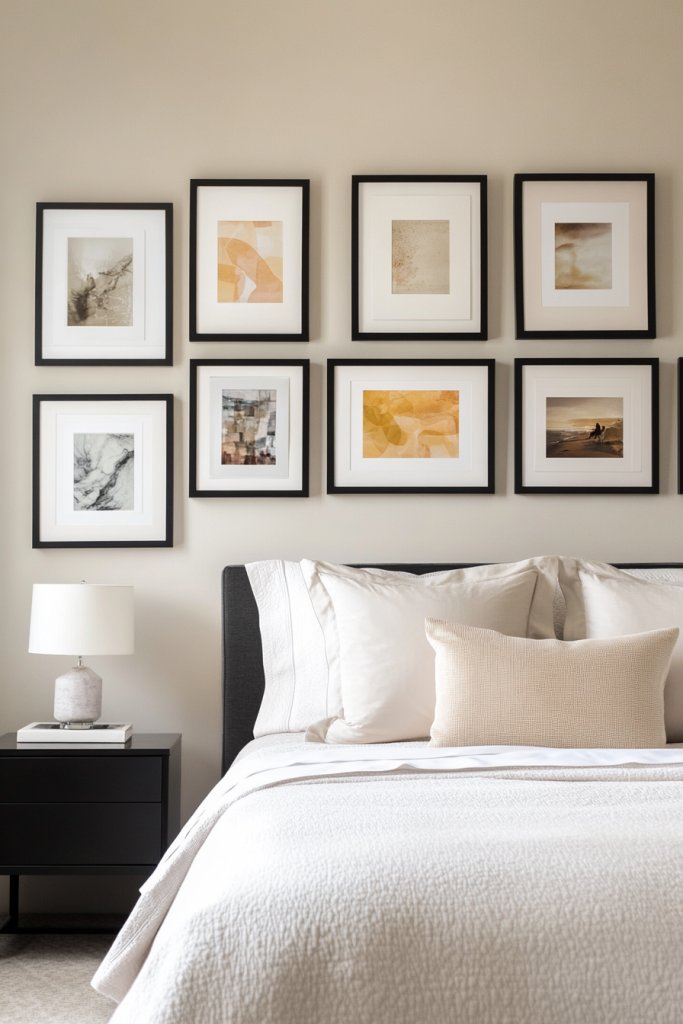
Want to showcase your personality and memories without cluttering your space? A gallery wall is the perfect way to display your favorite artwork, photos, and meaningful quotes in an organized yet artistic manner. It adds visual interest and becomes a focal point that reflects your story.
Visualize a curated collection of black-and-white photos, colorful prints, and textured frames arranged in a grid or eclectic pattern. The varied sizes and styles create a dynamic, layered effect that draws the eye. Surrounding the display with your personal treasures makes the room feel warm and lived-in. The arrangement adds personality and a sense of intimacy to your space.
Mix different frame styles—wood, metal, or vintage—to suit your aesthetic. Use themed collections, such as travel, family, or art prints, to tell a story. In smaller rooms, keep the arrangement compact and symmetrical for a tidy look. Seasons or mood changes can be reflected by swapping out or rearranging frames. Incorporate other decor elements like small shelves or wall-mounted lights for added interest.
Start by selecting your favorite photos and prints. Lay out your arrangement on the floor first to experiment with spacing and positioning. Use painter’s tape to mark the placement on the wall, then hang frames with appropriate hooks or nails. Keep the spacing consistent to maintain balance. Consider a unifying color scheme for the mats or frames for a cohesive look. Regularly step back to view your progress and make adjustments as needed.
Add decorative elements like small accent pieces, postcards, or fabric swatches between frames. Incorporate string lights or LED strips to highlight the gallery. Personalize with handwritten captions or decorative tags. Change out prints seasonally or for special occasions to keep the display fresh and engaging.
A gallery wall turns your personal memories into a curated piece of art. It boosts your confidence in your decorating skills and creates a cozy, inviting vibe. Ready to tell your story visually? Start laying out your frames and enjoy the process!
11. Implement DIY Washable Chalkboard or Whiteboard Walls
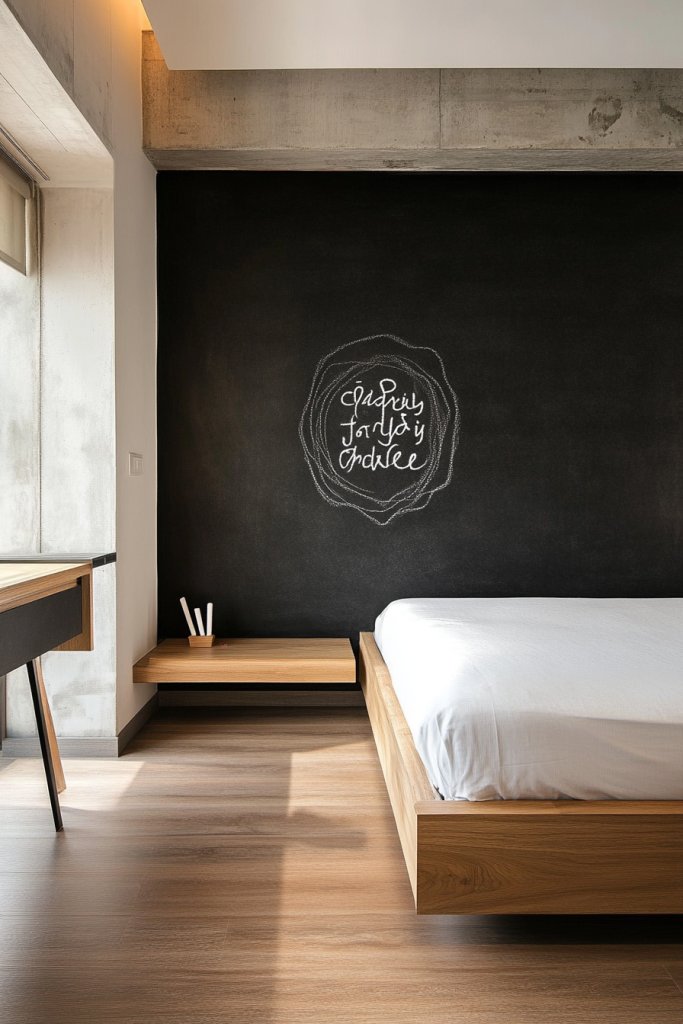
Looking for a functional yet fun way to stay organized and inspired? A chalkboard or whiteboard wall combines practicality with creativity, perfect for jotting down reminders, doodles, or motivational quotes. Best of all, it’s totally customizable and easy to update whenever you like.
Picture a large black chalkboard wall behind your desk or headboard, filled with colorful handwritten notes and sketches. The surface invites spontaneous creativity, and the surrounding decor remains minimal to let the wall stand out. The writable surface becomes a dynamic feature, constantly changing with your mood or needs. It’s a canvas that grows and evolves with you.
Choose between traditional chalkboard paint for a matte, erasable surface or whiteboard paint for a sleek, glossy finish. Decorate the borders with washi tape, decals, or molding to match your style. Seasonal or project-based updates make it versatile—use it for meal planning, motivational quotes, or art. Small bedrooms work well in corners or above desks, while larger walls can be dedicated to creative zones.
Begin by cleaning and priming your wall to ensure paint adhesion. Use painter’s tape to create clean borders or sections if desired. Apply the chalkboard or whiteboard paint with a roller or brush, following the manufacturer’s instructions. Multiple coats may be needed for a smooth, durable surface. After curing, season the chalkboard with chalk or test markers for whiteboards. Regular cleaning and maintenance keep it looking fresh.
Add decorative borders, magnetic accessories, or small clipboards for extra functionality. Use colorful chalk or markers to make it lively and engaging. Incorporate themed sections, like a gratitude corner or daily to-do list. Personalize with your favorite doodles or inspirational quotes for motivation.
A DIY chalkboard or whiteboard wall makes your space more interactive and productive. It encourages creativity and organization, turning your bedroom into an inspiring hub. Feeling motivated? Set it up and start writing your way to a happier, more organized room!
12. Apply Metallic or Foil Accents for a Touch of Glam
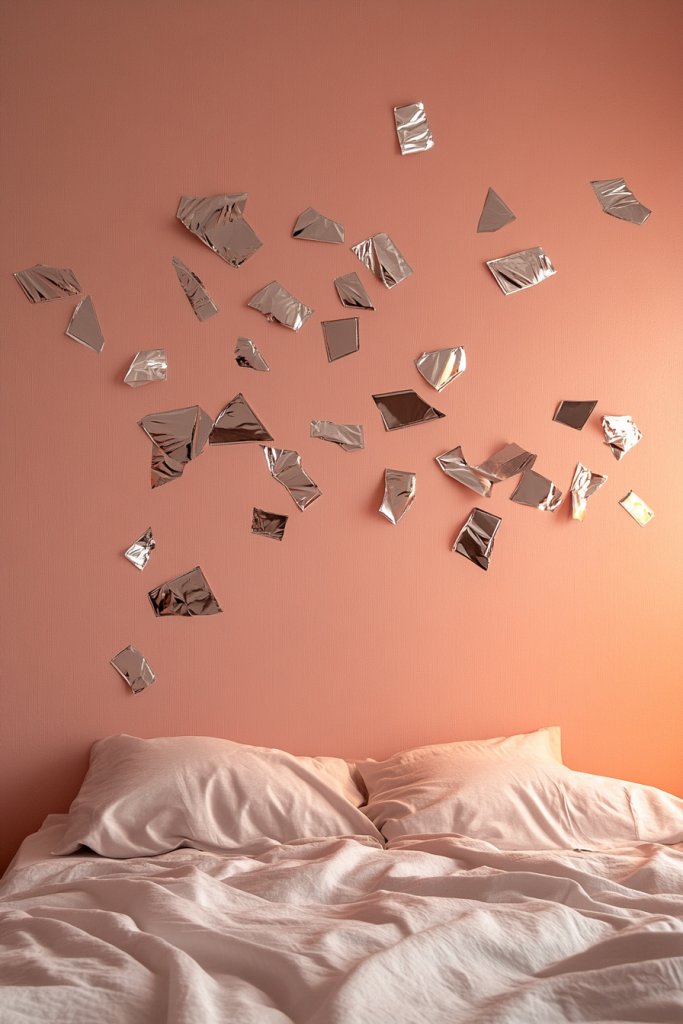
Want to add a hint of luxury and sophistication to your bedroom walls? Metallic or foil accents are a simple way to elevate your decor without a complete overhaul. They catch light beautifully, creating a subtle shimmer that makes your space feel more glamorous. Plus, it’s easier than you think to incorporate metallic touches.
Visualize a wall with sections painted in matte neutrals, accented by metallic gold or silver geometric shapes. The reflective surfaces bounce light and add depth, making the wall pop without overwhelming the room. When you move around, the accents shimmer and change with the lighting, adding a dynamic element. The contrast between matte and metallic finishes creates visual interest and elegance.
Use foil or metallic paint in geometric patterns, stripes, or abstract designs to match your decor theme. For a more subtle effect, highlight edges or corners with metallic accents. Seasonal or special occasion updates are easy—just add metallic decals or tape for a quick luxe refresh. Combine with textured paint or wallpaper for a layered, sophisticated look.
Prepare your wall by cleaning and sanding if needed. Use painter’s tape to outline your designs precisely. Apply metallic or foil paint with a small brush or sponge for control. For foil accents, adhere adhesive sheets with a roller, then carefully press and smooth the foil onto the surface. Remove tape carefully before the paint or foil dries completely. Seal with a clear matte or gloss topcoat for durability.
Incorporate metallic or foil details into existing wall art or patterns. Use metallic paint to highlight architectural features like moldings or niches. Complement with textiles, bedding, or accessories that have metallic threads or accents. Personalize your space with monograms or symbols in metallic foil for a custom touch.
Metallic accents provide instant elegance and a modern touch that elevates your bedroom style. They’re versatile, easy to apply, and can be updated as your taste evolves. Ready to add a touch of glam? Just embrace the shimmer and enjoy your luxe new vibe!
13. Incorporate Vertical Garden Wall Panels (using faux greenery)
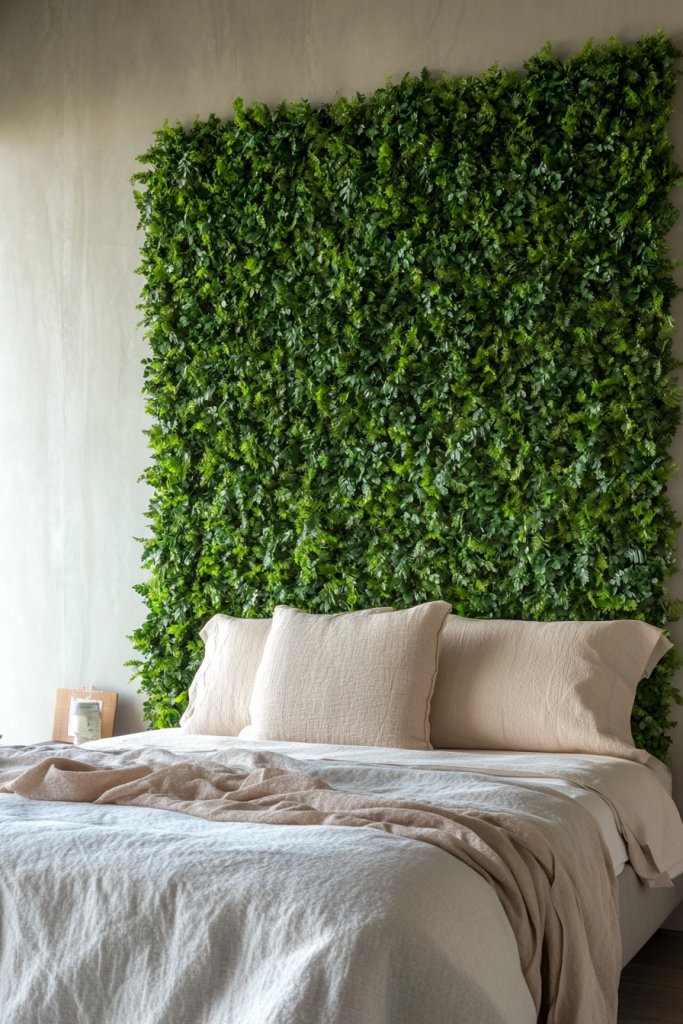
Craving a fresh, lively feel in your bedroom but don’t want the maintenance of real plants? Faux greenery panels offer a stunning, low-effort way to bring nature indoors. They add texture, color, and a calming vibe, transforming your wall into a mini oasis. Perfect for those with a busy schedule or limited sunlight.
Imagine lush, vibrant faux leaves cascading down a wall, creating a lush, tropical backdrop. The textured panels mimic real foliage, adding depth and dimension. The subtle variations in shades and textures make it look authentic up close, while the overall effect is a vibrant, refreshing focal point. When combined with soft lighting, it feels like a serene garden.
Choose panels that match your decor—dense tropical leaves, minimalist succulents, or elegant ferns. Arrange panels in pattern or clusters for a layered, natural look. Seasonal updates can be achieved by swapping out panels or adding decorative elements like fairy lights or small sculptures. This approach works well in large or small bedrooms and complements various decor styles.
Start by measuring your wall to determine the size and number of panels needed. Clean the surface thoroughly, then attach panels using adhesive strips or hooks designed for heavy decor. For a seamless look, join panels tightly to minimize gaps. Use a level to ensure even placement. Clean the panels periodically to maintain their lush appearance. Lighting can be added behind or above for extra effect.
Add fairy lights or ambient LED strips to enhance the natural effect. Incorporate decorative planters or sculptures to create focal points within the greenery. Mix different shades of faux foliage for a more realistic and colorful look. Personal touches like motivational quotes or small art pieces can be positioned nearby for an inspiring environment.
A faux greenery wall elevates your bedroom into a calming retreat with minimal upkeep. It’s a stylish way to add texture and color, making your space feel more alive and inviting. Feeling inspired? Create your indoor garden today and enjoy the lush, maintenance-free beauty!
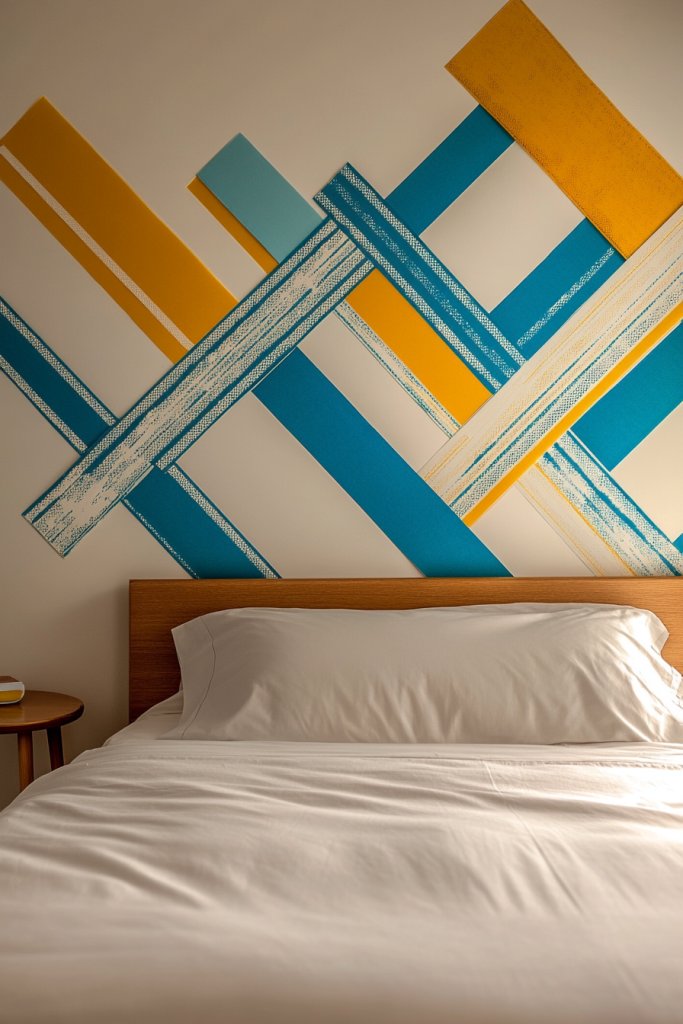
14. Opt for a Striped or Geometric Painted Pattern
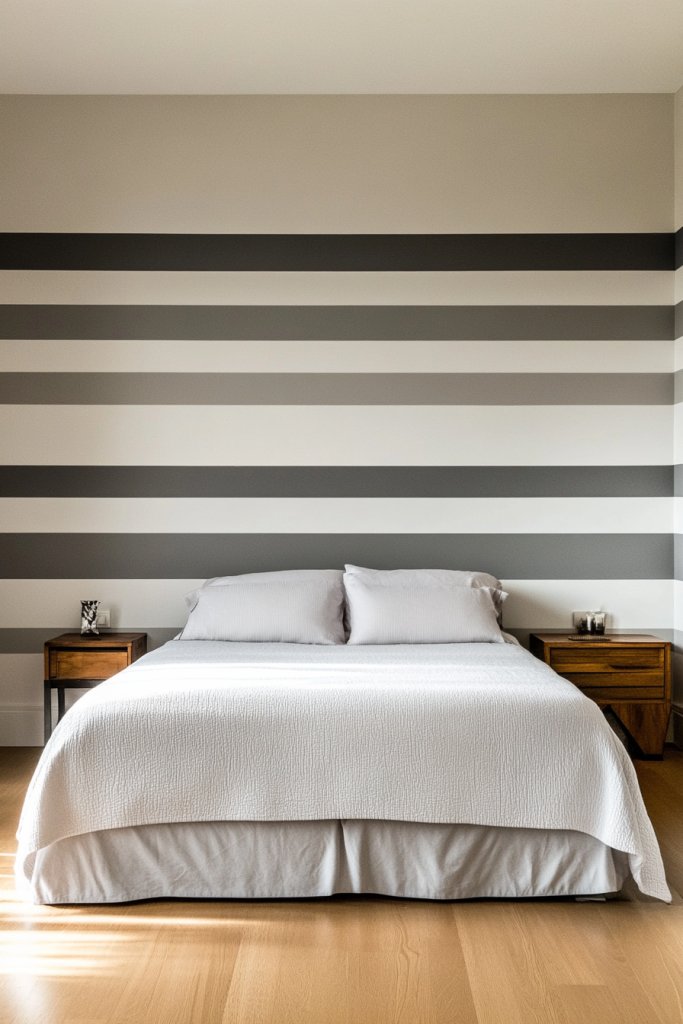
Tired of plain, boring walls but not ready for wallpaper or decals? Painting stripes or geometric shapes is an affordable, impactful way to add visual interest. It’s a bold choice that can make your entire room feel more energetic and modern. Plus, it gives you a chance to showcase your painting skills—no gallery required.
Picture crisp, clean stripes in contrasting colors running horizontally or vertically across your wall. Or imagine sharp geometric shapes—triangles, diamonds, or abstract polygons—intersecting in a dynamic pattern. The painted lines create a sense of movement and rhythm, making your wall a statement piece. When light hits the surface, the painted edges pop with clarity and precision.
Choose bold, high-contrast colors for a statement look or subtle shades for a more refined style. Use painter’s tape for clean, straight lines and perfect shapes. Small rooms benefit from vertical stripes to elongate the space, while horizontal stripes make rooms feel wider. Geometric patterns work well in contemporary or eclectic decor. Mix widths and angles for a more personalized design.
Start by planning your pattern and taping out your design with painter’s tape. Use a level to ensure straight lines and a pencil to mark your pattern. Apply your chosen paint in layers, carefully removing tape before drying for sharp edges. Use small brushes for detailed shapes or rollers for larger areas. Touch up any uneven lines with a steady hand. Seal the design with a clear protective coat if desired.
Add metallic or glow-in-the-dark paint accents for extra flair. Incorporate your favorite colors or themes—like ombre effects or color blocking—to match your mood or season. Complement your painted wall with minimal decor, such as sleek furniture or textured textiles. Personalized touches like initials or symbols can be painted into the design.
Stripes and geometric patterns are bold, modern, and customizable, giving your room a fresh vibe. They’re a DIY-friendly way to elevate your walls without breaking the bank. Ready to get creative? Pick your colors, plan your pattern, and bring your walls to life!
15. Cover Walls with Patterned Fabric Panels for Texture and Color
Looking for a soft, plush way to add color and texture to your bedroom walls? Fabric panels offer a cozy, inviting alternative to paint or wallpaper. They’re easy to install, removable, and perfect for creating a warm, tactile environment. Plus, they’re a fantastic way to incorporate bold patterns or soft neutrals.
Imagine a wall covered in upholstered fabric panels featuring floral, geometric, or textured patterns. The fabric’s plush surface absorbs light and adds depth, making the wall feel like a piece of soft art. When you run your hand over the panels, the tactile quality enhances the cozy vibe. The pattern and color choices can tie your entire room together, creating a unified, inviting space.
Choose fabrics that match your decor style—velvet for luxe, linen for airy simplicity, or patterned textiles for visual interest. Arrange panels in a grid or offset pattern for a modern look, or create a patchwork effect for eclectic style. Seasonal updates can be achieved by swapping out fabrics or changing their placement. Use decorative trims or piping to finish edges and add detail.
Measure your wall and cut fabric panels to size, then attach them with double-sided tape, Velcro strips, or fabric adhesives designed for walls. For a more polished look, frame each panel with decorative trim or wooden borders. Smooth out wrinkles or bubbles as you go to ensure a clean, professional appearance. For heavier fabrics, use small nails or tacks hidden behind the panels. Regularly dust or vacuum to maintain freshness.
Add decorative trims, tassels, or embroidery to personalize the fabric panels. Incorporate coordinating textiles in bedding or throws for a layered look. Use lighting strategically—such as uplights or sconces—to highlight texture and pattern. Personal touches like monograms or custom embroidery make your bedroom truly yours.
Fabric-covered walls create a plush, inviting atmosphere that’s easy to update and customize. They add softness and warmth, perfect for cozy nights and lounging. Feeling inspired? Choose your favorite fabrics and craft a tactile, stylish feature wall today!
16. Use Peel-and-Stick Tile for a Stylish Backsplash Effect
Want the look of a chic backsplash without the hassle of grout or professional installation? Peel-and-stick tiles give your walls a textured, stylish upgrade in minutes. They’re perfect for adding a modern or vintage touch, and they’re easily removable if you change your mind. Best of all, no mess, no fuss.
Picture a wall with geometric patterned tiles in black, white, or metallic finishes creating a contemporary focal point. The textured surface adds dimension, making the wall feel lively without overwhelming the room. When light hits the tiles, they shimmer subtly, adding depth and sophistication. The grid-like pattern enhances the visual order, making your room look polished and intentional.
Choose tiles in various finishes—matte, gloss, or metallic—for different effects. Mix geometric patterns with solid colors for contrast or create a border with decorative accents. Small bedrooms or alcoves benefit from a tiled accent wall to add interest without crowding the space. Seasonal or mood updates involve replacing tiles or changing the layout for a fresh look.
Clean and dry your wall surface thoroughly. Plan your layout, then peel and stick each tile carefully, aligning edges precisely. Use a level or spacers for straight lines and consistent gaps. Apply firm pressure to ensure adhesion and remove air bubbles with a squeegee or credit card. For uneven surfaces, use a thin layer of adhesive primer before applying tiles. Regular cleaning with a damp cloth keeps the tiles looking new.
Mix and match tile patterns or finishes for a custom mosaic effect. Incorporate decorative trims or metallic accents for a luxe feel. Add LED strip lighting behind the tiled area to highlight texture. Use the tiles as a backdrop for artwork or shelving to create a layered, styled look. Personal touches like monograms or custom patterns make it uniquely yours.
Peel-and-stick tiles provide a stylish, low-effort way to upgrade your walls with minimal expense. They make your bedroom more modern and interesting while being easy to update or remove. Feeling inspired? Choose your favorite patterns and enjoy a quick, impactful decor upgrade!
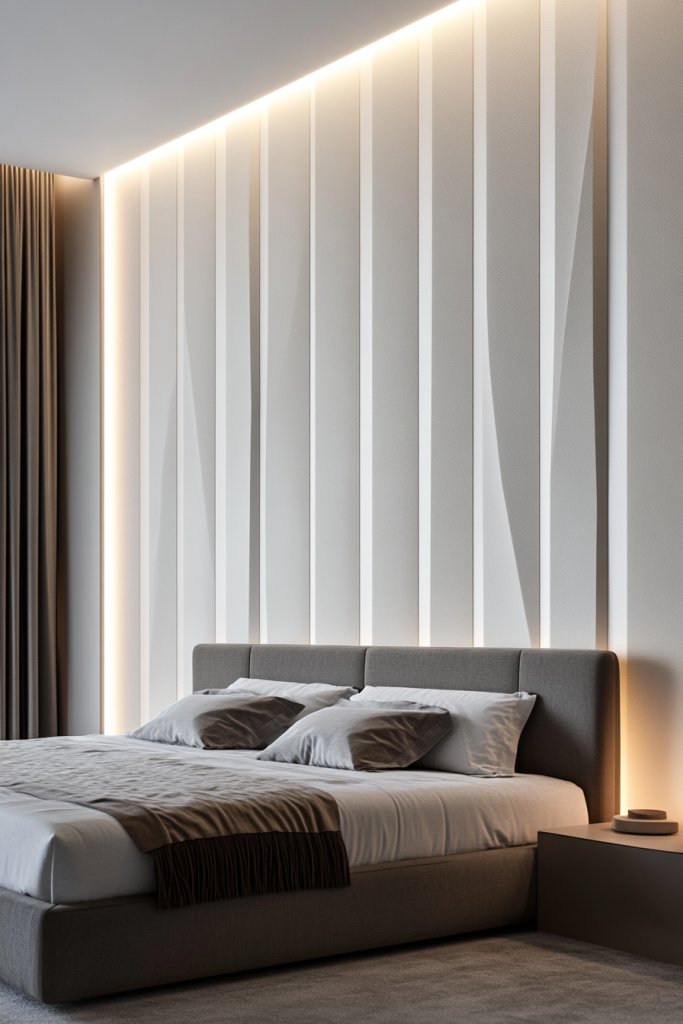
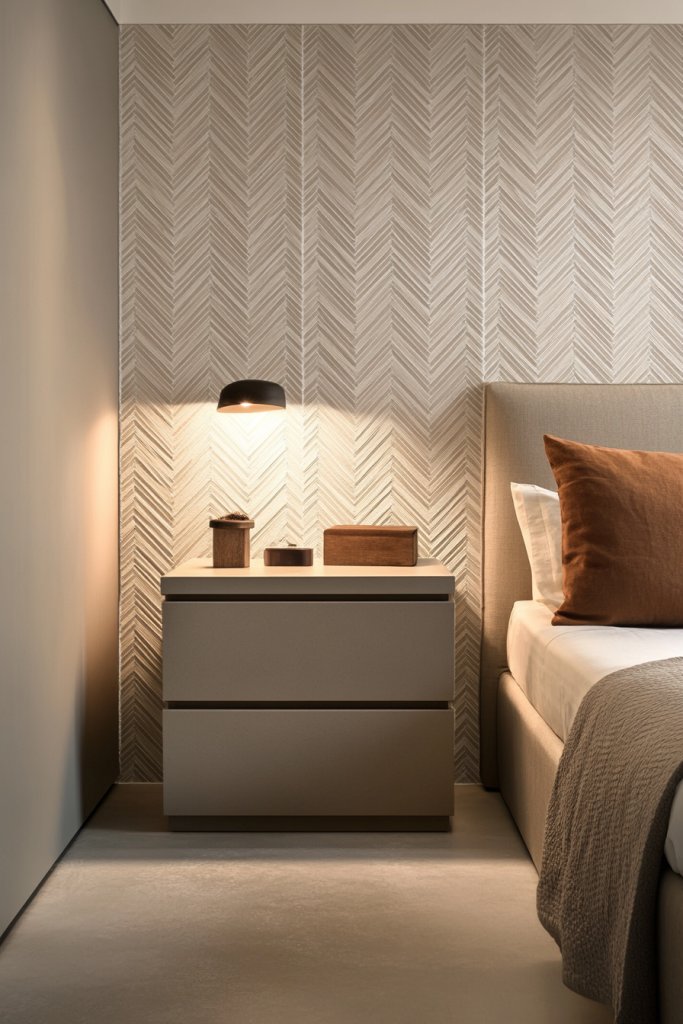
17. Enhance with Soft, Ambient Lighting and Wall Sconces
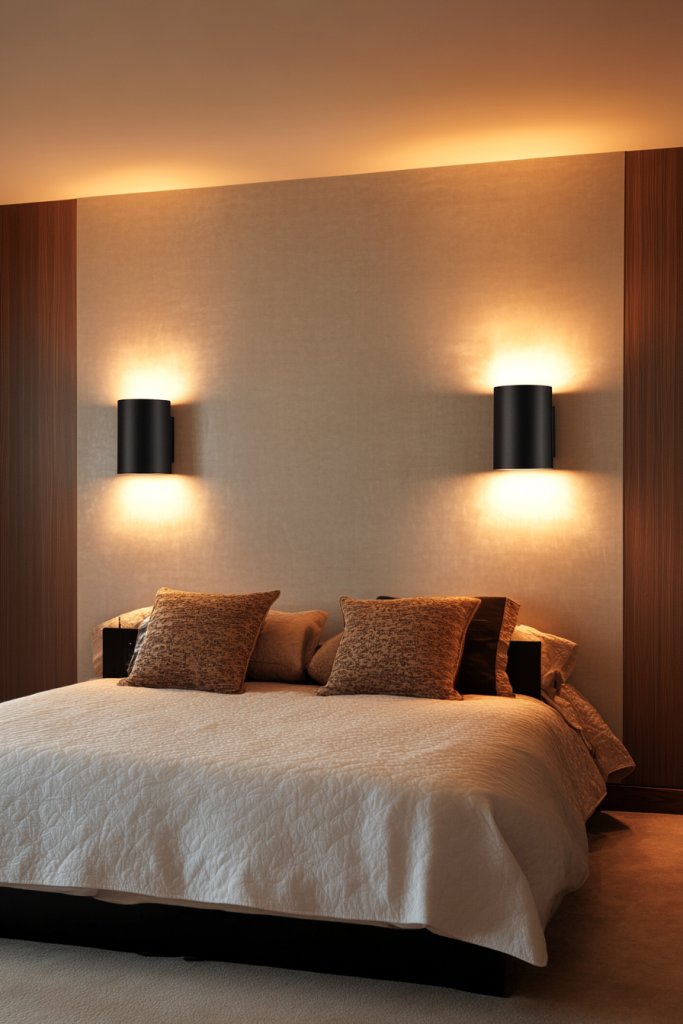
Is your bedroom feeling flat or overly bright? Soft, ambient lighting adds warmth and intimacy, making your space more relaxing and inviting. Wall sconces are a stylish way to add layered lighting without cluttering your surfaces. They’re perfect for setting the mood, highlighting decor, or simply making your room feel more polished.
Imagine warm glow from sleek wall sconces flanking your bed, casting gentle light that creates cozy shadows and highlights textures. The soft light bounces off your walls and ceiling, filling the room with a calming atmosphere. When dimmed, the sconces add an intimate, romantic glow that’s perfect for winding down. The fixtures themselves can be a statement piece, whether modern, vintage, or sculptural.
Choose fixtures that match your decor—metallic, matte, or glass designs. Install sconces at the right height for functional or mood lighting, often around eye level or just above head height. Use dimmable bulbs or smart controls for adjustable brightness. In larger rooms, add multiple sconces or combine with table lamps for layered lighting. Seasonal updates can include changing shades or finishes for a fresh look.
Determine the optimal placement for your sconces—typically flanking the bed or above a vanity. Ensure your wall can support the fixtures and that wiring is safely managed. Turn off power before wiring, and follow manufacturer instructions carefully. Use a level to ensure even installation. Connect to dimmer switches or smart systems for versatile control. Test the setup thoroughly before finalizing.
Add decorative shades or bulbs to match your style—warm white or amber for cozy vibes. Incorporate dimming features for adjustable ambiance. Pair wall sconces with textured wall finishes or artwork to create focal points. Use them to highlight architectural details, alcoves, or artwork, adding depth and interest. Personalize with custom fixtures or colors that reflect your personality.
Soft, ambient lighting elevates your bedroom into a relaxing sanctuary. It’s a simple upgrade that makes a big difference in mood and style. Ready to create a warm glow? Install some sconces and enjoy a more inviting, stylish retreat!
18. Design a Dynamic Mutable Wall with Magnetic or Cork Boards
Want a versatile wall that can change with your mood, goals, or inspiration? Magnetic or cork boards turn a blank wall into a functional, ever-changing display space. They’re perfect for notes, photos, or creative ideas, and they keep your room feeling fresh and personal. Plus, they’re easy to update without damage.
Imagine a large, framed cork board filled with colorful notes, sketches, and mementos. Magnetic panels can hold photos, inspiring quotes, or even small decorative objects. The layered arrangement creates a lively, dynamic focal point that evolves over time. When lit subtly, they add a textured, tactile element that invites interaction and creativity.
Choose boards with decorative frames or sleek, minimalist designs to match your aesthetic. Arrange multiple panels in a grid or asymmetrical pattern for visual interest. Use seasonal or themed inserts—like holiday decorations or motivational quotes—to keep the display fresh. Pair with functional items like shelves or lighting for a multi-dimensional look.
Measure your wall space and select boards that fit your layout. Mount cork or magnetic panels with brackets, hooks, or adhesive strips depending on weight and surface. Plan your arrangement before mounting, using painter’s tape or templates. Attach the panels securely and ensure they’re level. Decorate with your notes, photos, or artwork, changing them as needed.
Add decorative elements like washi tape borders, colorful pins, or magnetic accessories. Incorporate a mix of inspirational quotes, personal photos, or artwork to reflect your personality. Use LED strip lighting or spotlights to highlight the display area. Personalize further with themed inserts or seasonal decor for variety.
A mutable wall keeps your space lively and functional, inspiring you daily. It’s a creative way to stay organized and motivated, with endless possibilities for customization. Feeling inspired? Create your interactive display and make your bedroom truly yours!
Conclusion
Transforming your bedroom walls with these diverse ideas can turn an ordinary space into an extraordinary retreat. Whether you choose a subtle accent or a bold statement, these concepts are easy to adapt to your personal style and budget. Don’t hesitate to try out multiple ideas or mix and match for a truly unique look—your perfect bedroom awaits. Dive into these inspiring options and let your walls tell your story!
Leave a Reply