Step into the magical world of girls’ bedrooms, where creativity and whimsy come together to create dream spaces that inspire joy and imagination. Girls’ bedroom ideas are wildly popular because they allow for a perfect blend of fun, personalization, and style—transforming a simple room into a special sanctuary that reflects personality and dreams.
In this article, you’ll discover a delightful mix of charming decor tips, playful themes, and clever design tricks that cater to a variety of tastes and ages. Whether you’re searching for fairy-tale elegance, colorful boho vibes, or whimsical touches to spark curiosity, these ideas will help you craft a space that’s both beautiful and unique. Get ready to be inspired and make magic happen in your own home!
1. Fairy Tale Canopy Bed with Flowing Curtains
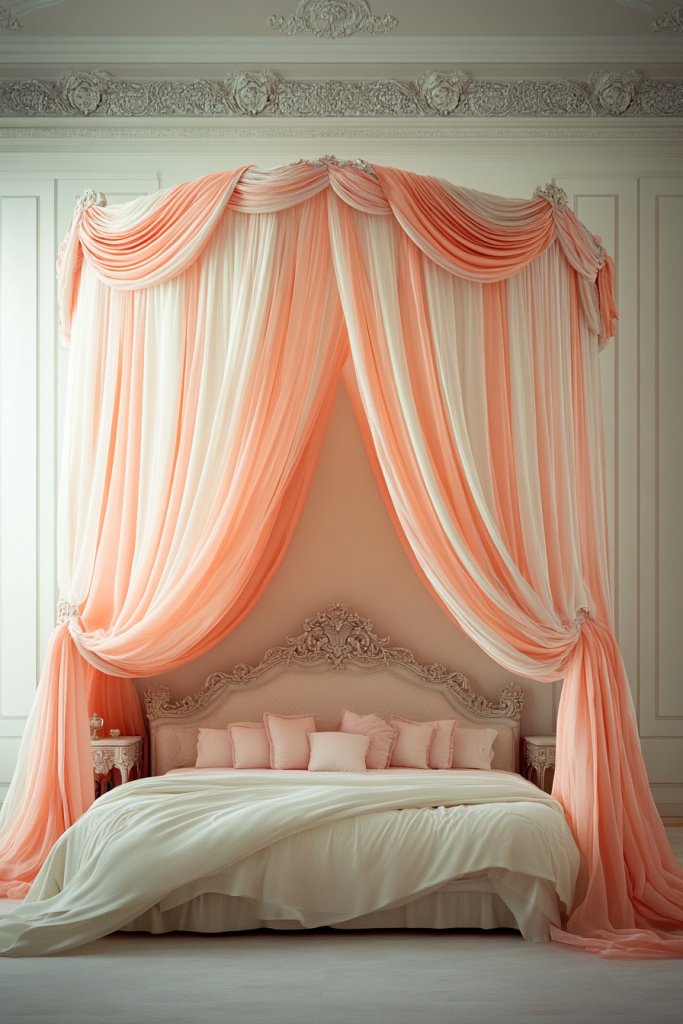
Many girls dream of feeling like a princess in a magical castle, but real life often falls short. A simple bed can feel plain and uninspiring, leaving little room for imagination and comfort. Creating a dreamy, enchanting space can transform bedtime into an exciting, relaxing retreat. Who wouldn’t want a little touch of fairy tale magic in their own room?
Imagine a bed draped with sheer, flowing curtains that cascade down from a delicate frame, creating a soft, floating canopy. The fabric catches the light with a gentle shimmer, while subtle pastel hues set a calming tone. Tiny twinkle lights hidden behind the fabric give a starry-night effect, making the space feel like a fairy’s hideaway. The overall scene exudes warmth, wonder, and endless possibilities.
Switch up the fabric for seasonal moods—think velvet for winter coziness or lightweight linen for summer breeziness. For smaller rooms, opt for a compact canopy frame that still creates that magical overhead effect. You can also customize the colors to match your favorite themes, from unicorns to mermaids. Adding decorative pillows or a plush rug underneath enhances the fairy tale vibe without clutter.
Start by choosing a lightweight, rust-proof curtain rod or frame that fits your bed size. Gather sheer fabrics in your favorite colors—multipurpose organza or voile work well—and attach them securely with small hooks or clips. If you want a more permanent look, sew the fabric onto a simple frame or ceiling hooks. Incorporate battery-operated fairy lights for a gentle glow, hiding wires behind the fabric for a seamless appearance. Keep the setup simple for easy removal or adjustments.
Add personal touches like embroidered initials or appliqué borders on the curtains. Experiment with different textures—think lace, tulle, or metallic accents—to make it uniquely yours. Incorporate themed accessories such as fairy wands or plush animals to deepen the fairy tale atmosphere. Switching out fabrics seasonally keeps the space fresh and exciting.
Transforming a basic bed into a whimsical fairy tale setting boosts confidence and sparks imagination. It turns a routine sleep space into a personal sanctuary that reflects personality and dreams. Plus, it’s a fun project that lets you get creative and make your room truly magical. Ready to create your own enchanted retreat?
2. Whimsical Wall Decals with Playful Shapes
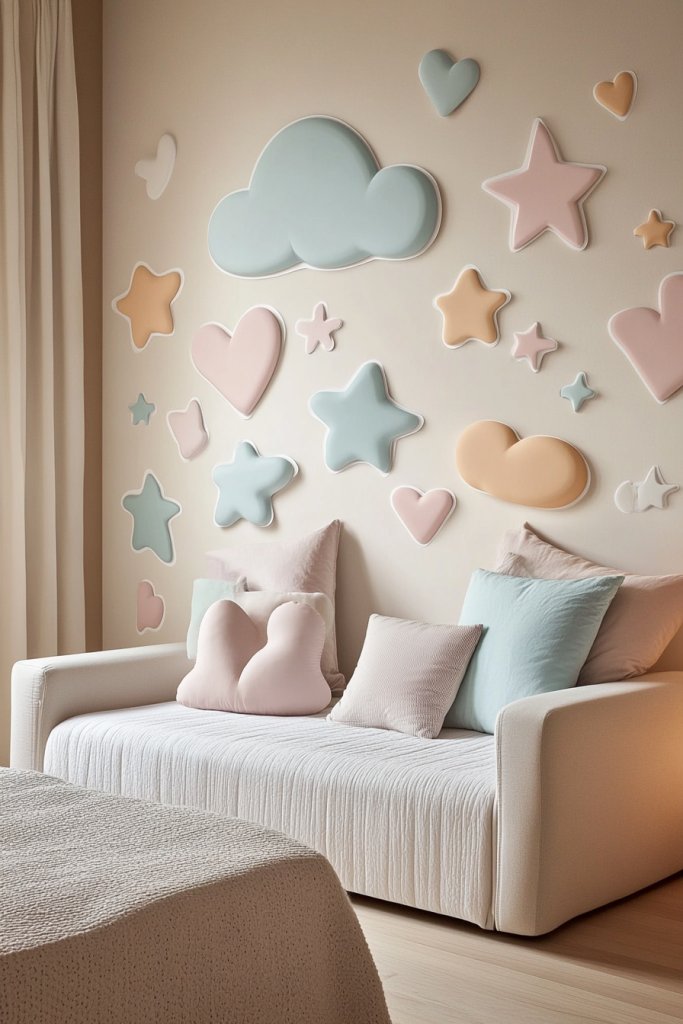
Walls can be a blank canvas or a boring backdrop, especially if you’re not into painting or wallpapering. The solution? Removable wall decals that instantly add personality and fun. They’re perfect for kids’ rooms because they’re easy to change as tastes evolve. Want a space that sparks imagination without the permanence? Decals are your new best friend.
Envision a wall dotted with cheerful stars, fluffy clouds, or crescent moons, all in vibrant pastel shades or metallic finishes. These decals peel and stick easily, creating a playful scene that feels lively yet calming. They can be arranged in whimsical patterns or clustered for a focal point. The decals cast subtle shadows that add depth, making the wall feel alive and dynamic. It’s like having a tiny universe right on your wall.
Mix different shapes and sizes to create a custom scene that matches your theme—fairy tale, space adventure, or jungle safari. For a more subtle look, choose decals in soft tones or transparent finishes. You can also layer decals with removable murals for added dimension. Seasonal themes—like snowflakes or flowers—keep the room feeling fresh and relevant year-round.
Start by selecting decals that match your room’s theme and color scheme. Clear the wall surface and ensure it’s clean and dry. Carefully peel the backing and position the decals, pressing firmly to avoid bubbles. Use a squeegee or credit card to smooth out any wrinkles. For larger scenes, plan the layout beforehand with masking tape. The decals can be repositioned during installation, but avoid pulling them off and reapplying excessively to prolong their lifespan.
Create your own decals by printing custom designs on adhesive paper. Incorporate your child’s favorite characters or motifs for a personalized touch. Use decals to frame a special area, like a reading nook or bed. Add glow-in-the-dark decals for a starry night effect without additional lighting. Changing decals seasonally keeps the decor lively and engaging.
Whimsical wall decals are a simple way to transform a plain space into an imaginative wonderland. They’re renter-friendly and quick to install, making decorating stress-free. Your creativity shines through in the unique arrangements and themes you choose. It’s amazing how a few stickers can turn a dull wall into a storybook scene—your room just got a whole lot more magical!
3. Vintage-Inspired Dress-Up Corner with a Mirrored Wardrobe
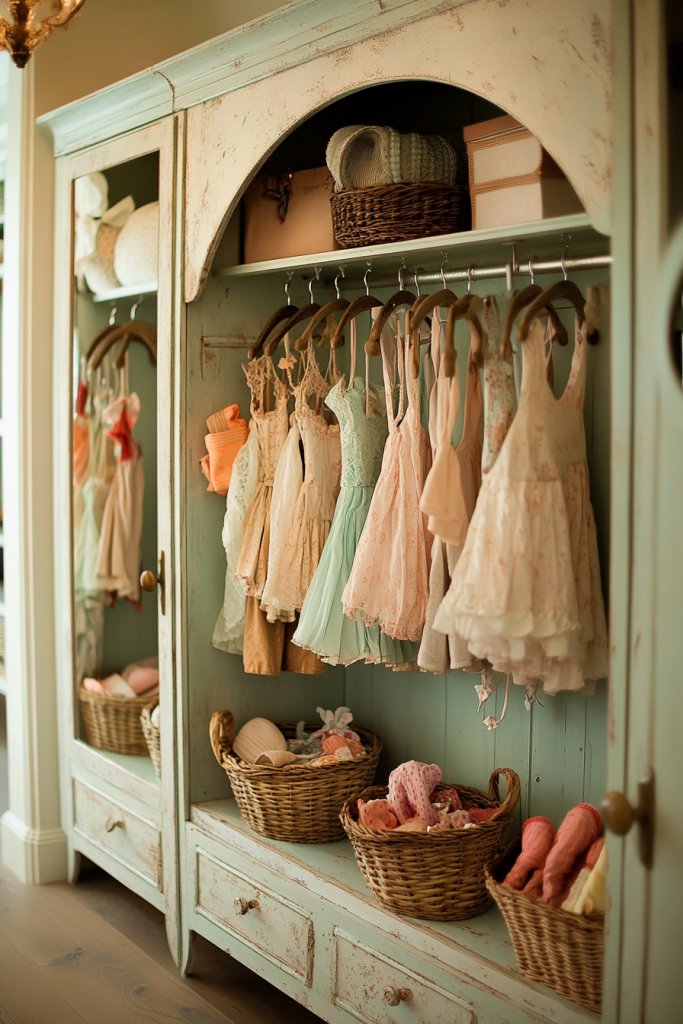
Every little girl loves to pretend and dress up, but finding a dedicated space for play can be tricky. Without a special corner, costumes and accessories clutter the room and make cleanup a hassle. Creating a vintage-inspired dress-up nook transforms chaos into charm and encourages imaginative play. Who wouldn’t want their own little fashion boutique?
Imagine a cozy corner with a petite, vintage-style wardrobe with intricate details and a large, ornate mirror. Soft floral wallpaper or a distressed painted wall backdrop sets a nostalgic tone. A small wooden bench or antique trunk provides seating and storage. Add playful accessories like feathered boas, lace hats, and glittering jewelry displayed on hooks or trays. This space feels like a secret boutique straight out of a fairy tale.
Choose furniture with distressed finishes or painted in pastel shades for a shabby chic look. For smaller rooms, opt for a compact wardrobe with built-in shelves. Incorporate vintage-inspired hooks or peg rails for accessories. Seasonal accents like faux snow or floral curtains can refresh the space. Personalize with framed vintage photos or a small collection of antique toys to deepen the nostalgic vibe.
Select a corner or small alcove to dedicate to dress-up play. Find a vintage or vintage-style wardrobe that fits the space, or repurpose an old cabinet with paint and new hardware. Install a large mirror at eye level, attaching it securely to the wall or door. Add baskets or trays inside the wardrobe for organizing accessories. Decorate the area with leftover fabric for curtains or a small rug for comfort. Keep the space clean and organized with labeled bins or hooks.
Personalize with embroidered name tags on baskets or custom-painted signs. Incorporate themed accessories like princess crowns or pirate hats. Use vintage suitcases or trunks for extra storage and style. Rotate costumes seasonally to keep the space fresh and engaging. Encourage your child to decorate the corner with their own artwork or photos.
A dedicated dress-up corner boosts confidence and nurtures creativity. It invites your child to explore different identities and express themselves freely. Plus, a charming vintage look adds character and a touch of history to the room. It’s more than just a play space—it’s a confidence-building, imaginative retreat.
4. Rustic Wooden Nightstand with Hand-Painted Details
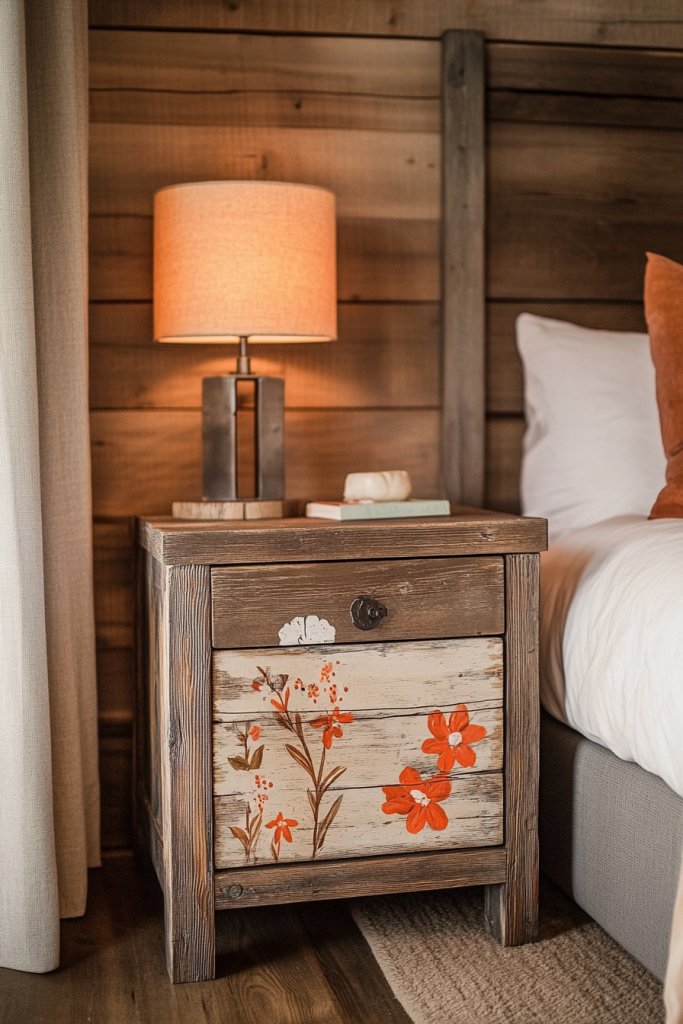
Nightstands often blend into the background, but they’re crucial for adding charm and functionality to a girl’s bedroom. A plain, mass-produced table can feel uninspired and forgettable. Want a piece that’s both practical and full of personality? A rustic wooden nightstand with hand-painted details might be just what you need.
Picture a weathered wooden table with a soft matte finish, adorned with delicate hand-painted motifs—like floral swirls, stars, or whimsical animals. The imperfect paintwork adds charm and tells a story of craftsmanship. It sits beside a cozy bed, holding a vintage lamp, a stack of favorite books, and a small decorative item. The whole scene radiates warmth, nostalgia, and personality, making it a focal point in the room.
Choose wood tones that match or contrast your room’s palette—light pine, distressed white, or deep walnut. For a more modern twist, use monochrome or metallic paint accents. Small drawers or open shelves provide storage, while decorative hand-painted motifs make each piece unique. You can also customize with your own designs or favorite themes, creating a truly personal piece.
Start by sourcing a simple wooden table or nightstand—look for reclaimed or unfinished wood for a rustic feel. Sand it smooth, then apply a base coat of paint or stain. Use fine brushes or stencils to add your hand-painted details. Seal the design with a clear protective finish to prolong durability. Position the stand beside your bed, adding a small tray or decorative box for essentials. Regular touch-ups will keep it looking fresh.
Add your own signature by painting initials, favorite quotes, or little doodles. Mix in decorative knobs or handles for extra flair. Incorporate seasonal accents like fairy lights or small seasonal figurines on top. The rustic look pairs beautifully with textiles like linen or burlap for a cozy, farmhouse vibe. Your nightstand becomes a canvas for your personality.
A hand-painted rustic nightstand adds charm and a personal touch to your space, making it feel loved and lived-in. It’s a rewarding DIY project that boosts confidence in your craftsmanship. Plus, it proves that even simple furniture can be transformed into a statement piece. Your room just gained a new story—crafted by you!
5. Vintage Suitcases as Decorative Storage
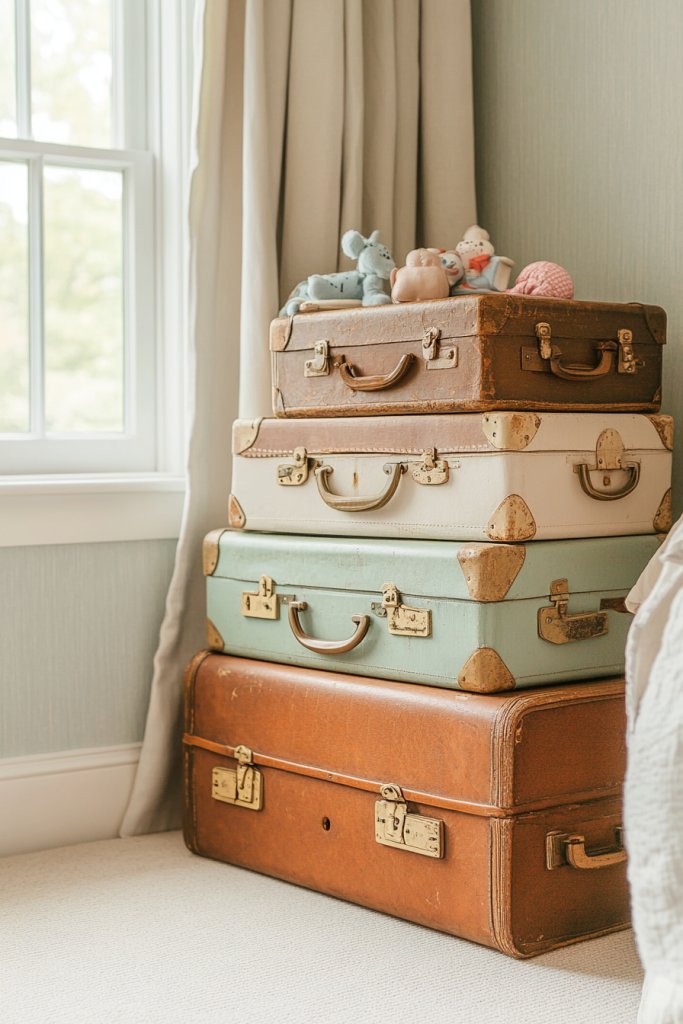
Cluttered bedrooms can feel chaotic and overwhelming, especially when toys, clothes, and books pile up. Finding stylish storage solutions that also add character can be tricky. Vintage suitcases are the perfect answer—functional, charming, and a little nostalgic. Who wouldn’t want to stash their treasures in a piece that looks like it’s straight out of a storybook?
Picture a stack of weathered suitcases in pastel shades or distressed finishes, arranged creatively in a corner or beside the bed. They serve as both storage and decorative accents, with vintage hardware and worn leather details adding charm. When opened, they reveal organized compartments for toys, clothes, or art supplies. The collection evokes a sense of adventure and nostalgia, turning storage into a statement feature.
Mix different sizes, colors, and styles for an eclectic, playful look. Use distressed or painted finishes to match your room’s decor—think shabby chic or boho. Stack them horizontally or vertically, or even use them as side tables with a cushion on top. Seasonal accents like fairy lights or fabric liners can refresh their appearance.
Source vintage suitcases from thrift stores, flea markets, or online marketplaces. Clean and treat the surfaces if needed, or paint over to customize. Use sturdy hinges or add extra support if stacking multiple cases. Inside, organize items with fabric bins or small boxes to keep everything tidy. Position the suitcases where they’re easily accessible but also add visual interest. Regularly dust and maintain hardware to keep the vintage charm alive.
Add decorative tags, stickers, or paint details that reflect your personality. Use them to store seasonal clothing, craft supplies, or treasured keepsakes. Incorporate a small, vintage-style tray or lamp on top for added functionality. Rotate the contents seasonally to keep the look fresh and engaging. Personal touches turn practical storage into a decor feature.
Using vintage suitcases for storage combines practicality with style, making your room more organized and inviting. It shows that functional pieces can also be beautiful, boosting your confidence in creative decorating. Plus, it’s a fun DIY project that adds a nostalgic, adventurous vibe to your space. Your room just got a whole lot more inspiring!
6. Whimsical Wall Hooks Shaped Like Clouds or Stars
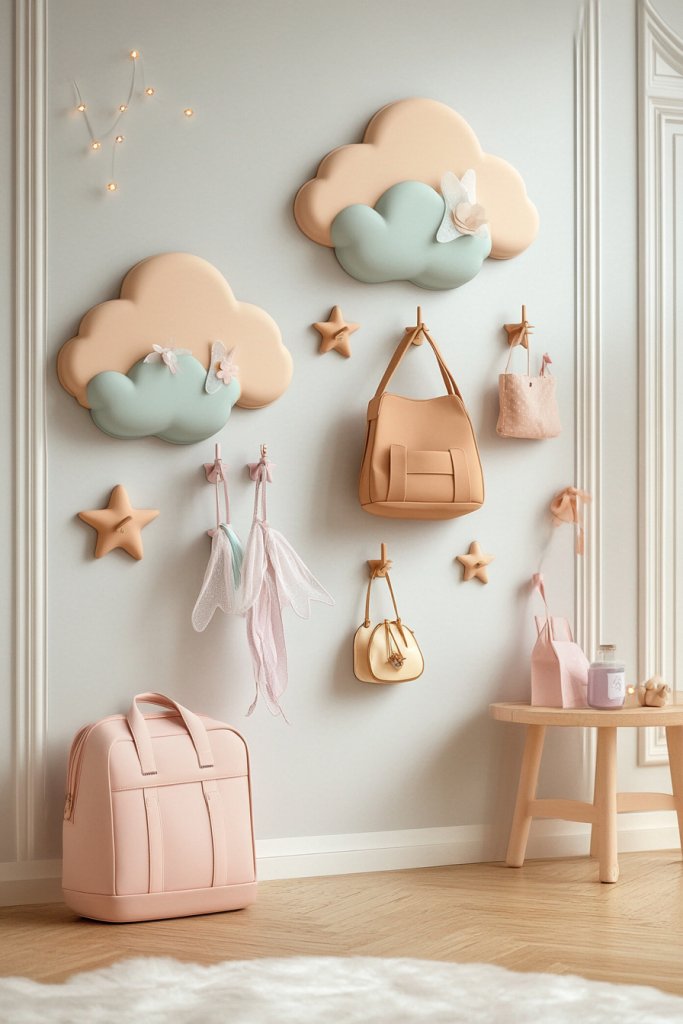
Cluttered walls and scattered accessories kill the vibe of a dreamy bedroom. Girls want a fun, easy way to hang their favorite accessories, bags, or fairy wings without sacrificing style. Whimsical wall hooks shaped like clouds or stars make organization adorable and functional. Who says hooks have to be boring?
Imagine a wall adorned with playful cloud-shaped hooks painted in soft pastel shades or shining metallic finishes. They hold jewelry, backpacks, or special keepsakes, turning everyday organization into a charming display. The hooks’ rounded or starry shapes add a whimsical touch, softening the room’s lines and creating a friendly, inviting atmosphere. When illuminated by natural light or fairy lights, they seem to glow with magic.
Choose hooks in different sizes or finishes—matte, gloss, or metallic—to match your decor theme. Mix and match shapes for variety, such as stars, moons, and clouds. Install them at varying heights to create an organic, playful arrangement. Use them to display seasonal accessories or to keep everyday items handy. This small detail can make a big difference in the room’s charm.
Mark the wall where you want the hooks, spacing them evenly or in a pattern that pleases your eye. Use strong adhesive strips or screws depending on wall type and weight of items. For removable options, command hooks or adhesive-backed hooks work well; for permanent fixtures, opt for wall anchors and screws. Arrange your accessories on the hooks, balancing colors and sizes for visual harmony. Clean the wall beforehand for a secure hold. Regularly check and tighten hooks as needed.
Paint or decorate the hooks yourself with coordinating colors or motifs. Add small decals or stickers around the hooks to enhance the whimsical theme. Use them to hang special jewelry or mementos that are meaningful. You can also create a themed grouping—like stars for a space-inspired room or clouds for a sky theme—to make the display cohesive. The hooks become a playful central feature.
Whimsical wall hooks are a simple way to add personality and function to your space. They encourage organization while doubling as decorative art. It’s a quick, budget-friendly upgrade that shows off your creative flair. Your room becomes a playful, organized haven that’s uniquely yours—so get hooking!
7. Personalized Name Banner with Hand-Lettered Fonts
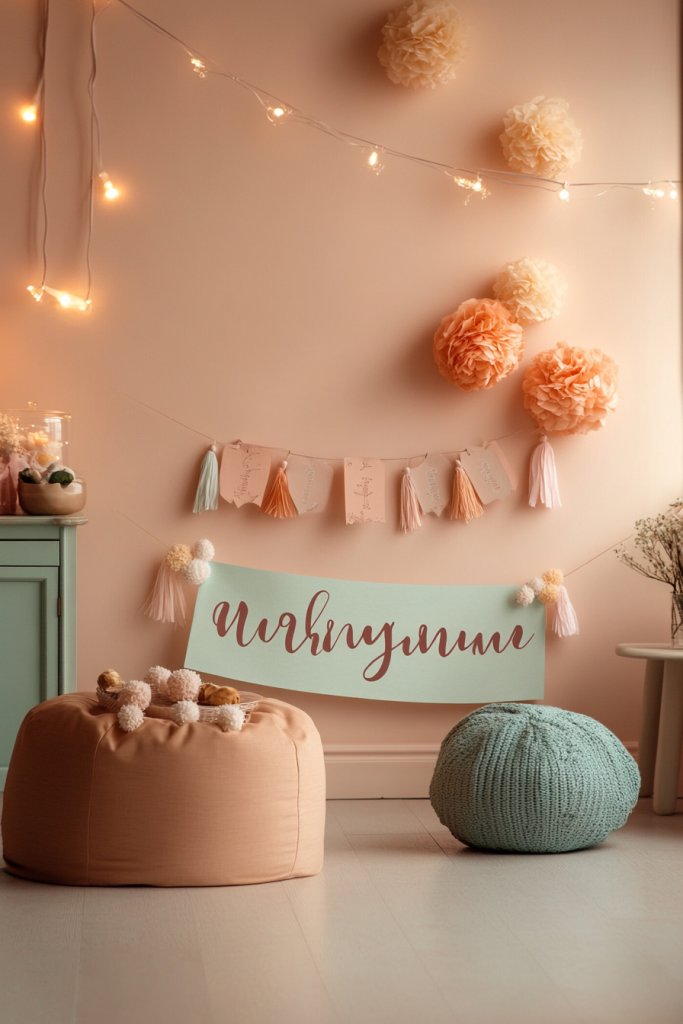
A room without a personal touch can feel generic and uninspired. Girls crave a space that reflects their personality and makes them feel special. A custom name banner in playful hand-lettered fonts adds that perfect personal touch. Who wouldn’t love to see their name shining proudly in their room?
Picture a colorful fabric or paper banner strung across the wall above the bed or window, with each letter crafted in a whimsical, hand-drawn style. Bright colors, polka dots, or glitter accents make the banner pop. The personalized name instantly draws attention and creates a focal point. It’s a cheerful, vibrant statement that celebrates individuality while adding charm.
Use different materials—fabric, paper, or felt—in coordinating colors or patterns. Mix fonts and letter sizes for a playful effect, or keep it uniform for a cleaner look. Incorporate tassels, pom-poms, or small decorative charms for added flair. Hang the banner with colorful ribbon or twine, adjusting length to fit your space. Seasonal variations could include themed banners for birthdays or holidays.
Create or purchase pre-made banners in your preferred style. If DIYing, cut fabric or paper into large, bold letters and decorate with markers, glitter, or stickers. Attach each letter to a length of ribbon or twine using hot glue or sew-in methods. Hang the banner at eye level using removable hooks or clothespins for easy updates. Ensure it’s evenly spaced and securely fastened for safety and aesthetic appeal. Regularly check for wear and replace if needed.
Add small charms, tassels, or mini banners with affirmations alongside your name. Incorporate your favorite colors or themes—like rainbows or stars—to match your personality. Use fabric paint or markers to add personal doodles or designs. The banner becomes a visual celebration of who you are and a fun DIY project to showcase your artistic side.
A personalized name banner makes your space feel uniquely yours, boosting confidence and ownership of your room. It’s a simple, inexpensive way to make an impact and celebrate your individuality. Plus, creating your own banner is a fun craft that encourages creativity and pride in your personal space. Your room just got a whole lot more YOU.
8. DIY Fairy Garden on a Windowsill or Shelf
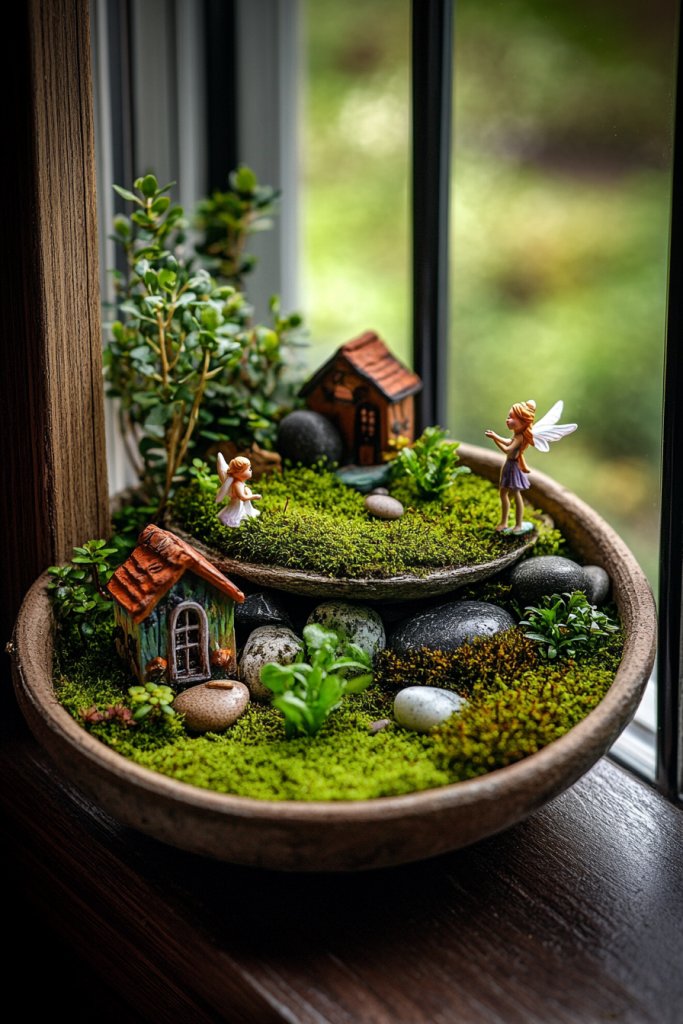
Indoor spaces often lack the lush greenery or mystical charm we crave, especially in small rooms. Girls love the idea of a tiny, magical garden that sparks imagination and brings a touch of nature inside. But maintaining real plants can be tricky, and fake ones often look flat. How about a DIY fairy garden that’s easy, cute, and full of whimsy?
Visualize a miniature garden on a sunny windowsill or a small shelf, filled with tiny plants, fairy figurines, and decorative stones. Tiny furniture, mushroom houses, and miniature bridges create a fairy tale scene. The garden is a lush, enchanting hideaway that invites curiosity and play. When sunlight hits the scene, it’s like a secret world bursting to life with color and charm.
Use a shallow tray or a small pot as the base, adding layers of moss, pebbles, and miniature plants. Incorporate tiny fairy figurines, lanterns, or benches made from natural materials. For a winter vibe, add faux snow or icicle decorations. Change the theme seasonally—spring flowers or winter frost—to keep your fairy garden fresh and exciting. You can also customize with painted stones or handcrafted accessories.
Select a container that fits your space and style—wooden boxes, glass jars, or shallow trays work well. Fill with soil or faux turf, then plant small succulents or artificial greenery. Arrange fairy figurines and tiny accessories, securing them with glue if needed. Decorate with miniature furniture, fairy lights, or decorative stones for extra magic. Position your garden in a spot with good natural light, watering and maintaining it as needed. It’s a fun, low-maintenance project with big visual payoff.
Create custom furniture from clay or painted wood for a unique look. Incorporate your favorite colors and fairy motifs. Add tiny signs with inspirational quotes or the fairy’s name. Seasonal decorations like mini pumpkins or snowflakes make it adaptable year-round. Personal touches turn your fairy garden into a personal enchanted escape.
Building your own fairy garden boosts creativity and responsibility, and it’s a delightful project to share with friends or family. It brings a little magic into everyday life and creates a calming, imaginative space. Plus, it proves that small details can create big wonder—your mini fairy world is just a few steps away!
9. Colorful String Art with Inspirational Quotes

Plain walls and dull decor can make a room feel uninspired, especially when you want a space that energizes and motivates. String art is a playful, creative way to add color and personality while sharing inspiring messages. Who wouldn’t want to wake up every day to a vibrant reminder of their dreams?
Imagine a wooden board decorated with intricate string patterns forming words like ‘Dream Big’ or ‘Believe in Yourself’. Bright yarns in colors like pink, turquoise, or yellow create bold, eye-catching designs. The textured strings contrast beautifully with the smooth background, adding depth and interest. When hung on the wall, it’s a cheerful focal point that radiates positivity and creativity.
Use different colors to match your room’s color scheme or mood—softer tones for serenity, vibrant hues for energy. Experiment with shapes—heart, star, or abstract designs—for a personalized touch. Mount the string art on a canvas, wood, or directly onto the wall for different effects. Seasonal quotes or affirmations can be swapped in to keep the message fresh and motivating.
Start with a wooden or cork board as your base. Sketch your quote or design lightly with pencil. Tie colorful yarn or thread around nails or pins arranged along your sketch lines, creating intricate patterns. Use different string tension levels for texture variation. Secure the ends with glue or by wrapping tightly around nails. Hang your finished piece at eye level using hooks or nails, ensuring it’s straight and secure. Regularly check the strings for wear and re-tension as needed.
Add small decorative elements like beads or charms along the strings for extra sparkle. Incorporate your favorite colors or themes—like rainbows or stars—to reflect your personality. Customize the quotes with your handwriting or decorative fonts. Create a series of smaller pieces with different messages for a gallery wall effect. Personal touches make the art more meaningful.
Colorful string art with uplifting quotes transforms your room into a space of inspiration and positivity. It’s a DIY project that’s easy to customize and perfect for expressing your personality. Seeing your own creations every day boosts confidence and encourages a proactive, optimistic attitude. Your space becomes a reflection of your dreams—vibrant, personal, and full of hope.
10. Whimsical Ceiling Mobiles with Paper or Fabric Elements
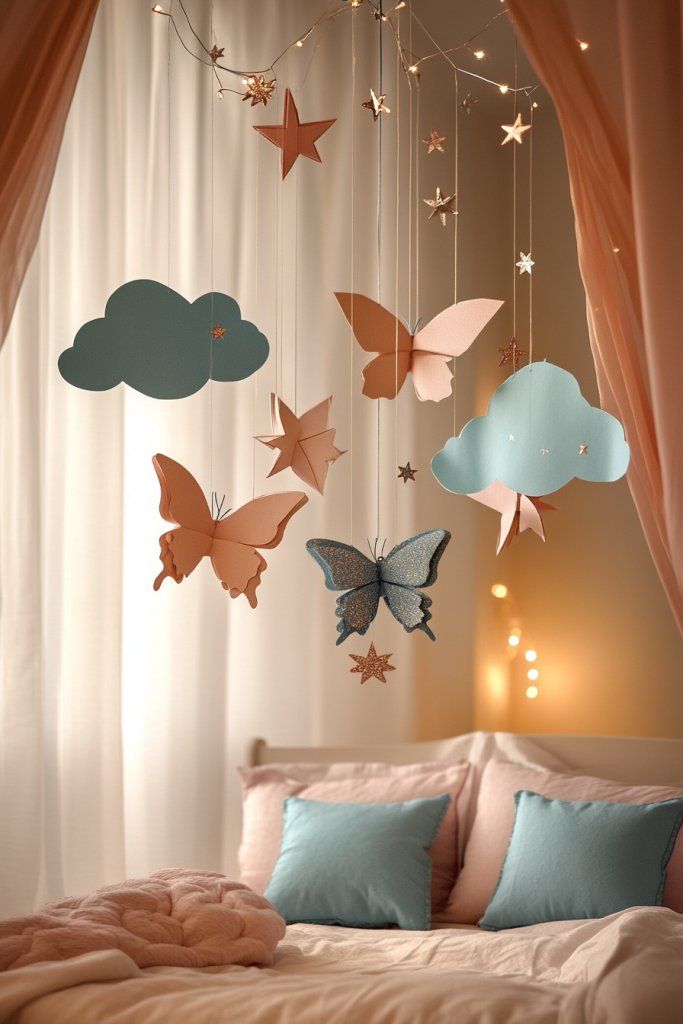
Ceilings are often overlooked when decorating, but they hold huge potential for adding charm and movement. Mobiles made of paper or fabric bring a playful, dynamic element that catches the eye and sparks joy. Want to add a dreamy, floating touch to your room? A whimsical mobile might just do the trick.
Picture a mobile hanging above the bed or reading nook, with paper stars, butterflies, or clouds gently spinning and fluttering. Soft fabrics or delicate paper cutouts sway in the breeze or when touched, creating a calming, mesmerizing effect. The colors match your room’s palette—pastel pinks, blues, or metallic accents—adding a touch of magic and wonder. The movement creates a peaceful, enchanting atmosphere, perfect for relaxing or dreaming.
Design a themed mobile—like fairy wings, moons, or flowers—that complements your room’s decor. Use lightweight materials like tissue paper, felt, or cardstock, and hang with fine fishing line or ribbon for a subtle look. For a modern twist, incorporate metallic or holographic elements. Change the colors or shapes seasonally or whenever you feel like a refresh. Layer multiple mobiles at different heights for added visual interest.
Create or buy cutouts in your chosen theme—stars, clouds, or butterflies—and decorate with markers, glitter, or paint. Attach them to a circular or star-shaped frame using thin thread or fishing line, spacing the pieces evenly. Secure the frame to the ceiling with hooks or adhesive strips, ensuring stability. Balance the mobile so it spins smoothly and quietly. Test the movement and adjust the hanging points if needed. Keep the setup light to avoid strain on the ceiling fixtures.
Incorporate your favorite colors or motifs for a personalized look. Add small charms or beads for extra sparkle. Use different textures—shiny, matte, or holographic—to elevate the visual appeal. Hang a small, lightweight crystal or prism to catch the light and create rainbow effects. Make a seasonal mobile with holiday-themed shapes for variety and fun.
Whimsical ceiling mobiles bring movement and life into a bedroom, creating a calming, dreamy environment. They’re a simple DIY project that sparks creativity and adds a magical touch without overwhelming the space. The gentle motion invites relaxation and inspires imagination. Your room becomes a floating wonderland—ready for dreams and adventures.
11. Antique-Style Vanity with Rounded Mirror and Accessories
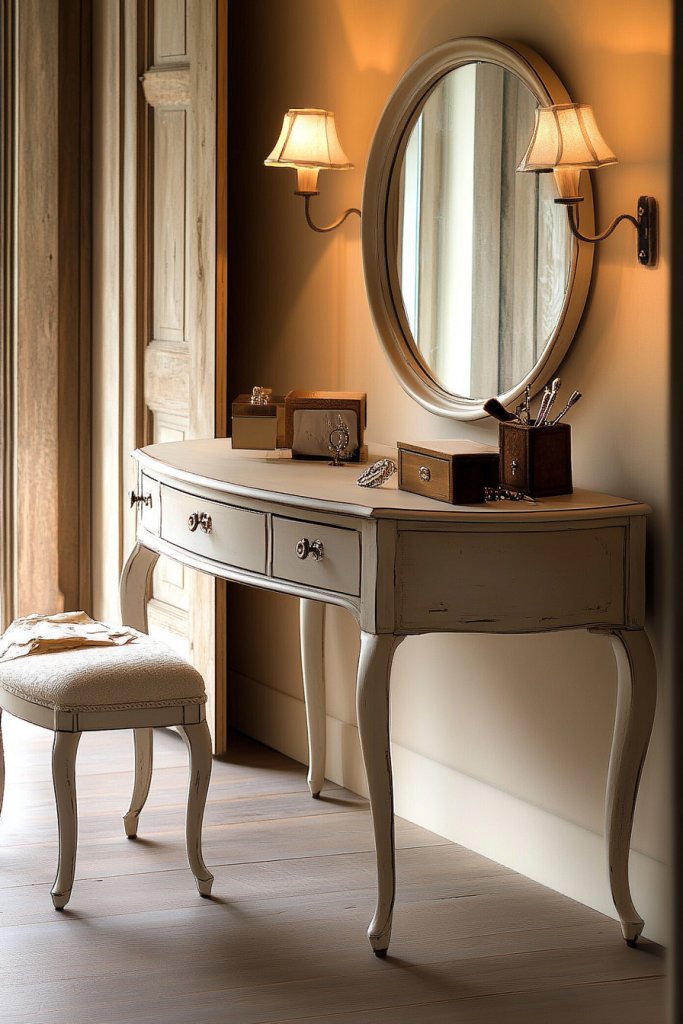
Every girl dreams of a glamorous space to get ready, but modern vanities can feel sterile and uninspired. An antique-inspired vanity with soft curves and a rounded mirror adds a touch of elegance and whimsy. It’s the perfect spot for grooming, dressing, or just feeling like a princess. Who wouldn’t want a charming, vintage-inspired dressing table?
Picture a delicate wooden vanity with ornate carvings, painted in soft pastel or distressed finishes for that vintage look. The rounded mirror is framed with intricate details, reflecting a cozy, nostalgic vibe. Small trays and containers hold jewelry, hair accessories, and perfumes—elegant yet functional. The vanity’s charm lies in its soft curves, vintage hardware, and timeless appeal, making it a statement piece in the room.
Choose a vanity with a distressed finish or a sleek, painted look depending on your decor style. Add decorative knobs or drawer pulls to personalize it further. Use fabric or lace for a soft, romantic touch underneath or on top of the vanity. Match it with a vintage stool or a plush cushion for comfort. Seasonal updates can include adding ribbons, flowers, or themed accessories to keep it fresh.
Select a vintage-style vanity or refurbish an old piece with paint and new hardware. Ensure the mirror is securely mounted and at a comfortable height. Organize small items on trays or inside drawers, using dividers for neatness. Decorate the top with your favorite jewelry, hair clips, or perfume bottles—keeping them accessible yet stylish. Place the vanity in a well-lit corner, adding a soft rug underneath for comfort. Regular polishing and cleaning keep it looking timeless.
Personalize with painted initials or floral motifs on the drawers. Use vintage-inspired containers for organizing accessories. Incorporate a small fabric or lace runner for extra softness and elegance. Rotate seasonal decorations like mini wreaths or themed figurines on top. The vanity becomes a reflection of your personality and style—elegant and personal.
A vintage-inspired vanity elevates your space and boosts confidence during your routine. It encourages self-care and makes grooming feel special. Plus, it’s a timeless piece that can be passed down or repurposed. Your room becomes a luxurious retreat where beauty and personality shine—ready for any occasion.
12. Colorful DIY Pinboard with Fabric and Pom-Pom Trim

Bulletin boards are practical but often look dull and utilitarian. Girls want a fun, colorful way to display photos, notes, or artwork that also adds to their room’s charm. A DIY pinboard with fabric and pom-pom trim combines function with playful style. Who says organization can’t be adorable?
Imagine a vibrant fabric-covered pinboard framed with a cheerful pom-pom trim in your favorite colors. It’s decorated with photos, drawings, and inspiring quotes pinned with cute thumbtacks. The textured fabric adds softness and color, making the board a lively focal point. The playful trim and cheerful accents turn a simple corkboard into a cheerful showcase of memories and creativity.
Choose fabrics in bold patterns, pastel tones, or glittery finishes to match your style. Mix and match trims—think pom-poms, tassels, or fringe—for variety. Use a frame or DIY a border with painted or wrapped cardboard for a custom look. You can also section off areas for different themes—like school, art, or friends—to keep it organized.
Cut your chosen fabric slightly larger than your corkboard or foam core backing. Wrap the fabric around the edges and staple or glue it securely at the back. Attach a decorative trim around the border, securing it with glue or small nails. Mount the pinboard on the wall using picture hooks or adhesive strips. Decorate with photos, notes, or artwork using colorful pushpins or clips. Regularly update and refresh to keep the space lively.
Create themed sections or add personalized labels with your name or favorite phrases. Use fabric paints or markers to add doodles or borders on the fabric. Incorporate mini decorative items like charms or stickers on the trim. Change the fabric seasonally or for special events to keep it fun. Your DIY pinboard is now a personalized, colorful hub of inspiration.
A vibrant pinboard turns organization into an art form, showcasing your personality and creativity. It makes your room more inviting and helps keep important items within reach. Creating it yourself boosts confidence and satisfaction, knowing it’s uniquely yours. It’s a simple project with a big impact—ready to pin your world?
13. Whimsical Bedside Lamp with Fantasy Motifs
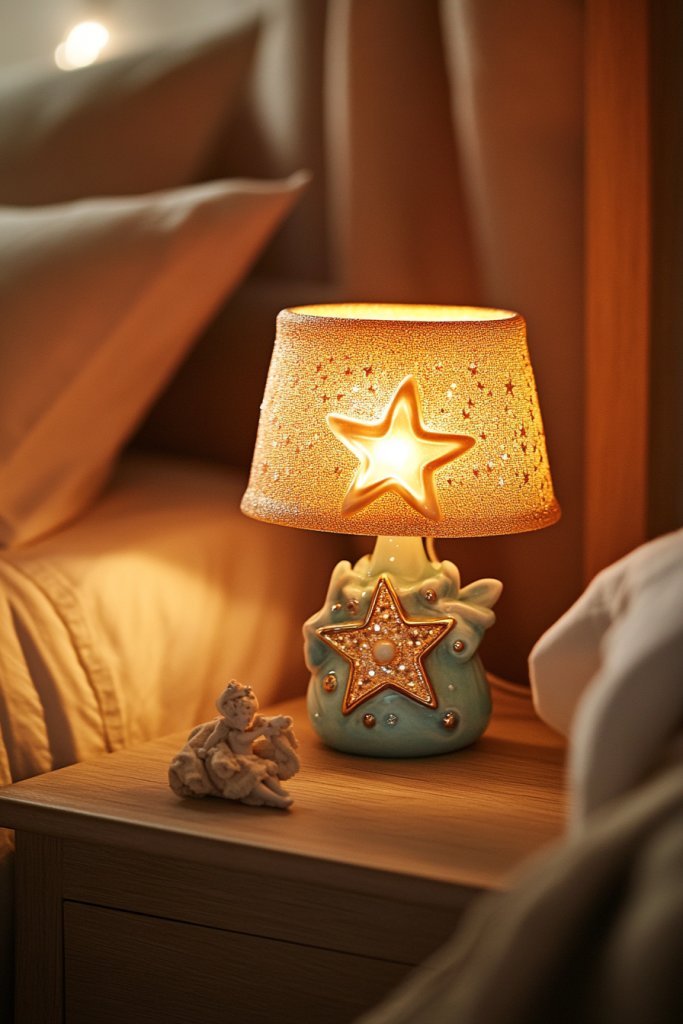
Nighttime lighting is often boring and uninspired, yet it’s essential for a cozy, magical bedroom. Girls want a bedside lamp that not only provides light but also adds a whimsical, fairy-tale touch. A fantasy-themed lamp can make bedtime routines more enchanting and enjoyable. Who wouldn’t want their room to glow with a touch of magic?
Imagine a lamp base designed as a fairy-tale character—like a unicorn, star, or cloud—crafted from ceramic, wood, or resin. The lampshade could be a soft fabric with embroidered motifs or fairy lights woven inside for a gentle glow. When turned on, the lamp casts enchanting shadows and creates a dreamy ambiance. It’s a statement piece that sparks imagination and complements your room’s whimsical theme.
Choose lamps with adjustable brightness or dimming features for versatility. Opt for designs with hand-painted details or metallic accents for extra flair. Match the lamp with other fairy-tale elements—like bedside mobiles or decorative figurines—to create a coordinated look. Seasonal or themed lamps—like snowy castles or flower fields—keep the decor fresh and fun.
Select a lamp with a sturdy base and a shade that suits your style. Secure the electrical cord neatly along the wall with clips or ties to prevent tripping or tangling. Place the lamp on a small, decorative table or mounted shelf to keep it accessible. Use LED bulbs for safety and energy efficiency, and consider a timer or remote for convenience. Clean the lamp regularly to keep it looking magical.
Add personal touches like painted designs or stickers to the lamp base. Incorporate themed accessories—small fairy figurines or floral accents—that match your room’s decor. Use colored bulbs or light filters to change the mood—warm, cool, or multicolor. Switching up the lampshade seasonally or for special occasions keeps the theme fresh and exciting.
A whimsical bedside lamp elevates your space and makes your nighttime routine feel special. It’s a simple way to add personality and a touch of magic—plus, it’s a project you can personalize easily. The right lighting boosts confidence in your decorating skills and helps create a calming environment for restful sleep. Your room will glow with charm and character—get ready to shine!
14. Themed Accent Wall with Watercolor or Soft Murals
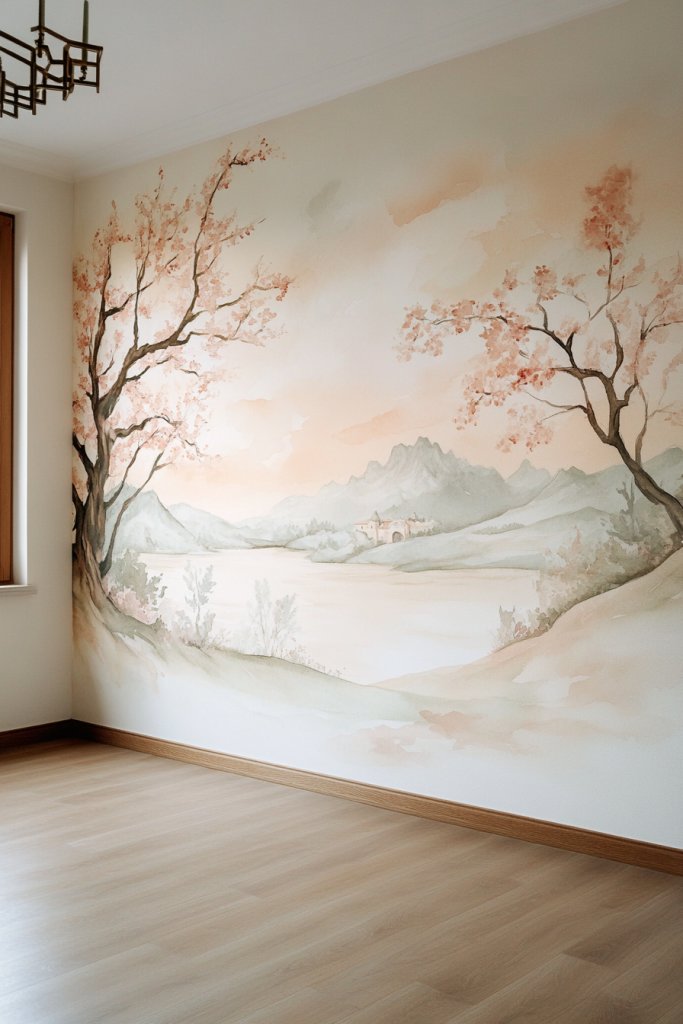
A plain wall can make a room feel dull and uninspired, especially when you crave a space that transports you to a fantasy world. An accent wall with watercolor or soft murals adds depth, color, and personality. It’s a bold statement that sets the tone for the entire room and sparks imagination. Want to turn a simple wall into a piece of art?
Visualize a wall painted with gentle watercolor washes—think dreamy skies, enchanted forests, or magical castles—blending seamlessly for a soft, ethereal effect. The muted tones create a calming backdrop that complements other decor elements. You might also add subtle details like silhouettes of animals or flowers to deepen the story. This artistic touch makes the room feel alive, inspiring dreams and creativity.
Use watercolor paints, sponges, or brushes to create a custom mural—no professional skills needed! Alternatively, opt for removable wallpaper with watercolor or pastel scenes for an easier, mess-free option. Keep the design subtle for a calming effect or vibrant for a lively vibe. Pair with matching textiles, like curtains or bedding, to unify the theme. Seasonal or thematic murals can be painted or applied temporarily for variety.
Prepare the wall by cleaning and priming if necessary. Sketch your design lightly with pencil or use stencils for precision. Use watercolor paints, blending colors softly for a dreamy effect. Seal the mural with a clear matte finish to protect it from dirt and smudges. If using wallpaper, follow manufacturer instructions for application. Incorporate additional details with brushes or sponges for texture. Regular touch-ups keep the mural vibrant.
Add personalized touches like your name or favorite quotes subtly integrated into the scene. Incorporate metallic or glitter accents for a touch of sparkle. Use matching decor—like plush cushions or curtains—to enhance the mood. Change or update the mural seasonally, painting over or adding new elements. Your wall becomes a personalized canvas of inspiration and dreams.
A themed watercolor or mural accent wall elevates your room’s style and sparks your imagination daily. It’s a creative, rewarding project that makes a big visual impact. Seeing your own artistic work on display boosts confidence and pride. Your room transforms into a magical, inspiring space—ready for adventures and dreams.
Conclusion
From enchanting fairy gardens to vibrant, playful accents, this collection offers a diverse array of girls’ bedroom ideas with whimsical charm. Each concept is designed to ignite creativity and bring personality into any space, making it easy to create a room that your girl will love. Don’t hesitate to try these ideas and personalize them to fit your style—your dream bedroom is just a few creative touches away. Embrace the magic and transform a simple room into a captivating retreat that sparks joy and imagination!
Leave a Reply